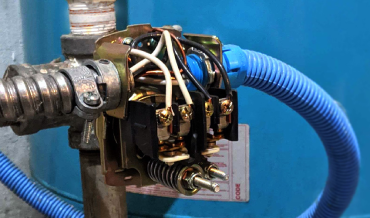
Troubleshooting a water well pressure switch involves checking for power supply issues and examining the pressure settings. Ensure the switch contacts are clean and the pressure tank is functioning correctly.Water well systems rely on a pressure switch to maintain water pressure and manage the pump’s operation. Dealing with pressure switch problems can be a headache for homeowners, but understanding the basics can help alleviate the stress. A faulty pressure switch can lead to water pressure inconsistency or a non-functioning well pump.
Identifying common issues like electrical connectivity, incorrect pressure settings, or a malfunctioning pressure tank is crucial. With a strategic approach, one can diagnose and resolve most pressure switch issues, ensuring a steady water supply. Regular maintenance and awareness of the system’s operation can prevent many of these issues, keeping water flowing smoothly to your home.
Introduction To Water Well Pressure Switches
Water well pressure switches are vital for pump control. They maintain water pressure throughout a system. Understanding how these switches work helps diagnose problems. This guide explains their role and common issues.
The Role Of Pressure Switches
Pressure switches regulate water flow in wells. They activate pumps at low pressure. They also turn off pumps at high pressure. These switches ensure consistent water supply. They protect pipes from pressure damage.
Common Issues With Pressure Switches
- Switch fails to activate
- Switch won’t turn off
- Erratic water pressure
- Corroded contacts
Troubleshooting these problems can restore proper function. Regular checks prevent disruptions. Clean contacts and adjust settings for optimal performance.

Identifying Pressure Switch Problems
Identifying Pressure Switch Problems is crucial for water well maintenance. A faulty pressure switch can lead to poor water pressure or no water at all. Understanding the symptoms and having the right tools can make troubleshooting easier.
Symptoms Of A Failing Pressure Switch
- Water pressure is too low or too high.
- The pump does not start or stop.
- Short cycling of the pump occurs.
- Strange noises come from the pressure tank.
Tools Needed For Troubleshooting
Having the right tools is important. Here is a list:
| Tool | Use |
|---|---|
| Voltmeter | Check electrical connections. |
| Pressure gauge | Measure water pressure. |
| Screwdriver | Adjust pressure switch. |
| Pliers | Change pressure switch. |
Safety First: Preparing To Troubleshoot
Before diving into troubleshooting your water well pressure switch, safety is paramount. Proper preparation ensures your safety and the success of your efforts. Follow these steps to start safely:
Turning Off Power
Always turn off the power before beginning. This step is crucial to prevent electric shock. Find the circuit breaker that powers your well system and switch it off. Confirm the power is off with a voltage tester for extra safety.
Ensuring A Safe Work Environment
- Clear the area of any water to avoid slips and falls.
- Make sure the ground is dry and stable.
- Work in bright lighting to see clearly.
- Keep tools and parts organized to avoid accidents.
- Wear protective gear like gloves and safety glasses.
Initial Checks
When your water stops flowing, the pressure switch might be the issue. Let’s start with some initial checks to troubleshoot your water well pressure switch.
Inspecting For Visible Damage
Begin with a visual inspection of the pressure switch. Signs of wear, burns, or corrosion may point to problems. Look for broken wires or loose connections too. Ensure power is off before you inspect.
Verifying Pressure Tank Status
Check the pressure tank’s air charge with a tire gauge. It should be 2 psi below the cut-in pressure of the switch. Listen for hissing or water at the air valve, indicating a damaged bladder.
- Turn off the circuit breaker first.
- Remove the cover of the pressure switch.
- Examine all parts for any damage.
- Check the pressure gauge reading.
- Ensure the tank is not waterlogged.
Remember, safety first. Always disconnect the power supply before handling electrical components.
Adjusting Pressure Settings
Adjusting the pressure settings on your water well pressure switch is crucial. It ensures your water system runs smoothly. Let’s dive into how you can do this yourself.
Understanding Cut-in And Cut-out
Cut-In and Cut-Out are key terms in managing water pressure. Cut-In is the pressure point that turns the pump on. Cut-Out is the pressure point that turns it off. Proper adjustment of these settings is essential for optimal performance.
- Cut-In: When water pressure drops, the pump starts.
- Cut-Out: When water pressure reaches its peak, the pump stops.
Steps To Adjust The Pressure
Adjusting the pressure involves a few clear steps. Follow them carefully.
- Turn off the power to the pressure switch.
- Remove the cover of the pressure switch.
- Locate the adjustment nuts. There are typically two: one for Cut-In and one for Cut-Out.
- To increase pressure, tighten the nuts. To decrease, loosen them.
- Cut-In: Adjust the larger nut for Cut-In pressure changes.
- Cut-Out: Adjust the smaller nut for Cut-Out pressure changes.
- After adjustments, replace the cover.
- Turn the power back on.
- Test the system by running water and observing the pressure gauge.
Making these adjustments improves your water system’s efficiency. It helps avoid short cycling of the pump, extending its life. Always ensure safety by turning off power before making any adjustments.
Cleaning The Pressure Switch
Maintaining your well system requires regular care. A crucial step is cleaning the pressure switch. Dirt and debris can cause malfunctions. Let’s walk through the cleaning process step-by-step.
Disassembling The Switch
First, ensure power is off. Safety is key. Remove the switch cover carefully. Note the wiring placement for reassembly.
- Turn off the circuit breaker.
- Unscrew the switch cover.
- Observe wire connections.
Cleaning Contacts And Components
With the cover off, you will see the contacts. They should be clean for the switch to work properly.
- Inspect contacts for dirt.
- Use a contact cleaner spray.
- Wipe gently with a clean cloth.
Clean other components too. Reassemble the switch after drying. Test the system to ensure functionality.
Replacing Faulty Components
When your water well pressure switch malfunctions, it’s often due to faulty components. These parts may fail over time, affecting water pressure and system reliability. Replacing faulty components is crucial. It restores system functionality and ensures consistent water supply.
Identifying Defective Parts
Detecting bad parts is the first step towards a solution. Look for signs like erratic water pressure, noise, or no water flow. A multimeter test can confirm a switch failure. Check for visible damage like burnt contacts or a stuck lever.
Guidelines For Replacement
Follow these steps for safe and effective part replacement:
- Power Off: Turn off power to the system. Safety comes first.
- Release Pressure: Drain the system. Avoid water-related accidents.
- Document: Take pictures before disassembly. They guide reassembly.
- Remove Defective Parts: Uninstall faulty components carefully. Use proper tools.
- Install New Parts: Replace with compatible components. Ensure a snug fit.
- Test: Restore power and test. Check for proper operation.
Always consult your system’s manual. It provides specific instructions for your model. Use recommended parts. They ensure compatibility and durability.
| Step | Action | Tip |
|---|---|---|
| 1 | Turn off power | Prevents electric shock |
| 2 | Drain system | Avoids water mess |
| 3 | Document setup | Aids in reassembly |
| 4 | Remove parts | Use correct tools |
| 5 | Install new parts | Check fit and compatibility |
| 6 | Test system | Confirm functionality |
Testing The Pressure Switch
Is your water well behaving oddly? It could be the pressure switch. Pressure switches control the water pressure. Knowing how to test one is crucial. Let’s dive in.
Procedure For Testing Functionality
To start testing, gather tools like a multimeter and a screwdriver. Safety first, so turn off the power. Here’s a quick guide:
- Remove the cover of the pressure switch.
- Test the air pressure in the pressure tank.
- Set your multimeter to the ohms setting.
- Place multimeter probes on the terminals.
- Check for continuity; the meter should read zero.
- If not, the switch may need replacing.
Interpreting Test Results
Understanding the test results is key. Here’s what they mean:
- Zero reading: The switch works well.
- No continuity: You might need a new switch.
If the switch is faulty, water pressure can suffer. Always consult a professional if unsure. They will ensure your system runs smoothly again.
When To Call A Professional
Water well pressure switch issues can be tricky. Sometimes, a professional touch is necessary. Knowing when to call in the experts can save time and prevent further damage. Let’s dive into when it’s time to put the tools down and dial a technician.
Limitations Of Diy Fixes
DIY repairs on water well pressure switches can be limited. Here’s why:
- Safety concerns – Electrical hazards pose serious risks.
- Complex diagnostics – Identifying the true issue requires expertise.
- Temporary solutions – DIY might not fix underlying problems.
If your fixes are not working, it’s time to call a pro. They have the right tools and know-how.
Finding Qualified Technicians
Finding the right help is crucial. Ensure your technician is qualified:
- Check for licenses and certifications.
- Read reviews and testimonials from other customers.
- Ask for proof of insurance to protect your property.
Choosing a skilled technician will ensure your water well pressure switch is in good hands.

Maintaining Your Pressure Switch
Maintaining your Pressure Switch is key to a healthy water well system. This section dives into how to keep the pressure switch in top shape. Let’s explore routine inspections, cleaning, and preventive measures.
Routine Inspection And Cleaning
Regular checks keep your system running smoothly. Here’s what to do:
- Turn off the power to avoid accidents.
- Remove the cover of the pressure switch carefully.
- Check for rust, dirt, or debris.
- Use a soft brush or compressed air to clean the switch.
- Look for any worn-out parts.
- Replace parts as needed.
- Put the cover back and turn on the power.
Preventive Measures
To avoid future issues, follow these steps:
- Keep the area around the well clean and dry.
- Ensure no water leaks near the switch.
- Test the pressure switch every six months.
- Use a surge protector to protect from power spikes.
- Check the pressure tank regularly.
Frequently Asked Questions
How Does A Water Well Pressure Switch Work?
A water well pressure switch activates the pump to maintain water pressure within a preset range. It triggers the pump to start when the tank’s pressure drops and stops it once the desired pressure is reached.
What Signs Indicate A Faulty Pressure Switch?
Common signs of a faulty pressure switch include irregular water pressure, a pump that won’t start or stop, and odd noises from the pressure tank.
Can I Reset My Well Pressure Switch?
Yes, resetting a well pressure switch often involves turning off the power and manually lifting the lever until the contacts engage, but consult your manual first.
What Maintenance Does A Pressure Switch Need?
Regular maintenance for a pressure switch includes cleaning the contacts, ensuring electrical connections are tight, and checking for corrosion or damage.
When Should I Replace My Well Pressure Switch?
Replace your well pressure switch if it’s unresponsive, has visibly damaged components, or fails to maintain consistent water pressure despite troubleshooting.
Conclusion
Tackling water well pressure switch issues can be straightforward with the right knowledge. Remember, identifying and addressing problems early prevents more significant concerns down the line. This guide aimed to empower you with the basics of troubleshooting. Always prioritize safety and consult a professional when in doubt.
Keeping your water system running smoothly is within reach.


