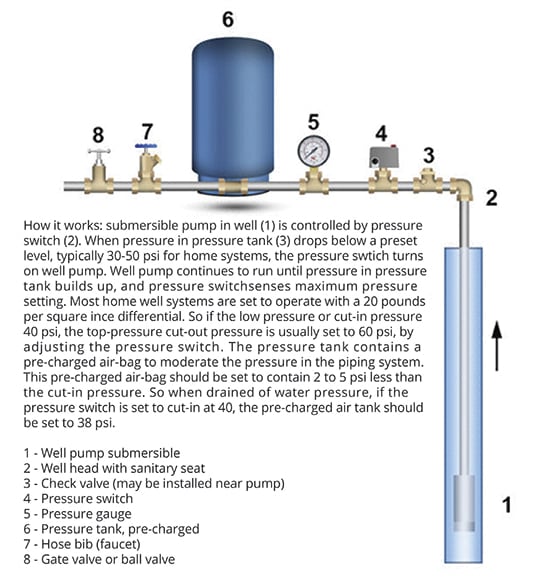
Well bladder tanks are crucial for maintaining water pressure in homes with wells. When issues arise, they can disrupt daily life.
Understanding the common problems with well bladder tanks helps you maintain smooth water flow. From low water pressure to unusual noises, these tanks can present several challenges. Knowing how to troubleshoot these issues can save you time and money. In this blog post, we’ll explore the typical problems you might face with your well bladder tank.
You’ll learn how to identify and fix these issues, ensuring your water system runs efficiently. Get ready to dive into practical solutions for a hassle-free water supply.

Credit: www.cleanwaterstore.com
Common Issues With Well Bladder Tanks
Well bladder tanks play a crucial role in maintaining water pressure in homes. They ensure the smooth operation of water pumps and provide a consistent water supply. Yet, like all mechanical systems, they can encounter issues. Understanding these common problems can help you troubleshoot and maintain your well bladder tank effectively.
Low Water Pressure
One of the most frequent issues with well bladder tanks is low water pressure. This can be caused by several factors:
- Air Leaks: Air leaks can lead to a loss of pressure.
- Bladder Damage: A damaged bladder means the tank cannot hold pressure.
- Incorrect Air Charge: Incorrect air charge can affect water pressure.
To resolve these issues, check for air leaks around the tank. If the bladder is damaged, consider replacing it. Ensure the air charge is set to the manufacturer’s specifications.
Frequent Pump Cycling
Frequent pump cycling is another common problem. It can wear out the pump quickly. The following factors may cause this issue:
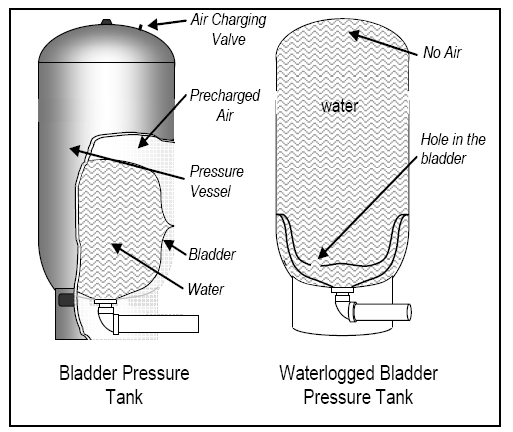
- Waterlogged Tank: A waterlogged tank can lead to frequent cycling.
- Pressure Switch Problems: A faulty pressure switch can cause rapid cycling.
- Bladder Issues: A damaged bladder can affect the pump cycle.
To fix frequent pump cycling, check if the tank is waterlogged. Drain and refill the tank if needed. Inspect the pressure switch and replace it if it’s faulty. Ensure the bladder is intact and functioning correctly.
Tools Needed For Troubleshooting
When dealing with well bladder tank troubleshooting, having the right tools is crucial. Proper tools ensure the process is smooth and efficient. They also help in diagnosing issues accurately. This section will cover the essential tools needed. We’ll look at both basic tools and specialized equipment.
Basic Tools
Basic tools are essential for any troubleshooting task. A wrench set helps in loosening or tightening bolts. Screwdrivers, both flathead and Phillips, are necessary for various screws. A flashlight helps in illuminating dark areas. A pair of pliers can help in gripping and turning objects. Measuring tape is useful for measuring dimensions accurately.
A pressure gauge is vital for checking tank pressure. An adjustable wrench can fit different sizes of nuts and bolts. A bucket or container is useful for catching water during the process. Safety gloves protect your hands from sharp objects. These basic tools are a must for starting any troubleshooting task.
Specialized Equipment
Specialized equipment makes troubleshooting more accurate. A multimeter helps in checking electrical connections. It measures voltage, current, and resistance. A water test kit checks for water quality issues. A stethoscope can help listen for unusual sounds in the tank.
A tank air volume control device measures the air volume inside the tank. A submersible pump extractor can help in removing the pump if needed. A pipe cutter is useful for cutting pipes cleanly. These specialized tools offer precision and efficiency. They ensure that you can diagnose and fix issues effectively.
Checking Tank Pressure
Experiencing issues with your well bladder tank? Checking the tank pressure is a crucial step in diagnosing and fixing problems. Proper pressure ensures efficient water delivery and extends the lifespan of your system. Below, we’ll walk you through the key steps of checking and adjusting the tank pressure.
Pressure Gauge Usage
First, you’ll need a pressure gauge. This tool measures the air pressure inside your well bladder tank. Attach the gauge to the air valve, which is usually located on the top of the tank. Make sure the gauge is secure to get an accurate reading.
Check the pressure reading. It should match the manufacturer’s recommended pressure, often between 30-50 psi. If the reading is outside this range, adjustments are necessary.
Adjusting Air Pressure
If the pressure is too low, you can add air using an air compressor. Connect the compressor to the air valve and slowly add air. Keep checking the pressure gauge to avoid over-inflation.
If the pressure is too high, release some air. Press the valve stem with a small tool or a screwdriver. Do this in short bursts and check the pressure after each release.
Always aim for the optimal pressure range specified by your tank manufacturer. Proper pressure ensures efficient operation and prevents damage to your well bladder tank.

Credit: www.apswater.com
Inspecting For Leaks
Inspecting a well bladder tank for leaks is crucial. Leaks can lead to serious issues. Regular checks help maintain the system. Two main methods can be used: visual inspection and leak detection methods. These methods ensure the tank operates efficiently.
Visual Inspection
Start with a visual inspection. Look for water around the tank. Check the tank, pipes, and fittings. Notice any wet spots or rust. Rust may indicate a leak.
Use a flashlight for better visibility. Examine the tank’s surface carefully. Check for any cracks or corrosion.
| Inspection Area | What to Look For |
|---|---|
| Tank Surface | Cracks, corrosion, rust |
| Pipes and Fittings | Water spots, wet areas |
Using Leak Detection Methods
If the visual inspection is not enough, use leak detection methods. These are more accurate. One simple method is the soap and water test.
Mix soap with water in a spray bottle. Spray the mixture on the suspected area. Look for bubbles. Bubbles indicate a leak.
- Mix soap and water.
- Spray on the suspected area.
- Observe for bubbles.
Another method is using a pressure gauge. Check the tank’s pressure. If the pressure drops quickly, there may be a leak.
For more serious leaks, consider professional help. Experts use advanced tools. They can detect even the smallest leaks.
Diagnosing Bladder Problems
A well bladder tank is crucial for maintaining consistent water pressure. Over time, issues can arise that affect its performance. Properly diagnosing bladder problems can save you time and money. Understanding the signs of bladder failure and knowing temporary fixes can help you manage the situation efficiently.
Signs Of Bladder Failure
Identifying the signs of bladder failure is essential. Here are some common indicators:
- Frequent Pump Cycling: The pump turns on and off more often than usual.
- Low Water Pressure: Water pressure drops unexpectedly.
- Waterlogged Tank: The tank feels heavy and full of water.
- Air Leaks: Hissing sounds near the tank or visible air leaks.
- Strange Noises: Unusual noises from the tank area.
Temporary Fixes
While permanent repairs or replacements are best, there are temporary fixes. These can help maintain system functionality until professional help is available.
- Check Air Pressure: Use a tire gauge to check the tank’s air pressure. Adjust it to the recommended level.
- Drain the Tank: Drain the water from the tank to relieve pressure. This can temporarily improve performance.
- Inspect for Leaks: Check for visible air and water leaks. Seal small leaks with plumber’s tape.
- Temporary Seal: If there is a small puncture, use an epoxy sealant for a short-term fix.
Remember, these are temporary solutions. Consult a professional for a thorough inspection and repair.
Addressing Waterlogging
Waterlogging in a well bladder tank can cause many issues. Understanding the causes and preventive measures helps keep your tank running smoothly.
Causes Of Waterlogging
Waterlogging happens when the tank cannot separate air and water. This can occur due to several reasons:
- Bladder rupture: A damaged bladder allows water to fill the air space.
- Improper air charge: An incorrect air charge disrupts the balance.
- Valve issues: Defective valves can cause air leaks.
- High water pressure: Excess pressure forces water into the air chamber.
Preventive Measures
Preventing waterlogging extends the life of your well bladder tank. Here are some steps you can take:
- Regular maintenance: Check the bladder and air charge regularly.
- Monitor pressure: Keep water pressure within recommended limits.
- Inspect valves: Ensure all valves are functioning correctly.
- Install a pressure relief valve: This helps manage excess pressure.
By addressing waterlogging, you can avoid costly repairs and ensure a reliable water supply.
Maintaining The Well Bladder Tank
Troubleshooting a well bladder tank involves checking for leaks, ensuring proper pressure, and inspecting the tank for damage. Regular maintenance prevents water flow issues and extends the tank’s lifespan.
Maintaining your well bladder tank ensures consistent water pressure and system longevity. Regular upkeep prevents costly repairs and interruptions in water supply. Follow these simple steps to keep your well bladder tank in top shape.Routine Checks
Regular checks help identify issues early. Inspect the tank monthly. Look for visible leaks, rust, or dents. Ensure the pressure gauge is functional. Check the air pressure inside the tank. Use a tire gauge for this. The pressure should match the manufacturer’s recommendations. Adjust it if needed.Cleaning Procedures
Cleaning the tank is crucial. Disconnect the power supply first. Drain the tank completely. Use a mild detergent and water solution. Clean the interior with a soft brush. Rinse thoroughly to remove soap residue. Dry the tank before reconnecting it. Regular cleaning keeps the tank free from debris and sediment. “`When To Call A Professional
Well bladder tanks are crucial for maintaining water pressure. Knowing when to call a professional can save you from severe damage and costly repairs. This guide will help you identify major issues and choose a qualified technician.
Identifying Major Issues
Some problems require professional help. These issues are usually complex and beyond a simple fix. Listen for strange noises from the tank. If you hear banging or hissing, it’s a sign of trouble. Check for low water pressure. It could indicate a failing bladder. Inspect for leaks around the tank base. Even small drips can lead to bigger problems.
Choosing A Qualified Technician
Finding the right professional is essential. Look for technicians with proper licensing. Verify their experience with well bladder tanks. Ask for references from past clients. This ensures they have a good track record. Check online reviews. Positive feedback can give you confidence in their skills. Confirm they offer a warranty for their services. It shows they stand by their work.

Credit: www.youtube.com
Frequently Asked Questions
How Do I Know If My Well Bladder Tank Is Bad?
Check for waterlogged symptoms. These include frequent pump cycling, low water pressure, or visible leaks.
What Causes A Well Bladder Tank To Lose Pressure?
Common causes include a damaged bladder, a leak in the tank, or a faulty pressure switch.
Can I Repair A Well Bladder Tank Myself?
Yes, you can. But it requires basic plumbing skills. Always ensure safety first and follow the manufacturer’s instructions.
How Often Should I Check My Well Bladder Tank?
Inspect it every six months. Regular checks help identify issues early and prolong the tank’s life.
What Are The Signs Of A Failing Pressure Switch?
Signs include the pump not turning on, rapid cycling, or inconsistent water pressure. Replace if faulty.
Conclusion
Regular maintenance keeps your well bladder tank in top shape. Check for leaks often. Listen for unusual noises. Test the pressure regularly. Replace worn parts promptly. These steps ensure efficient operation. A well-maintained tank saves money and hassle. Troubleshooting can be simple.
Stay vigilant and proactive. Keep your water system running smoothly. Your efforts today prevent bigger problems tomorrow. Enjoy reliable water supply with minimal stress.


