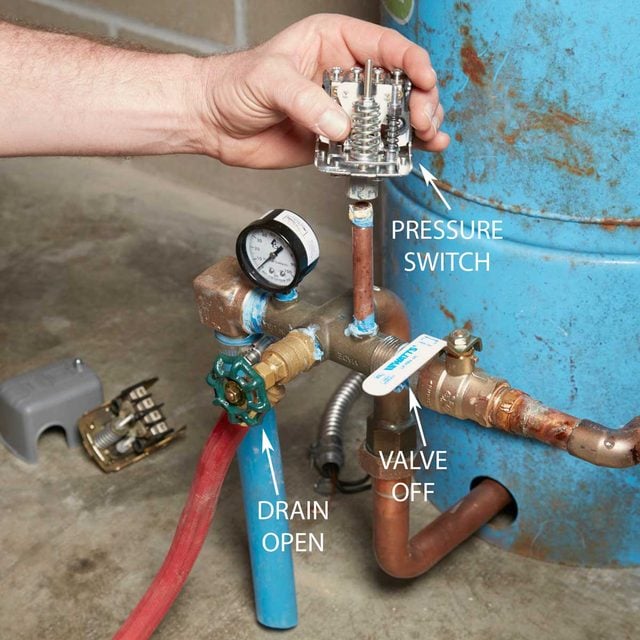
To troubleshoot a well pump pressure switch, first check for electrical continuity and proper setting of cut-in and cut-out pressures. Ensure the pressure tank is functioning and there are no water leaks.
Troubleshooting a well pump pressure switch can often resolve water delivery issues in your home. This vital component controls the operation of your well pump, signaling when to start and stop water flow based on pressure changes. A malfunctioning pressure switch may lead to erratic water pressure or no water at all.
Regular inspection and maintenance of the pressure switch can prevent unexpected water outages and prolong the life of your well pump system. Knowing the basics of how to test and adjust the pressure switch can save you time and money, avoiding the need for professional intervention for simple fixes. Stay vigilant for signs of switch failure, such as odd sounds or a pump that cycles too frequently, to keep your water supply running smoothly.
Introduction To Well Pump Pressure Switches

Well pump pressure switches are crucial for system regulation. They maintain water pressure throughout your home. These switches signal the pump to start when water pressure drops. They also tell it to stop when the desired pressure is reached.
Key Functions Of Pressure Switches
- Start/Stop Pump: They power the pump as needed.
- Keep Pressure Stable: They ensure consistent water flow.
- Prevent Damage: They protect the pump from running dry.
Common Signs Of Pressure Switch Issues
- No Water: A clear sign something is wrong.
- Low Pressure: Indicates the switch might not activate the pump.
- Pump Runs Constantly: Suggests the switch isn’t turning off the pump.
Safety First: Preparing For Troubleshooting
Before fixing a well pump pressure switch, safety comes first. This guide helps you prepare safely. Let’s start!
Essential Safety Measures
Follow these steps to stay safe:
- Turn off the power at the breaker box.
- Wear rubber-soled shoes for extra protection.
- Use a voltage tester to make sure power is off.
- Keep your work area dry and well-lit.
Tools Needed For The Job
You will need these tools:
| Tool | Use |
|---|---|
| Screwdriver | To open the switch cover |
| Wrench | To adjust nuts and bolts |
| Voltage tester | To check for live wires |
| Flashlight | For better visibility |
Identifying The Problem
Identifying the Problem with your well pump pressure switch is crucial. A faulty switch can lead to water supply issues. Recognizing early signs prevents bigger problems. This section guides through symptoms and initial diagnostic steps.
Symptoms Of A Faulty Pressure Switch
Several signs indicate a problem with the pressure switch:
- No water pressure: Taps or showers lack flow.
- Pump cycles on and off rapidly: Known as short cycling.
- Water pressure varies: Pressure goes up and down.
- Pump does not start: Even when water is needed.
- Pump stays on: Fails to shut off automatically.
Initial Diagnostic Steps
Begin troubleshooting with these steps:
- Check power supply: Ensure switch and pump have power.
- Inspect pressure switch: Look for signs of damage or corrosion.
- Test pressure tank: Should be properly pressurized.
- Measure voltage: Use a multimeter to check switch voltage.
- Adjust pressure settings: May solve the issue if settings are off.
These steps help pinpoint the problem. Always turn off power before inspecting.
Quick Fixes For Minor Issues
Well pumps are vital for your home’s water supply. Sometimes, they face minor issues. You can fix these without calling a professional. Here are quick solutions to try first.
Adjusting Pressure Settings
If your well pump kicks on and off too often or not enough, the pressure might be off. Check the pressure gauge. It should read between 40 to 60 psi. To adjust, locate your pressure switch. It’s often in a gray box connected to the piping.
Steps to adjust:
- Turn off the power to the pump.
- Remove the cover of the switch.
- Turn the nut clockwise to increase pressure.
- Turn the nut counterclockwise to decrease pressure.
- Monitor the gauge to ensure correct settings.
- Replace the cover and restore power.
Cleaning Contact Points
Dirty contacts can cause electrical issues. They prevent your well pump from starting. Turn off the power before you start. Safety first!
Follow these steps:
- Open the pressure switch cover.
- Look for two exposed contact points.
- Use a piece of fine sandpaper.
- Gently rub the contacts to remove dirt.
- Blow away any residue.
- Reattach the cover and turn on the power.
Remember: Regular maintenance keeps your well pump happy. These simple fixes can save you time and money. If problems persist, seek professional help.
Electrical Checks And Adjustments
Electrical Checks and Adjustments are vital for a well pump pressure switch. These switches control your water pressure. A faulty switch may cause water issues. It’s crucial to test for power supply issues. Also, check and replace any damaged wiring. Let’s dive into the details.
Testing For Power Supply Issues
First, ensure safety by turning off power to the switch. Use a voltage tester to check for power at the switch. If the tester shows no power, inspect the circuit breaker. A tripped breaker indicates power supply problems. Resetting the breaker may resolve this. If issues persist, seek professional help.
Replacing Damaged Wiring
Look for visible signs of damage on wires. These include burns, cuts, and corrosion. Turn off power before handling wires. Remove and replace damaged wires with care. Use wire strippers and screwdrivers to connect new wiring. Ensure all connections are secure. Restore power and test the switch after replacement.
- Ensure safety first by turning off the power.
- Use a voltage tester to confirm power absence.
- Check circuit breakers for tripping.
- Reset breakers to restore power supply.
- Inspect wires for damage.
- Replace damaged wires with proper tools.
- Test switch function after repairs.
Dealing With Water Pressure Irregularities
Homeowners often face water pressure issues. A well pump pressure switch controls this flow. Let’s dive into how to fix water pressure irregularities.
Troubleshooting The Pressure Tank
Start by checking the pressure tank. It should have enough air to balance the water pressure. A simple gauge can test this. Look for a reading between 40-60 psi.
If the pressure is off, the switch may not function properly. Adjust the air pressure if needed. Use a bicycle pump or air compressor for this task.
Also, listen for strange noises. Banging or clicking sounds mean trouble. These could signal air or water logging in the tank.
Inspecting For Leaks In The System
Leaks can disrupt water pressure. Check all pipes and connections. Look for wet spots or drips.
Examine the area around the pressure switch. Water here is a red flag. It can cause switch failure.
Remember to check valves and faucets. Even small leaks can lead to big problems. Tighten or replace parts as needed.
Pressure Switch Replacement
Is your water pressure inconsistent? It might be time to replace your well pump pressure switch. A faulty switch can lead to a variety of water pressure problems in your home. Let’s walk through the replacement process and get your water system running smoothly again.
Step-by-step Replacement Guide
Turn off the power to your well pump at the breaker box. This ensures safety during replacement.
- Remove the cover from the pressure switch.
- Take a photo of the current wiring for reference.
- Unscrew the wires from the old switch.
- Remove the switch from the pipe.
- Clean the pipe threads to ensure a good seal.
- Apply Teflon tape to the threads.
- Mount the new switch onto the pipe.
- Reattach the wires according to your reference photo.
- Replace the cover on the new switch.
- Restore power and test the system.
Choosing The Right Replacement Switch
Selecting the correct switch is crucial. Match the PSI settings of your old switch for seamless operation.
- Check the pressure rating on your current switch.
- Choose a compatible switch with the same cut-in and cut-out pressure settings.
- Opt for a quality brand to ensure longevity.
With the right tools and a new switch, your water pressure will be back to normal. Enjoy a well-functioning water system in your home.

Maintenance Tips To Avoid Future Issues
Maintaining a well pump pressure switch is vital. Regular care prevents future problems. Follow these maintenance tips to keep your system running smoothly.
Regular Cleaning And Inspection
Keeping the pressure switch clean is crucial. Dirt and debris affect performance. Schedule cleaning and inspection twice a year. This ensures reliable operation. Use a soft brush and cloth for cleaning. Check for any signs of wear or damage. Look for corroded terminals or a pitted contact point. Replace components as needed.
- Turn off power before cleaning.
- Remove dust and insects.
- Tighten loose wiring connections.
Use a pressure gauge to verify accuracy. Adjust the pressure settings if necessary. Ensure the pressure tank air charge matches the switch cut-in pressure.
When To Call A Professional
Some issues require a professional touch. Call a licensed technician if you notice:
| Issue | Action |
|---|---|
| Switch fails to start | Seek professional help |
| Water pressure drops | Professional inspection needed |
| Frequent cycling | Call a technician |
Professional services ensure safety and accuracy. Experts diagnose and fix complex issues. They provide peace of mind. They extend the life of your well pump.
Remember to act quickly with any switch issues. This avoids water supply interruptions. It also prevents costly repairs. Regular maintenance and timely professional help keep your well pump in top shape.
Frequently Asked Questions
Why Does My Well Pump Pressure Switch Fail?
Common causes of well pump pressure switch failure include electrical issues, worn contacts, pressure tank problems, and clogged tubes.
How To Reset A Well Pump Pressure Switch?
Turn off the power supply, drain the pressure tank, then hold the lever at a 30-degree angle for a reset.
Signs Of A Faulty Pressure Switch?
A faulty pressure switch often leads to short cycling, no water pressure, or constant pump operation.
Can I Replace My Pressure Switch Myself?
Yes, with proper tools and safety precautions, you can replace a pressure switch by following the manufacturer’s guide.
What’s The Lifespan Of A Pressure Switch?
Typically, a well pump pressure switch lasts between 5 to 10 years, but its lifespan can vary based on usage and maintenance.
Conclusion
Troubleshooting your well pump pressure switch doesn’t have to be daunting. By following the steps outlined, you can ensure smooth operation and avoid common pitfalls. Remember, regular maintenance is key to preventing issues. Should you encounter complex problems, seeking professional help is wise.
Empower yourself with knowledge and keep your system running efficiently.


