A Yamaha 48 Volt charger is essential for keeping your electric vehicle running smoothly. But what happens when it stops working?
Let’s dive into troubleshooting your Yamaha 48 Volt charger. Electric vehicles rely heavily on efficient charging systems. Yamaha’s 48 Volt charger is no exception. When it malfunctions, it can disrupt your daily routine. This guide will help you identify common issues and solutions.
From checking connections to understanding error codes, we’ll cover it all. Whether you’re a seasoned rider or new to electric vehicles, this troubleshooting guide aims to simplify the process. Let’s ensure your Yamaha charger gets back to optimal performance. Read on for practical tips and insights.

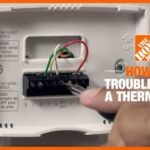
Credit: www.youtube.com
Common Issues
Yamaha 48 Volt Chargers are efficient and reliable. However, users sometimes face common issues. Understanding these problems helps in quick troubleshooting. Below are some common issues with Yamaha 48 Volt Chargers.
No Power
One of the most common issues is no power. If the charger does not power on, check the power source. Ensure the outlet is working by plugging in another device. If the outlet works, inspect the charger’s plug and cable. Look for visible damage or wear.
If everything looks fine, check the fuse inside the charger. A blown fuse can cause power issues. Replace the fuse if needed. Always use a fuse of the same rating. If the charger still does not power on, it may need professional repair.
Overheating
Overheating is another common issue. Chargers can overheat due to various reasons. Ensure the charger is in a well-ventilated area. Do not cover it while in use. Blocked vents can cause overheating.
If the charger gets too hot, it may have an internal problem. Unplug it and let it cool down. Check for dust or debris inside the vents. Clean it carefully if needed. If overheating continues, the internal components may be faulty. Professional inspection might be necessary.
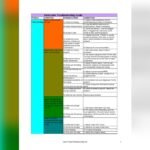
| Issue | Possible Cause | Solution |
|---|---|---|
| No Power | Faulty Outlet, Damaged Cable, Blown Fuse | Check Outlet, Inspect Cable, Replace Fuse |
| Overheating | Poor Ventilation, Blocked Vents, Internal Fault | Ensure Ventilation, Clean Vents, Seek Professional Help |
Pre-troubleshooting Checks
Before diving into complex issues with your Yamaha 48 Volt Charger, start with some basic checks. These steps often solve common problems quickly. They save time and effort by addressing simple issues first. Here are two important pre-troubleshooting checks to perform.
Inspect Connections
First, look at all the connections. Loose connections can cause the charger to malfunction. Make sure the charger is properly connected to the battery. Check for any frayed wires or visible damage. Secure all connections firmly.
Check Power Source
Next, ensure the power source is working. Plug the charger into a different outlet. Verify the outlet has power by plugging in another device. If the outlet works, the issue may be with the charger itself. This simple step can quickly identify if the problem lies with the power supply.
Battery Inspection
Inspecting the battery is a crucial step in troubleshooting your Yamaha 48 Volt Charger. A thorough battery inspection can reveal potential issues and help you maintain the health of your golf cart’s battery system. Follow these steps to ensure your battery is in optimal condition.
Check Battery Voltage
First, you need to check the battery voltage. This will help you identify if the battery is holding a charge properly. Use a digital voltmeter for accurate readings.
- Set the voltmeter to DC voltage.
- Connect the red probe to the positive terminal.
- Connect the black probe to the negative terminal.
- Read the voltage on the display.
A fully charged 48-volt battery pack should read between 50-52 volts. If the reading is significantly lower, the battery may need charging or replacement.
Inspect Battery Terminals
Next, inspect the battery terminals. Clean and secure terminals are essential for proper battery function.
- Check for any signs of corrosion.
- If corrosion is present, use a mixture of baking soda and water to clean it.
- Rinse with clean water and dry thoroughly.
- Ensure all connections are tight.
Loose or corroded terminals can cause poor electrical contact, affecting the performance of the battery and charger.

Credit: www.youtube.com
Charger Indicators
Understanding the indicators on your Yamaha 48 Volt Charger is crucial. These indicators help you diagnose issues and ensure your charger is working correctly. Let’s explore the meanings behind the LED lights and error codes.
Led Light Meanings
The LED lights on your Yamaha 48 Volt Charger communicate different statuses. A green light means your battery is fully charged. If you see a red light, it indicates the charger is actively charging. A blinking red light often signifies an error or issue. Make sure to check the charger manual for detailed meanings.
Error Codes
Error codes on the charger display help identify specific problems. Each code corresponds to a different issue, like connection problems or battery faults. For example, Error Code 1 might indicate a loose connection. Error Code 2 could point to a faulty battery. Refer to the user manual for a complete list of error codes and their solutions.
Testing The Charger
Testing the charger is a crucial step in identifying any issues with your Yamaha 48 Volt Charger. This process ensures that your charger is functioning properly and delivering the right amount of power to your battery. Let’s delve into the steps involved in testing your charger.
Using A Multimeter
A multimeter is an essential tool for this task. It helps measure voltage, current, and resistance. Follow these steps to use a multimeter:
- Set your multimeter to the DC voltage setting.
- Insert the black probe into the COM (common) port.
- Insert the red probe into the VΩ (voltage) port.
- Turn on the charger and connect the probes to the output terminals.
Ensure that you have a stable connection to get accurate readings.
Verifying Output Voltage
Once your multimeter is connected, the next step is to verify the output voltage:
- Check the display on the multimeter.
- Compare the reading with the expected voltage output (48 volts).
- If the reading is significantly lower or higher, your charger may have an issue.
Here is a simple table to help you understand the possible outcomes:
| Multimeter Reading | Condition |
|---|---|
| 48 volts | Normal |
| Less than 48 volts | Possible Charger Issue |
| More than 48 volts | Possible Overcharging |
If the output voltage is not within the expected range, consider checking the charger’s internal components or consulting a professional.

Credit: www.amazon.com
Cleaning And Maintenance
Maintaining your Yamaha 48 Volt Charger is essential for its long life. Regular cleaning and maintenance keep the charger working efficiently. A well-maintained charger can prevent potential issues and save you from costly repairs. This section covers how to clean and maintain your charger effectively.
Dust And Debris Removal
First, unplug the charger from the power source. Dust and debris can accumulate over time. Use a soft brush to remove any visible dust. A can of compressed air can help reach tight spots. Make sure to clean the vents. This allows proper airflow and prevents overheating. Avoid using water or liquid cleaners.
Terminal Cleaning
Dirty terminals can lead to poor charging performance. Check the terminals for any corrosion. Use a wire brush to clean them gently. Baking soda and water can help remove stubborn corrosion. Apply the mixture to the terminals and scrub. Wipe them dry with a clean cloth. Ensure the terminals are free of any cleaning residue.
Replacing Components
Sometimes, your Yamaha 48 Volt Charger may not work properly. When this happens, it might be time to replace some components. This section will guide you through replacing key parts. Follow these steps to ensure your charger works again.
Fuse Replacement
The fuse is a critical part of your charger. It protects the charger from power surges. To replace the fuse, first, unplug the charger. Then, locate the fuse holder. It is usually near the power cord. Open the fuse holder and remove the old fuse. Insert the new fuse and close the holder. Plug the charger back in and test it.
Connector Replacement
The connector links the charger to the battery. A faulty connector can stop the charging process. To replace the connector, start by unplugging the charger. Next, remove the old connector. This may require a screwdriver. Once removed, attach the new connector. Ensure it is secure. Plug the charger back in and check if it charges the battery.
Preventive Measures
Taking preventive measures ensures that your Yamaha 48 Volt Charger works efficiently. Regular maintenance and proper storage can prevent many common issues. These steps can prolong the life of your charger and help you avoid unexpected problems.
Regular Maintenance
Regular maintenance keeps your charger in top shape. Check the cables for any wear and tear. Replace damaged cables immediately to avoid malfunctions. Clean the charger ports to remove dirt and debris. Dust and grime can affect the connection and charging efficiency. Also, inspect the charger for any signs of overheating. If you notice any unusual heat, let the charger cool down.
Proper Storage
Proper storage of your charger can prevent damage. Store the charger in a cool, dry place. Avoid areas with high humidity or extreme temperatures. Moisture can damage the internal components of the charger. Keep the charger away from direct sunlight and heat sources. Excessive heat can cause the charger to overheat and fail. Use a protective case or cover to shield the charger from dust and accidental drops.
Frequently Asked Questions
How Do I Know If My Yamaha 48 Volt Charger Is Working?
Check if the charger’s LED lights are on. Listen for a humming sound. These indicate it’s working.
Why Is My Yamaha 48 Volt Charger Not Charging?
Check the power outlet and connections. Ensure the battery isn’t fully charged. Inspect for damaged wires or connectors.
What Does A Flashing Red Light On The Charger Mean?
A flashing red light usually indicates a fault. It could be due to overheating or a connection issue.
Can I Repair My Yamaha 48 Volt Charger Myself?
It’s safer to consult a professional. Attempting repairs without expertise can cause further damage or safety risks.
How Often Should I Use My Yamaha 48 Volt Charger?
Charge your battery after every use. Regular charging helps maintain battery health and extends its lifespan.
Conclusion
Solving Yamaha 48 Volt Charger issues is straightforward with these tips. Regular maintenance can prevent most problems. Ensure connections are tight and clean. Always follow the manufacturer’s guidelines. If issues persist, seek professional help. A working charger means a reliable ride.
Keep your charger in good condition. Your Yamaha will thank you. Stay safe and enjoy your ride!
")