Kohler Toilet Troubleshooting: Troubleshoot a Kohler toilet to resolve issues like running water or gurgling noises. A cracked tank or compromised seal may require professional service.
Common Causes Of A Running Toilet
A running toilet can be a source of frustration and wasted water. Understanding the common causes of this issue can help you troubleshoot and fix the problem effectively. Here are the most common culprits behind a running toilet.
Flapper Valve Issues
One of the primary causes of a running toilet is a malfunctioning flapper valve. The flapper valve is responsible for sealing the flush valve and preventing water from continuously flowing into the toilet bowl. If the flapper valve is worn out or damaged, it may not create a proper seal, causing water to leak into the bowl and triggering a continuous flow.
To check for flapper valve issues, remove the tank lid and inspect the flapper for any signs of wear or damage. If the flapper appears worn out or doesn’t seal properly, it may need to be replaced. Installing a new flapper valve can easily resolve the running toilet problem.
Fill Valve Problems
Another common cause of a running toilet is a faulty fill valve. The fill valve controls the water flow into the toilet tank after each flush, ensuring it reaches the correct level. If the fill valve doesn’t function properly, it can result in an imbalanced water level, causing the toilet to continuously run.
To troubleshoot fill valve problems, turn off the water supply to the toilet and remove the tank lid. Check if the water level reaches the recommended mark indicated on the fill valve. If not, adjust the fill valve according to the manufacturer’s instructions to achieve the correct water level. In some cases, the fill valve may need to be replaced if it’s damaged or malfunctioning.
Float Arm Misalignment
An improperly aligned float arm can also lead to a running toilet. The float arm is connected to the fill valve and is responsible for controlling the water flow by rising and falling with the water level in the tank. If the float arm is misaligned or not functioning correctly, it can result in an imbalanced water level and cause the toilet to keep running.
To check for float arm misalignment, observe the movement of the float arm as the toilet tank refills after a flush. Ensure that the float arm moves freely and doesn’t get stuck or tangled. Adjust the position of the float arm as necessary to ensure it properly controls the water level and stops the running toilet.
Water Level Adjustment
In some cases, a running toilet can simply be due to incorrect water level settings. If the water level in the tank is set too high, it can cause water to continuously overflow into the overflow tube, resulting in a running toilet. Adjusting the water level to the recommended mark on the fill valve can solve this issue.
Refer to the manufacturer’s instructions for your specific toilet model to learn how to adjust the water level properly. Most toilets have a water level adjustment screw or float adjustment mechanism that can be used to achieve the correct water level.
By understanding these common causes of a running toilet and following the troubleshooting steps, you can fix the problem and ensure your toilet operates efficiently, saving both water and your peace of mind.
Fixing Flapper Valve Issues
If you’re experiencing issues with your Kohler toilet, one common problem you may encounter is with the flapper valve. The flapper valve is responsible for controlling the water flow from the tank to the bowl during a flush. Over time, the flapper valve can wear out or become damaged, resulting in issues such as a constantly running toilet or incomplete flushes. In this section, we will discuss how to troubleshoot and fix flapper valve issues to restore your Kohler toilet’s functionality.
Check the For Wear Or Damage
When troubleshooting flapper valve issues, the first step is to check the flapper for any signs of wear or damage. A worn or damaged flapper can prevent a proper seal, leading to water leaks and incomplete flushes. Inspect the flapper for cracks, tears, or any other visible signs of damage. If you notice any damage, it’s time to replace the flapper.
Clean Or Replace The Flapper
If the flapper appears to be in good condition, it may simply be dirty or covered in mineral deposits. In this case, cleaning the flapper can often resolve the issue. Remove the flapper from its seat and clean it using a mild detergent or vinegar solution. Gently scrub away any dirt or deposits, and then rinse it thoroughly before reinstalling. If cleaning doesn’t improve the flapper’s functionality, it’s recommended to replace it with a new one.
Adjust The Chain Length
The chain connecting the flush lever to the flapper valve plays a crucial role in maintaining proper flushing. If the chain is too long or too short, it can interfere with the flapper’s ability to seal or lift completely. Check if the chain is properly attached to the flush lever and adjust its length accordingly. There should be enough slack in the chain to allow the flapper to fully close, but not so much that it gets tangled or prevents a complete seal.
Test The Flush
Once you’ve checked the flapper for wear or damage, cleaned or replaced it, and adjusted the chain length, it’s time to test the flush. Turn on the water supply, ensure the tank is filled to the proper level, and then flush the toilet. Observe if the flapper lifts completely and seals properly after each flush. If the flapper still doesn’t function as intended, it may be necessary to seek professional assistance or consider replacing the entire flush valve assembly.
By following these troubleshooting steps, you can often resolve flapper valve issues with your Kohler toilet. Remember to regularly inspect and maintain your toilet to prevent future problems and ensure its optimal performance.
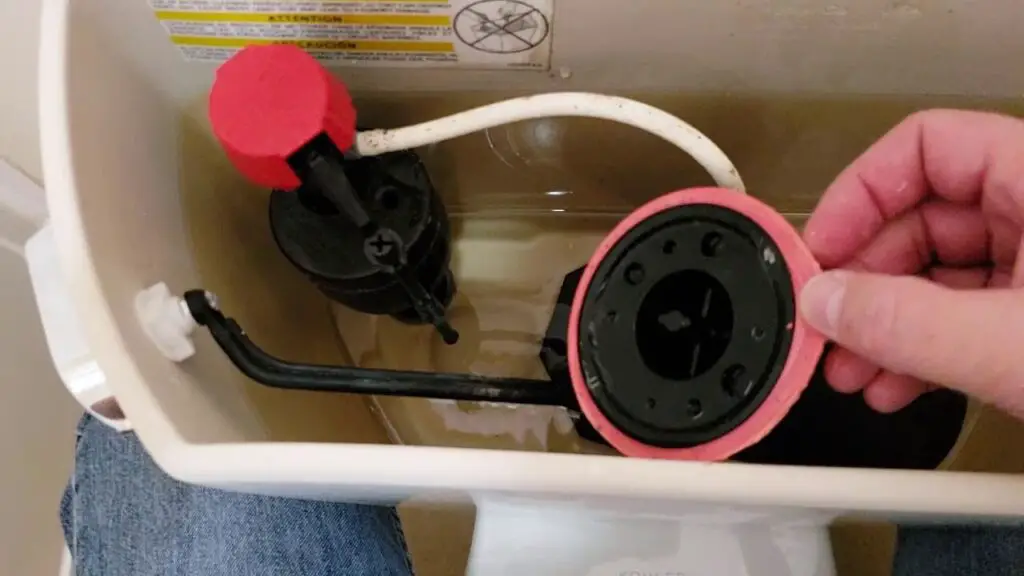
Resolving Fill Valve Problems
Inspect The Fill Valve For Any Leaks Or Damage
One common issue with Kohler toilets is a fill valve that is leaking or damaged. To resolve this problem, start by inspecting the fill valve for any visible leaks or signs of damage. You can do this by removing the tank lid and observing the fill valve closely. Look for any cracks, leaks, or loose connections. If you notice any issues, it’s important to address them promptly to prevent further damage.
Adjust The Water Level In The Tank
If your Kohler toilet is constantly running or overflowing, the water level in the tank may need to be adjusted. To do this, locate the water level adjustment screw on the fill valve. Use a flathead screwdriver to turn the screw clockwise to lower the water level or counterclockwise to raise it. Make small adjustments and test the flush after each adjustment to achieve the desired water level. Adjusting the water level can help prevent overflow and optimize the toilet’s performance.
Clean Or Replace The Fill Valve
If the fill valve is not functioning properly, it may be due to debris or mineral buildup. Cleaning the fill valve can often solve this issue. Start by shutting off the water supply to the toilet and flushing to drain the tank. Then, remove the fill valve cap and float assembly to access the inside of the valve. Use a brush or cloth to clean up any accumulated sediment or deposits. If cleaning does not resolve the issue, consider replacing the fill valve with a new one to ensure proper functioning.
Test The Fill Valve After Adjustments
After making any adjustments or repairs to the fill valve, it’s important to test the toilet’s functionality. Turn on the water supply and allow the tank to fill. Then, flush the toilet to ensure a proper flush and tank refill. Observe the fill valve during the process to ensure there are no leaks or malfunctions. Testing the fill valve after adjustments will help ensure that the issue has been resolved and prevent any future problems.
Aligning The Float Arm
When it comes to troubleshooting your Kohler toilet, one common issue that can arise is a misaligned float arm. The float arm is responsible for controlling the water level in the tank, ensuring it fills up to the appropriate level after each flush. If the float arm is not properly aligned with the fill valve, it can result in inconsistent flushing or continuous running of the toilet.
Ensure The Float Arm Is Properly Aligned With The Fill Valve
Before you go ahead and adjust the float arm, it’s essential to first ensure that it is properly aligned with the fill valve. To do this, follow these steps:
- Remove the tank cover to access the inside of the tank.
- Locate the float arm, which is connected to the fill valve and extends into the tank.
- Check that the float arm is parallel to the fill valve and not touching any other parts in the tank.
Ensuring that the float arm is properly aligned will help optimize its performance and prevent any potential issues.
Adjust The floating Arm If Misaligned
If you find that the float arm is misaligned, it’s crucial to make adjustments to correct its position. Follow these steps to adjust the float arm:
- First, turn off the water supply to the toilet.
- Next, locate the adjustment screw or clip on the float arm.
- Loosen the screw or release the clip to allow for movement of the float arm.
- Reposition the float arm so that it is parallel to the fill valve.
- Tighten the screw or reattach the clip to secure the float arm in its new position.
Test The Float Arm Adjustment
Once you have adjusted the float arm according to the previous steps, it’s essential to test its adjustment to ensure it is functioning correctly. Follow these steps to test the float arm adjustment:
- Turn on the water supply to the toilet.
- Observe the filling process and check that the tank fills up to the appropriate level.
- Flush the toilet and ensure that the tank refills properly without any issues.
Testing the float arm adjustment will confirm whether it has been aligned correctly, and if not, you may need to make further adjustments.
By properly aligning the float arm with the fill valve, you can ensure that your Kohler toilet operates effectively and efficiently. If you continue to experience issues or have any concerns, it may be beneficial to consult a Kohler technician for further assistance.
Adjusting The Water Level
One common issue that homeowners often face with their Kohler toilets is an incorrect water level. If the water level is too low, it may not provide an effective flush, while a water level that is too high can result in constant running or overflowing. Fortunately, adjusting the water level in your Kohler toilet is a simple process that you can do yourself. In this section, we will discuss how to locate the water level adjustment screw or valve, determine the correct water level for your toilet, and turn the adjustment screw or valve to reach the desired water level.
Locate The Water Level Adjustment Screw Or Valve
To adjust the water level in your Kohler toilet, the first step is to locate the water level adjustment screw or valve. This can usually be found inside the toilet tank, near the top. Look for a small screw or valve that is connected to the fill valve or ballcock assembly. Once you have located the adjustment screw or valve, you can proceed to the next step.
Determine The Correct Water Level For Your Toilet
After locating the water level adjustment screw or valve, it is important to determine the correct water level for your Kohler toilet. The optimal water level is typically indicated by a marked line or measurement inside the toilet tank. Refer to your Kohler toilet’s user manual or the manufacturer’s website for specific instructions on determining the correct water level for your model.
Turn The Adjustment Screw Or Valve To Reach The Desired Water Level
Once you have determined the correct water level for your Kohler toilet, you can adjust the water level by turning the adjustment screw or valve. To increase the water level, turn the screw or valve in a clockwise direction. To decrease the water level, turn the screw or valve counterclockwise. Make small adjustments at a time, and test the water level after each adjustment.
When making adjustments, ensure that the water level is not below the minimum mark or above the maximum mark indicated inside the toilet tank. This will help prevent any issues with flushing or overflowing.
Test The Water Level After Adjustments
After making adjustments to the water level, it is important to test the water level to ensure that it is at the desired height. Simply flush the toilet and observe the refill process. If the water level is too low or too high, repeat the adjustment process until you achieve the optimal water level.
By following these steps, you can easily adjust the water level in your Kohler toilet and resolve any issues related to water flow, flushing, or overflowing. Remember to consult your Kohler toilet’s user manual or reach out to a professional if you have any specific concerns or questions about adjusting the water level in your toilet.
Frequently Asked Questions
How Do You Adjust A Kohler Toilet Fill Valve?
To adjust a Kohler toilet fill valve, follow these steps: 1. Remove the tank cover and locate the float cap assembly. 2. Cover the valve and remove the seal from the cap assembly. 3. Turn off the water supply, reinstall the seal, and turn the water back on. 4. Check that the tank is filling properly and replace the tank cover. For more detailed instructions, you can watch a video guide on YouTube.
Why do I have to hold the handle down to flush my Kohler toilet?
If you have to hold the handle down to flush your Kohler toilet, it’s likely because the flapper is not lifting away from the flush valve completely. This can be caused by too much slack in the lifting chain connecting the flush lever to the flapper. Adjusting the chain should fix the issue.
Why Does My Toilet Keep Running And Will Not Flush?
If your toilet keeps running and won’t flush, it’s likely due to a problem with the flapper or the lifting chain. Check if the flapper is worn or if the chain is unhooked or stuck under the flapper. Adjust or replace the flapper and chain to fix the issue.
How Do You Diagnose A Toilet That Is Not Flushing Properly?
To diagnose a toilet that is not flushing properly, first check the flapper to ensure it is lifting away from the flush valve. If there is too much slack in the lifting chain, adjust it accordingly. If water is running but not entering the bowl, check the flapper and chain for any issues. If these steps don’t solve the problem, it may require professional service.
What Should I Do If My Kohler Toilet Won’t Flush Properly?
Make sure there is no debris on the screen of the fill valve, and check if the flapper is seated properly over the opening.
Conclusion
If you’re experiencing issues with your Kohler toilet, there are several troubleshooting steps you can take to resolve the problem. From adjusting the fill valve to ensuring the flapper is seated properly, these simple fixes can make a big difference in your toilet’s performance.
Remember to consult professional service if needed, as persistent running or gurgling noises may indicate more significant problems. By following these troubleshooting tips, you can maintain a properly functioning Kohler toilet.
")


I have iron in my well water and I can see that it is starting to change the color of the tank where the water is holding. Can I put peroxide in my tank? I believe I have a Kelston that was installed by West Shore Home.
It’s not recommended to put peroxide in your water tank without consulting a professional, especially if you have a Kelston model installed by West Shore Home. Iron in well water can cause discoloration and other issues, but adding chemicals like peroxide might not address the root problem and could potentially damage the tank or plumbing. It’s better to explore options like installing a water filtration system or an iron filter specifically designed for well water. I’d suggest reaching out to a professional plumber or water treatment specialist for advice on the best solution.