The Noco Genius Gen 3 is a reliable battery charger. But, like any device, it can face issues.
Are you having trouble with your Noco Genius Gen 3? You’re not alone. Many users encounter problems and seek solutions. This blog post will guide you through common troubleshooting steps. We’ll help you understand the issues and fix them. No need for technical expertise, just simple, clear advice.
Keep reading to get your Noco Genius Gen 3 back in action.

Credit: www.amazon.com
Common Issues
Many users face common issues with the Noco Genius Gen 3. Understanding these problems helps in resolving them quickly. This section covers the most frequent issues and provides solutions.
Battery Not Charging
One of the most common issues is the battery not charging. Several reasons might cause this problem:
- Loose connections
- Faulty battery
- Incorrect settings
To troubleshoot, follow these steps:
- Check all connections for tightness.
- Inspect the battery for damage.
- Ensure the charger settings match the battery type.
If the problem persists, try using a different battery. This helps determine if the charger is faulty.
Error Codes
Error codes provide information about specific issues. Here are some common error codes and their meanings:
| Error Code | Description | Solution |
|---|---|---|
| E01 | High Voltage | Check the input voltage. Ensure it matches the charger’s specifications. |
| E02 | Low Voltage | Verify the battery connections. Make sure they are secure. |
| E03 | Over Temperature | Allow the charger to cool down. Ensure proper ventilation. |
Note: If an error code persists, consult the user manual for detailed troubleshooting steps.
Initial Checks
When troubleshooting your Noco Genius Gen 3 charger, start with some initial checks. These checks can help identify any basic issues quickly. A thorough inspection of the power source and connections is essential. Let’s dive into these steps.
Power Source
First, ensure your charger is getting power.
- Check if the outlet is working.
- Use another device to test the outlet.
- Verify the extension cord, if used, is functional.
Next, inspect the charger’s power cord.
- Look for any visible damage.
- Ensure the plug is firmly connected.
Sometimes, a simple reset can help. Unplug the charger, wait a few moments, and plug it back in.
Connections
Proper connections are crucial for the charger to work.
- Check the battery clamps are secure.
- Ensure the polarity is correct: red to positive, black to negative.
- Inspect the clamps and cables for damage or corrosion.
Clean any corrosion you find on the battery terminals. Use a brush or sandpaper for this task.
Verify the connection to the vehicle’s battery. Sometimes, a loose clamp can cause issues.
For safety, make sure the charger is off when making adjustments.
By performing these initial checks, you can often resolve issues without further troubleshooting. Ensure all connections are secure and the power source is stable.
Battery Health
Battery Health is crucial for the performance and longevity of your vehicle. Regular checks can prevent unexpected issues. Understanding the health of your battery can save time and money.
Testing Battery
To test your battery, use a digital voltmeter. Set the voltmeter to DC voltage. Connect the red probe to the positive terminal and the black probe to the negative terminal. A fully charged battery should read around 12.6 volts or higher. If the reading is below 12.4 volts, the battery may be undercharged. If the reading is below 12 volts, the battery might be failing.
Another method is using a battery tester. These devices can provide more detailed information. Some models check the battery’s cold cranking amps (CCA) and reserve capacity. Follow the device instructions for accurate results.
Signs Of Wear
There are several signs of battery wear to watch for:
- Slow engine crank
- Dim headlights
- Electrical issues (e.g., power windows, radio)
- Check engine light
- Swollen battery case
- Corrosion on terminals
If you notice these signs, the battery might need a replacement. Regular checks can help identify problems early.

Credit: m.facebook.com
Error Code Solutions
The Noco Genius Gen 3 is a reliable battery charger. But sometimes, error codes may appear. Understanding these error codes helps solve problems quickly. Below, we will discuss solutions for two common error codes: Code E1 and Code E2.
Code E1
Code E1 usually indicates a connection problem. The charger detects an incorrect battery connection. Follow these steps to resolve it:
- Check the battery connections. Ensure they are tight and secure.
- Inspect the battery terminals. Clean any corrosion or dirt.
- Verify the polarity. Make sure the positive and negative clamps are correctly connected.
If the problem persists, try using the charger on a different battery. This helps to rule out battery issues.
Code E2
Code E2 indicates a battery voltage problem. The charger detects a battery with too high or too low voltage. Here’s what to do:
- Ensure the battery voltage matches the charger’s specifications.
- If the voltage is too low, try a different battery.
- If the voltage is too high, disconnect the charger and consult the manual.
If these steps do not help, the battery may be faulty. Consider replacing it.
Firmware Updates
Firmware updates are essential for keeping your Noco Genius Gen 3 charger running smoothly. Regular updates can fix bugs, enhance features, and ensure compatibility with the latest devices. In this section, we will guide you through the steps of checking and updating the firmware on your Noco Genius Gen 3 charger.
Checking Version
Before updating, you need to check the current firmware version of your charger. Follow these steps:
- Turn on your Noco Genius Gen 3 charger.
- Connect the charger to your computer using a USB cable.
- Open the Noco Genius software on your computer.
- Navigate to the “Settings” menu.
- Click on “Firmware Version” to see the current version.
Updating Process
Once you know the current firmware version, you can proceed with the update. Here are the steps:
- Download the latest firmware update from the Noco support website.
- Save the update file to your computer.
- Open the Noco Genius software.
- Connect your charger to the computer via USB.
- Go to the “Settings” menu and select “Firmware Update”.
- Follow the on-screen instructions to complete the update.
Updating the firmware on your Noco Genius Gen 3 charger ensures it remains efficient and reliable. Regular updates can help prevent problems and extend the life of your charger.
Maintenance Tips
Maintaining your Noco Genius Gen 3 is essential for optimal performance. Regular care ensures longevity and efficiency. Follow these simple maintenance tips to keep your charger in top shape.
Cleaning
Cleaning your Noco Genius Gen 3 is straightforward. Ensure the device is unplugged before cleaning. Use a soft, dry cloth to wipe the exterior. For stubborn dirt, dampen the cloth slightly. Avoid using harsh chemicals or abrasive materials as they can damage the surface. Regular cleaning prevents dust and grime buildup.
Storage
Proper storage extends the life of your charger. Store your Noco Genius Gen 3 in a cool, dry place. Avoid areas with extreme temperatures or moisture. Ensure the cables are neatly coiled and secured. This prevents tangling and potential damage.
Consider these storage tips:
- Keep away from direct sunlight.
- Store in a dust-free environment.
- Use a protective case if available.
By following these simple cleaning and storage tips, you can ensure your Noco Genius Gen 3 remains reliable and efficient for years to come.
Advanced Troubleshooting
When your Noco Genius Gen 3 charger faces issues, advanced troubleshooting can help. This step ensures your charger works efficiently. Below are some detailed methods to diagnose and fix problems.
Multimeter Use
A multimeter is a vital tool for troubleshooting. It measures voltage, current, and resistance. This helps in identifying electrical issues. Follow these steps:
- Set the multimeter to the correct mode.
- Check the voltage output of the charger.
- Ensure the charger is providing the expected voltage.
- Test the battery connections for any anomalies.
Using a multimeter helps pinpoint the problem. Accurate measurements are crucial. If the readings are off, your charger may have an internal issue.
Component Testing
Testing individual components ensures each part works. Here’s a guide:
- Inspect the cables: Look for any wear or damage.
- Check the fuses: A blown fuse can stop the charger from working.
- Test the connectors: Ensure a snug fit.
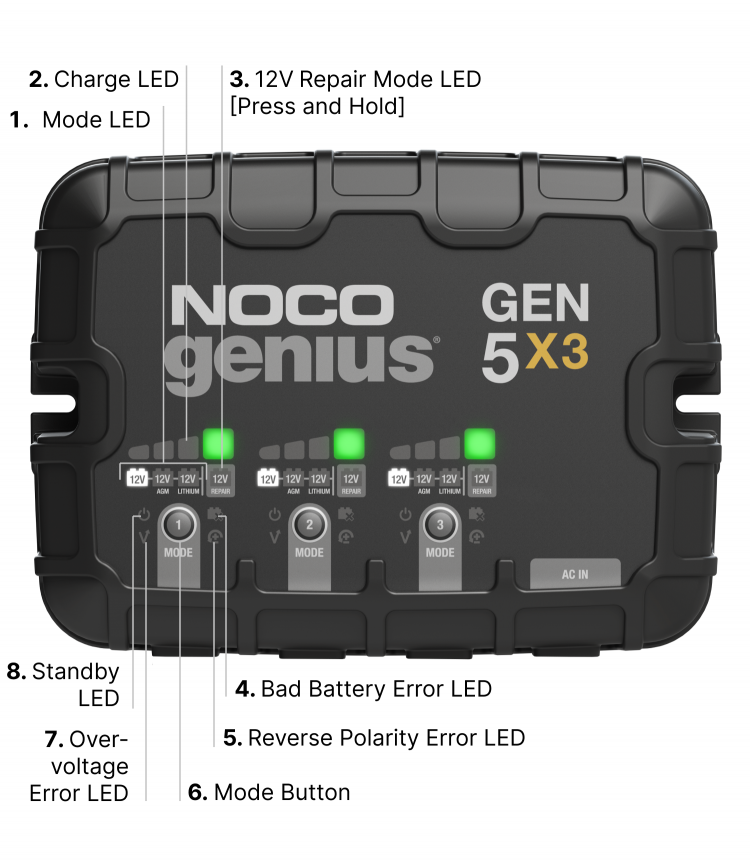
- Examine the LED indicators: They often signal specific issues.
Each component must function properly. Replacing faulty parts can restore the charger’s performance. Regular maintenance prevents many issues.
| Component | Issue | Solution |
|---|---|---|
| Cables | Frayed or broken | Replace the cables |
| Fuses | Blown | Install new fuses |
| Connectors | Loose or corroded | Clean or tighten connectors |
Maintaining these components ensures longevity. Regular checks help catch issues early. This keeps your Noco Genius Gen 3 running smoothly.
Credit: no.co
Customer Support
When facing issues with your Noco Genius Gen 3, reliable customer support can be a lifesaver. This section provides all the necessary information to help you navigate through the support process effectively.
Contact Information
If you need help, Noco’s customer service team is ready to assist. You can reach them through various methods:
- Phone: 1-800-456-6626
- Email: support@no.co
- Live Chat: Available on their website
Customer service hours are Monday through Friday, 8 AM to 5 PM EST.
Warranty Claims
If your Noco Genius Gen 3 is still under warranty, you can file a claim. Follow these steps:
- Gather your proof of purchase.
- Visit the Noco Support Page.
- Fill out the warranty claim form with all required details.
- Submit the form and wait for a response from the support team.
Make sure to provide accurate information to expedite the process. Warranty claims are usually processed within 5-7 business days.
Having the right customer support information can make troubleshooting your Noco Genius Gen 3 much simpler. Keep this guide handy for quick reference.
Frequently Asked Questions
How Do I Reset My Noco Genius Gen 3 Charger?
To reset, disconnect the charger from the power source. Wait 30 seconds. Reconnect and restart.
Why Is My Noco Genius Gen 3 Not Charging?
Check the battery connections and ensure they are secure. Verify the power source is working.
What Do The Noco Genius Gen 3 Indicator Lights Mean?
Indicator lights show charging status. Red means charging, green means fully charged. Flashing lights indicate errors.
Can The Noco Genius Gen 3 Charge Different Battery Types?
Yes, it can charge different battery types. Check the manual for compatible batteries and settings.
How Do I Fix Noco Genius Gen 3 Error Codes?
Refer to the user manual for error codes. Follow the recommended troubleshooting steps to resolve issues.
Conclusion
Troubleshooting your Noco Genius Gen 3 can seem challenging at first. But with patience and careful steps, you can solve most issues. Remember to check connections, firmware, and settings. Always refer to the user manual for specific problems. Regular maintenance helps avoid future issues.
Stay informed and your Noco Genius Gen 3 will serve you well. Happy charging!
")


