Rain Bird solenoid valves are vital for irrigation systems. They control water flow effectively.
But what happens when they stop working? Troubleshooting these valves can seem tricky. Don’t worry, though. This blog post will guide you through common issues and solutions. By the end, you’ll feel confident fixing your Rain Bird solenoid valve. Understanding how solenoid valves work is important.
These valves use an electric coil to control water flow. When the valve malfunctions, it can disrupt your entire irrigation system. Problems may include no water flow, leaks, or the valve not opening or closing properly. Knowing how to troubleshoot these issues can save time and money. This guide will help you identify and fix common problems with your Rain Bird solenoid valve. Let’s dive in!
Credit: www.centraltis.com
Introduction To Rain Bird Solenoid Valves
Rain Bird solenoid valves are vital components in irrigation systems. They control the flow of water through your system. These valves ensure that your lawn or garden gets the right amount of water. If a valve malfunctions, it can lead to overwatering or dry spots. Proper troubleshooting can help maintain an efficient irrigation system. Understanding how these valves work is the first step.
What Is A Solenoid Valve?
A solenoid valve is an electromechanically operated valve. It uses an electric current to produce a magnetic field. This magnetic field opens or closes the valve. Solenoid valves are commonly used in irrigation systems. They allow for automated control of water flow.
The main parts of a solenoid valve include:
- Solenoid Coil
- Plunger
- Valve Body
Importance In Irrigation Systems
Solenoid valves play a critical role in irrigation systems. They enable precise control over water distribution. This is essential for maintaining healthy plants. Proper water management helps prevent water waste. It also ensures that each plant receives adequate water.
In an irrigation system, solenoid valves are typically controlled by a timer or controller. This allows for scheduled watering times. Automated systems reduce manual labor and increase efficiency. When a solenoid valve fails, it can cause significant issues. Troubleshooting and repairing these valves is crucial for system performance.
Below is a table summarizing the key features of Rain Bird solenoid valves:
| Feature | Description |
|---|---|
| Material | High-Grade Plastic |
| Operation | Electromechanical |
| Control | Automated |
| Usage | Irrigation Systems |
Understanding the basics of Rain Bird solenoid valves can help in troubleshooting. Proper maintenance will ensure your irrigation system runs smoothly.
Common Issues With Solenoid Valves
Solenoid valves play a key role in irrigation systems, controlling the flow of water. Over time, you may face issues with these valves. Understanding common problems can help you troubleshoot effectively. Let’s explore some frequent issues you might encounter with Rain Bird solenoid valves.
Valve Not Turning On
Sometimes, a solenoid valve may fail to turn on. This could disrupt your irrigation schedule. Common causes include:
- Power Supply Issues: Ensure the valve is receiving power. Check the wiring and connections.
- Faulty Solenoid: The solenoid itself might be defective. Test it with a multimeter to confirm.
- Clogged Valve: Debris can block the valve, preventing it from opening. Clean the valve thoroughly.
Address these issues step by step. This will help you restore normal function to your irrigation system.
Valve Not Shutting Off
A valve that doesn’t shut off can waste water and cause overwatering. Here are some reasons this might happen:
- Debris in Valve: Dirt or debris might be keeping the valve open. Inspect and clean the valve.
- Worn Diaphragm: The diaphragm inside the valve may be worn out. Replace it if necessary.
- Electrical Problems: Check for any electrical issues. Faulty wiring can cause the valve to stay open.
Taking these steps can help you fix the problem. You’ll ensure your irrigation system works efficiently.
Tools Needed For Troubleshooting
To effectively troubleshoot a Rain Bird solenoid valve, having the right tools is essential. The proper tools make the job easier and ensure accurate diagnosis and repair. Let’s look at the necessary tools for troubleshooting.
Basic Tools
These tools are essential for any troubleshooting task. They are easy to use and widely available.
- Screwdriver Set: A set of screwdrivers helps to open valve boxes and remove screws.
- Adjustable Wrench: This tool is crucial for loosening and tightening nuts and bolts.
- Multimeter: Use this to check electrical connections and solenoid functionality.
- Utility Knife: Handy for cutting wires or removing insulation.
- Wire Strippers: Essential for stripping wire ends to make proper connections.
Advanced Tools
For more complex troubleshooting, advanced tools can be very helpful. These tools might require some technical knowledge.
- Valve Solenoid Tester: This tool specifically tests the solenoid’s operation.
- Electrical Test Leads: These are used with a multimeter for extended reach or precise measurement.
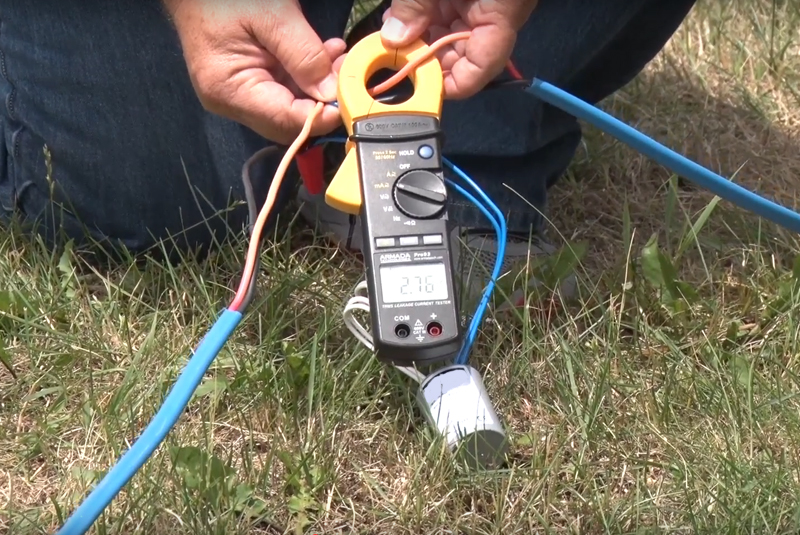
- Digital Clamp Meter: Measures the current without disconnecting wires, useful for live circuits.
- Pipe Cutter: Needed if you need to replace or repair the piping.
- Voltage Detector: Helps to identify live wires without direct contact.
With these tools, you’ll be well-prepared to troubleshoot any issues with your Rain Bird solenoid valve.
Step-by-step Troubleshooting Guide
Rain Bird solenoid valves are crucial for your irrigation system. They control the water flow to your plants. If a valve stops working, it can cause big problems. This guide will help you troubleshoot your Rain Bird solenoid valve.
Initial Inspection
Start with a visual check. Make sure everything looks fine. Check for obvious issues like loose wires or dirt buildup.
- Look for loose connections.
- Check for dirt or debris around the valve.
- Make sure the valve is in the correct position.
Next, turn off the water supply. This step is crucial for safety. Use a screwdriver to open the valve box. Check the solenoid and valve for any visible damage.
Testing Solenoid Coil
To test the solenoid coil, you will need a multimeter. This tool measures electrical current. Follow these steps:
- Set the multimeter to the ohms setting.
- Place the probes on the solenoid terminals.
- Read the resistance on the multimeter.
The solenoid coil should have a resistance between 20 to 60 ohms. If the reading is outside this range, the solenoid may be faulty. Here is a table to help interpret the readings:
| Resistance (Ohms) | Condition |
|---|---|
| 0-19 | Short Circuit |
| 20-60 | Normal |
| 61+ | Open Circuit |
If the solenoid coil is faulty, it needs replacement. Turn off the power supply before replacing the solenoid. Safety first!
Fixing Electrical Problems
Dealing with electrical issues in a Rain Bird solenoid valve can be challenging. Whether your system is not turning on or off, electrical problems are often the culprit. This section will guide you through troubleshooting electrical issues step-by-step. We’ll focus on checking wiring connections and replacing a faulty solenoid.
Checking Wiring Connections
Start by inspecting the wiring connections. Loose or broken wires can cause your solenoid to malfunction. Follow these steps to ensure all connections are secure:
- Turn off the power to your irrigation system to avoid any electrical hazards.
- Open the valve box and locate the solenoid and its wiring.
- Check the wires connected to the solenoid. Make sure they are tightly secured.
- Look for any signs of damage, such as frayed or burnt wires.
- Use a multimeter to test for continuity. If the multimeter shows no continuity, the wire is likely damaged.
If you find any damaged wires, replace them. Ensure the new wires are properly insulated and securely connected.
Replacing A Faulty Solenoid
If the wiring is intact but the solenoid still doesn’t work, the solenoid itself may be faulty. Follow these steps to replace it:
- Turn off the water supply to the irrigation system.
- Remove the old solenoid by unscrewing it from the valve.
- Take the new solenoid and screw it into place.
- Reconnect the wires to the new solenoid. Make sure the connections are tight.
- Turn the water supply back on and test the system.
Replacing a faulty solenoid can restore your irrigation system to proper working order. Always ensure that the new solenoid is compatible with your Rain Bird valve model.
By checking wiring connections and replacing a faulty solenoid, you can effectively address many electrical problems in your Rain Bird solenoid valve.
Addressing Mechanical Issues
Mechanical issues with Rain Bird solenoid valves can disrupt your irrigation system. These issues often stem from dirt, debris, or worn-out internal parts. Proper maintenance and timely repairs can ensure smooth operation. Here, we will discuss common mechanical problems and their solutions.
Cleaning The Valve
A dirty valve can cause many issues. Begin by turning off the water supply. Then, carefully remove the valve from the system. Inspect it for any visible dirt or debris. Use a soft brush to clean the surfaces. For stubborn dirt, a mild soap solution works well.
Rinse the valve thoroughly with clean water. Ensure all soap and dirt are removed. Allow the valve to dry completely before reassembling it. This simple cleaning process can often resolve many valve issues.
Replacing Internal Parts
Worn-out internal parts can lead to valve failure. First, identify the faulty component. Common parts that may need replacement include the diaphragm, spring, or solenoid. Refer to the valve manual for specific part numbers and instructions.
Purchase genuine replacement parts for the best results. Carefully disassemble the valve, noting the placement of each part. Replace the faulty component, and reassemble the valve. Ensure all connections are tight and secure. Test the valve to confirm the repair’s success.
Preventive Maintenance Tips
Rain Bird solenoid valves are essential for efficient irrigation. Proper maintenance ensures they work smoothly. Regular checks and adjustments can prevent issues and extend their life. Here are some preventive maintenance tips to keep your system in top shape.
Regular Inspections
Inspect your solenoid valves regularly. Look for signs of wear and tear. Check for leaks around the valve. A leaking valve can waste water and cause damage. Ensure the solenoid is clean and free from debris. Dirt and debris can block the valve and affect its performance. Listen for unusual sounds. A buzzing or humming noise may indicate a problem.
Seasonal Adjustments
Adjust your system with the changing seasons. In winter, drain the system to prevent freezing. Frozen water can damage the valves. In spring, check the system before the first use. Ensure all parts are functioning correctly. In summer, inspect more frequently. High temperatures can stress the system. Make necessary adjustments to account for increased water usage. In autumn, prepare for the colder months ahead. Clean and store any removable parts properly.

Credit: www.youtube.com
When To Call A Professional
Call a professional if your Rain Bird solenoid valve issues persist after basic troubleshooting. Unresolved problems could indicate deeper electrical or mechanical issues. An expert ensures your irrigation system runs smoothly.
Sometimes, fixing a Rain Bird solenoid valve can be challenging. You may need to call a professional. This ensures your irrigation system works properly. A professional has the skills and tools needed.Identifying Complex Problems
Some issues are hard to spot. For instance, electrical problems can be tricky. You might think the valve is faulty. But the problem could be in the wiring. Professionals know how to find these hidden issues.Another complex problem is low water pressure. It can be caused by many factors. Professionals have the equipment to test and diagnose the root cause. They can also check for leaks and blockages.Hiring The Right Expert
Finding the right expert is important. Look for certified irrigation specialists. They have the training and experience needed. Check their reviews online. Good reviews mean satisfied customers.Ask if they offer guarantees on their work. This shows they stand by their services. Get a written estimate before they start. This helps avoid surprises later. Hiring the right expert can save time and money. “`
Credit: www.hillsirrigation.com.au
Frequently Asked Questions
How Do I Know If My Rain Bird Solenoid Valve Is Bad?
A faulty Rain Bird solenoid valve often causes leaks, no water flow, or unusual noises.
What Causes A Rain Bird Solenoid Valve To Malfunction?
Common causes include debris, electrical issues, or worn-out parts. Regular maintenance helps prevent these problems.
How Do I Test A Rain Bird Solenoid Valve?
Use a multimeter to check for proper voltage. Ensure the valve is clean and free of debris.
Can I Replace A Rain Bird Solenoid Valve Myself?
Yes, with basic tools and a guide, you can replace it. Always follow safety precautions.
How Often Should I Check My Rain Bird Solenoid Valve?
Check annually for leaks, debris, and proper function. Regular checks ensure longevity and efficiency.
Conclusion
Solving issues with your Rain Bird solenoid valve can be straightforward. Start by checking the basics. Ensure power supply and connections are secure. Inspect for debris or damage. Follow the steps mentioned to troubleshoot effectively. Regular maintenance helps prevent future problems.
With these tips, your irrigation system should work smoothly. Happy gardening!
")