Traeger Troubleshooting Codes: What You Need to Know Picture this: You’re all set for a perfect barbecue session, your Traeger grill is fired up, but suddenly, an error code flashes on the screen. Frustrating, right?
Don’t worry—you’re not alone. Many Traeger users experience this hiccup, and the good news is most issues can be resolved quickly once you understand what those troubleshooting codes mean. Think about it: the sooner you decode the issue, the faster you can get back to grilling those mouthwatering meals.
That’s why this guide is here for you. Whether it’s a simple fix or something that needs a bit more attention, we’ll walk you through the most common Traeger troubleshooting codes step by step. By the time you’re done reading, you’ll feel confident and ready to tackle any grill error like a pro. Let’s get started!
Common Error Codes
Traeger grills are fantastic for delivering that smoky, wood-fired flavor we all love. But let’s face it—when error codes pop up, it can throw a wrench in your grilling plans. Understanding these codes is key to getting your grill back on track without losing your cool.
H0 Code Issues
The H0 code typically signals a power interruption. It means your grill isn’t receiving consistent electricity. Before you panic, check your power outlet and cord connections.
Make sure the cord is fully plugged in and hasn’t been damaged. If you’re using an extension cord, try plugging the grill directly into the outlet. Is the circuit breaker tripped? Reset it if needed, and you’re good to go.
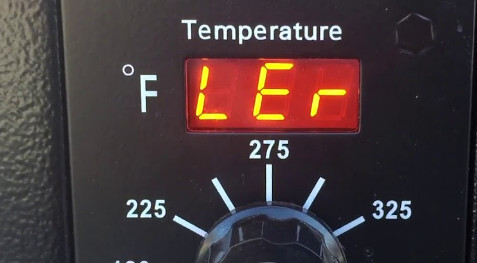
Ler Code Problems
Seeing the dreaded LEr code? This usually means your grill’s temperature has dropped too low. It often happens during colder weather or windy conditions.
First, check your pellet supply. Are they stuck or low? Stir them gently or refill the hopper. Also, ensure your firepot is clean and free of ash buildup. A clean grill is a happy grill!
Err Code Explained
The ERR code often relates to a faulty temperature probe. Your grill might not be reading the internal temperature correctly. This can lead to uneven cooking or even shutting down.
Inspect the temperature probe for any visible damage. Sometimes grease and debris can interfere with its accuracy. Clean it with a damp cloth and reconnect it securely. Still seeing the code? You may need to replace the probe.
Her Code Solutions
The HEr code indicates your grill is overheating. This isn’t just bad for your food—it can also damage the grill itself. Take action immediately when you see this code.
Start by turning the grill off and allowing it to cool. Check if the firepot is overloaded with pellets. Too many pellets can cause a flare-up, so remove any excess. Also, make sure the fan is working properly to regulate airflow.
So, which of these codes have you encountered? Troubleshooting doesn’t have to be intimidating. With a little patience and the right steps, you’ll have your Traeger running smoothly in no time.
Temperature Fluctuation Fixes
Temperature fluctuations can be frustrating when you’re trying to get that perfect cook on your Traeger grill. Whether it’s a sudden drop in temperature or unexpected spikes, these issues can throw off your grilling game. Let’s dive into practical fixes for common temperature problems and get your grill back on track.
Dealing With Low Temps
Low temperatures can mean undercooked food or extended cooking times. Start by checking your pellet supply—empty or damp pellets can disrupt heat levels. Replace them with dry, high-quality pellets for smoother burns.
Clean your firepot regularly. Ash buildup can choke the flame, leading to temperature drops. Use a shop vacuum or a brush to clear out debris after each cook.
Still seeing low temps? Take a look at your grill’s temperature probe. A dirty or misaligned probe can send incorrect readings to your controller. Wipe the probe clean and ensure it’s positioned correctly.
Resolving High Temp Spikes
High temperature spikes can ruin delicate dishes like fish or baked goods. First, check your controller settings. Accidentally setting the grill to a higher mode than intended is an easy mistake to fix.
If your grill is running hotter than expected, inspect the lid seal. A loose or damaged seal can let excess air in, feeding the fire and boosting the heat. Tighten or replace the seal if needed.
Also, pay attention to grease buildup inside your grill. Excess grease can ignite and cause sudden spikes. Scrape off grease from the drip tray and other surfaces regularly.
Maintaining Consistent Heat
Consistency is key for achieving that perfect smoke ring or even cooking. To maintain stable temperatures, preheat your grill properly before adding food. Let it run for at least 10–15 minutes to stabilize.
Keep your grill in a sheltered location. Wind and rain can mess with your grill’s performance. A covered patio or grilling tent can make a big difference.
Finally, check your grill’s firmware. Outdated software can cause erratic temperature behavior. Update your Traeger app or controller firmware to ensure smooth operation.
What’s your go-to fix when your grill acts up? Share your tips or experiences in the comments below!
Ignition Problems
Traeger grills are a backyard chef’s dream, but ignition problems can quickly turn that dream into a frustrating nightmare. Nothing kills the excitement of a barbecue faster than a grill that won’t light. If your Traeger is giving you trouble, don’t panic. Let’s walk through some common causes and solutions to get your grill back up and running.
Pellet Ignition Failures
Pellet ignition failures usually happen when there’s a disruption in the ignition process. This can occur if your pellets are damp or if there’s too much ash buildup in the firepot. Start by checking the pellets—are they dry and fresh? If not, replace them with new ones.
Next, clean out the firepot. Old ash can block the hot rod from igniting the pellets properly. Use a shop vacuum or a brush to remove any residue. A clean firepot is key to maintaining consistent ignition.
Still having trouble? Inspect the pellets themselves. Low-quality pellets can sometimes cause ignition issues. Stick to trusted brands recommended by Traeger to avoid unnecessary headaches.
Checking Hot Rod Function
The hot rod is the hero of your grill’s ignition system. If it’s not working, your grill won’t ignite. To test it, turn on the grill and carefully check if the hot rod gets warm. Be cautious—it should start heating within a minute or two.
If it’s not heating, the hot rod might need replacing. Luckily, Traeger sells replacement parts, and swapping out a hot rod is usually straightforward. Always disconnect the grill from power before attempting any repairs.
Sometimes, loose wiring is the culprit. Inspect the connections to make sure everything is secure. A quick adjustment can often solve the problem without the need for replacement parts.
Fixing Auger Blockages
The auger feeds pellets into the firepot, and if it’s jammed, your grill won’t ignite. Blockages are often caused by wet or swollen pellets. If you hear the auger motor running but pellets aren’t moving, that’s a sign of a jam.
Turn off the grill and empty the hopper. Check the auger tube for any stuck pellets. Use a tool like a wooden dowel to gently dislodge the blockage. Avoid using metal tools to prevent damage.
Once the auger is clear, refill the hopper with fresh, dry pellets. Run the grill for a few minutes to ensure the auger is feeding pellets smoothly. Regular maintenance can help prevent jams in the future.
Ignition problems can be frustrating, but they’re usually easy to fix if you know where to look. Whether it’s cleaning out the firepot, testing the hot rod, or clearing the auger, these steps will help get your Traeger grill back in action. What’s the most annoying grill issue you’ve faced? Share in the comments below and let’s troubleshoot together!
Credit: www.yaoawe.com
Pellet Delivery Issues
Pellet delivery issues can quickly derail your Traeger grilling experience. If your grill isn’t feeding pellets consistently, it’s hard to maintain steady heat. Understanding how to fix these problems can save your BBQ night from turning into a frustrating disaster.
Clearing Jammed Augers
A jammed auger is one of the most common pellet delivery problems. It happens when pellets get stuck in the tube that feeds them to the firepot. The good news? You can usually clear the jam yourself.
Start by turning off and unplugging your Traeger. Remove the pellets from the hopper and use a screwdriver or socket wrench to detach the auger motor. Manually pull out the jammed pellets or debris from the auger tube. Take your time—it’s better to clear everything out now than deal with repeated jams later.
After clearing the blockage, reassemble the auger and test it. Use the manual feed button (if your model has one) to confirm the auger is spinning freely. Regular cleaning can prevent this issue from happening again. When was the last time you inspected yours?
Using Dry Pellets Effectively
Wet or damp pellets are a hidden culprit behind many delivery issues. Moisture causes pellets to swell and break apart, leading to clogs in the auger. Always store your pellets in a dry, airtight container to keep them in top condition.
If you suspect your pellets are damp, try this quick test: grab a handful and check if they crumble easily. Crumbly pellets are a red flag. Replace them with fresh, dry ones to avoid more problems.
Also, avoid leaving pellets in your hopper for long periods, especially in humid weather. Even if they look fine, they might absorb moisture over time. Are you guilty of forgetting to empty your hopper after a cookout?
Preventing Pellet Buildup
Pellet buildup in the auger or firepot can choke the delivery system over time. This often happens when you don’t clean out leftover ash or partially burned pellets. A little maintenance goes a long way here.
Make it a habit to vacuum your firepot after every 2–3 cooks. Use a shop vac or a dedicated ash vacuum for this job. Also, check the auger tube periodically to ensure it’s clear of leftover pellets.
If you’re switching between pellet types, give your grill a full cleanout before adding new ones. Mixing different pellets can sometimes cause uneven feeding or buildup. Do you switch pellets often without thinking about this?
By tackling these pellet delivery issues head-on, you’ll enjoy a smoother and more reliable grilling experience. Which of these tips will you try first at your next cookout?
Wifire Connectivity Tips
Traeger’s WiFIRE feature enhances grilling by connecting your grill to your smart device. This allows you to control temperature, monitor cooking, and manage settings remotely. Sometimes, connectivity issues can disrupt this convenience. Below are simple tips to troubleshoot and resolve WiFIRE connectivity problems.
Troubleshooting App Connection
Ensure your Traeger app is updated to the latest version. Outdated apps may cause bugs and disrupt connectivity. Check your smartphone’s software. Compatibility issues can affect the app’s performance.
Restart your phone and reopen the app. This clears temporary glitches and refreshes the system. Confirm that your Traeger grill is powered on and the WiFIRE feature is enabled. Connection errors often occur if the grill is off or disconnected.
Reconnecting To Wi-fi
Verify your home Wi-Fi is working properly. Weak signals can cause disconnections. Place the grill closer to the router for better signal reception.
Re-enter the Wi-Fi credentials in the Traeger app. A typo in the password can block access. Use a 2.4GHz network for WiFIRE. Many grills don’t support 5GHz networks.
Restart your router to refresh the connection. This often resolves minor network issues.
Resetting The Wifire System
Access the settings on your Traeger grill. Locate the WiFIRE reset option. Press and hold the reset button for 10 seconds. This clears previous configurations and restores default settings.
Reconnect the grill to your home network using the Traeger app. Follow the on-screen instructions carefully. Check the app to confirm successful pairing.
If issues persist, contact Traeger customer support. They can guide you through advanced troubleshooting steps.

Credit: support.traeger.com
Cleaning And Maintenance
Proper cleaning and maintenance are crucial for your Traeger grill’s performance. Neglecting these tasks can lead to error codes and uneven cooking. By keeping your grill clean, you can avoid many troubleshooting issues. Follow these simple steps to keep your grill running smoothly.
Clearing Ash Build-up
Ash build-up can block airflow and cause ignition problems. Empty the ash from the fire pot regularly. Use a shop vacuum to remove fine ash particles. Clean the interior walls to prevent residue from hardening. Avoid using water inside the grill as it can damage components.
Inspecting The Fire Pot
The fire pot is crucial for maintaining consistent heat. Check it for clogs or damage during each cleaning. Remove any debris or leftover pellets stuck in the fire pot. Replace the fire pot if it shows signs of corrosion or cracks. Keeping it clean ensures proper ignition and steady heat.
Maintaining The Grill Grates
Dirty grill grates can affect the taste of your food. Scrub them with a grill brush after every use. Remove stubborn residue using a damp cloth or mild soap. Avoid harsh chemicals that could damage the coating. Well-maintained grates improve heat distribution and food flavor.
When To Contact Support
Traeger grills are designed to make outdoor cooking effortless. But sometimes, error codes pop up, leaving you puzzled. Knowing when to contact support can save you time and ensure your grill gets back to cooking delicious meals. Let’s break it down so you’re prepared when issues arise.
Identifying Critical Issues
Not all error codes demand immediate support. Some, like a temperature fluctuation, might just need a quick fix—like checking your pellets or cleaning the fire pot. But if your grill won’t turn on or shows codes like “ERR” repeatedly, it’s a sign of a deeper issue.
Think about it: is the error affecting your grill’s basic functionality? If yes, it’s time to consider reaching out for expert help. Don’t wait until the problem worsens or compromises your cooking plans.
Gathering Error Code Details
Before contacting support, collect the necessary details. Write down the error code your grill displays. Note the situation when the issue occurred—was the grill preheating, cooking at a high temperature, or cooling down?
Also, document any troubleshooting steps you’ve already tried. For example, did you restart the grill or check for loose wires? This information can help support agents pinpoint the problem faster.
Having these details ready not only speeds up the process but also helps you feel confident while explaining the issue.
Reaching Out For Assistance
Once you’ve identified a critical issue and gathered the details, it’s time to contact Traeger support. You can reach them via their website, phone, or mobile app. Make sure you’re near your grill when you call—they may ask you to try a few steps while on the call.
Be clear and concise while describing the problem. Don’t hesitate to ask questions if their guidance seems unclear. Support teams are there to help, but they need your input to offer the best solutions.
Have you ever hesitated to ask for help, thinking you could fix it yourself? Sometimes, reaching out can save you hours of frustration and ensure your grill performs like new again.

Credit: www.youtube.com
Conclusion
Troubleshooting your Traeger grill doesn’t have to feel overwhelming. Understanding error codes helps you fix common issues quickly. Always check your manual for specific instructions. Regular maintenance can prevent many problems before they start. Keep your grill clean and inspect parts often.
If issues persist, contacting customer support is a smart choice. A well-maintained grill ensures better performance and longer lifespan. Stay proactive, and your grilling experience will remain enjoyable. Remember, a little care goes a long way in keeping your Traeger working its best.
Happy grilling!
")


