To troubleshoot Rohl faucet repair issues, first, identify the model number for accurate guidance. Consult online resources for specific steps.
Are you experiencing issues with your Rohl faucet and in need of repair solutions? Understanding how to troubleshoot common problems with your Rohl faucet can save you time and money. Whether it’s a leaky faucet, low water pressure, or a malfunctioning handle, knowing how to address these issues can help you keep your faucet in top condition.
By following the manufacturer’s guidelines and utilizing online resources, you can effectively troubleshoot and repair your Rohl faucet, ensuring its longevity and optimal performance. Let’s explore some common troubleshooting techniques to keep your Rohl faucet running smoothly.
Identifying Common Rohl Faucet Issues
If you’re experiencing issues with your Rohl faucet, it’s essential to identify common problems such as low water flow, dripping, or leaks. By troubleshooting and understanding the root cause of these issues, you can effectively repair your Rohl faucet and ensure it functions smoothly.
Leaky Faucet Solutions
If your Rohl faucet is leaking, start by checking the faucet’s connections and O-rings for wear and tear. Tighten loose connections or replace damaged O-rings to stop the leak.
Low Water Pressure Fixes
Low water pressure in your Rohl faucet may be due to mineral buildup or a clogged aerator. Clean the aerator and check for any obstructions in the water supply line to improve water flow.
In case of persisting issues, consider contacting a professional plumber for further assistance.
Initial Inspection Steps
For Rohl faucet repair troubleshooting, begin with an initial inspection. Remove the handle, cartridge, and test the faucet to identify issues. Clean the hot side inlet or change the diverter for effective repair solutions.
Checking The Valve
When troubleshooting a Rohl faucet, the first step is to check the valve. Ensure that the valves under the sink are open, allowing water to flow to the faucet. If the valves are closed, the faucet will not function properly, and you may experience no water flow or low water pressure. Additionally, check the water supply lines to ensure they are not kinked or damaged.
Inspecting For Clogs
If the valves and water supply lines are functioning correctly, the next step is to check for clogs. Debris and mineral buildup can cause clogs, leading to low water pressure or no water flow. To inspect for clogs, start by removing the aerator from the faucet and checking for debris. If debris is present, clean the aerator and reattach it to the faucet. If the aerator is not the issue, check the water supply lines and faucet cartridge for clogs.
Replacing The Cartridge
If the valve and water supply lines are not the issue, and there are no clogs present, the problem may be the faucet cartridge. Over time, cartridges can wear down or become damaged, causing leaks or inconsistent water flow. To replace the cartridge, first, turn off the water supply valves under the sink. Next, remove the handle and cartridge from the faucet and replace it with a new one. Finally, reassemble the faucet and test it to ensure it is functioning correctly.
In conclusion, by following these initial inspection steps, you can troubleshoot and repair your Rohl faucet. If the issue persists, it may be best to contact a professional plumber to assist you.
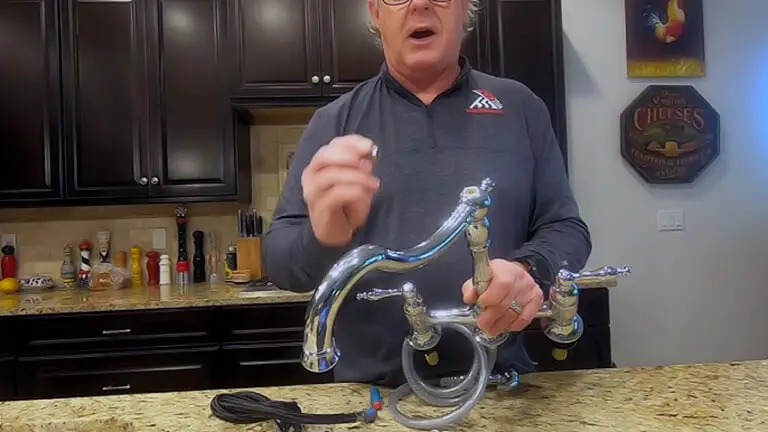
Handle Removal Process
When it comes to troubleshooting and repairing your Rohl faucet, understanding the handle removal process is crucial. Whether you need to replace a cartridge or repair a leak, removing the handle is the first step in accessing the internal components of your faucet. Below is a step-by-step guide and the tools required for removing the handle of your Rohl faucet.
Tools Required
To begin the handle removal process, you will need the following tools:
- Adjustable wrench
- Phillips head screwdriver
- Allen wrench (if applicable)
Step-by-step Guide
Follow these steps to remove the handle of your Rohl faucet:
- Locate the set screw: Depending on the faucet model, the set screw may be located on the side or underneath the handle.
- Use the appropriate tool: Use the Phillips head screwdriver or Allen wrench to loosen and remove the set screw.
- Remove the handle: Once the set screw is removed, carefully lift the handle off the faucet.
- Inspect for additional components: After removing the handle, inspect for any additional components such as a handle adapter or decorative cap.
Cartridge Replacement Techniques
When it comes to Rohl faucet repair troubleshooting, understanding cartridge replacement techniques is essential. The cartridge is a crucial component of the faucet, controlling the flow of water and temperature. Over time, it may develop leaks or malfunctions, requiring replacement. Here, we will explore the process of identifying cartridge types, installation tips, and techniques to ensure a successful replacement.
Identifying Cartridge Type
Before proceeding with a cartridge replacement, it is crucial to identify the specific type of cartridge used in your Rohl faucet. This can typically be determined by the model of the faucet and the manufacturer’s specifications. The cartridge type will dictate the replacement part required, ensuring compatibility and optimal functionality.
Installation Tips
When installing a new cartridge, it is important to follow specific tips to ensure a successful replacement. Firstly, ensure that the water supply to the faucet is turned off to prevent any leaks or water damage during the replacement process. Additionally, carefully follow the manufacturer’s instructions for the specific cartridge type to guarantee proper installation.
Cleaning And Maintenance Tips
Proper cleaning and maintenance are essential for keeping your Rohl faucet in top condition. Regular upkeep not only ensures the longevity of your faucet but also helps prevent common issues that may arise over time. Here are some valuable cleaning and maintenance tips to help you keep your Rohl faucet in optimal working order.
Clearing Hot Side Inlet
If you notice reduced water flow from the hot side of your Rohl faucet, it could be due to mineral build-up or debris blocking the inlet. To clear the hot side inlet, follow these steps:
- Turn off the water supply to the faucet.
- Remove the handle and cartridge according to the manufacturer’s instructions.
- Inspect the inlet for any obstructions or build-up.
- Clean the inlet thoroughly using a mild descaler or vinegar solution.
- Rinse the inlet with water to remove any remaining residue.
- Reassemble the faucet components and test the hot water flow.
Routine Cleaning Advice
Regular cleaning is crucial for maintaining the aesthetic appeal and functionality of your Rohl faucet. Here are some routine cleaning tips to keep your faucet looking and performing its best:
- Use a soft cloth and mild soap to clean the exterior of the faucet.
- Avoid abrasive cleaners or harsh chemicals that may damage the finish.
- For stubborn stains or mineral deposits, apply a gentle cleaner specifically formulated for the faucet material.
- Periodically clean the aerator to remove any sediment or debris that may affect water flow.
- Inspect the faucet for any leaks or loose components during routine cleaning, and address any issues promptly.
Diverter Valve Replacement
To resolve Rohl faucet issues, consider Diverter Valve Replacement. Follow step-by-step tutorials for quick troubleshooting and easy fixes. Elevate your kitchen and bath experience with authentic luxury faucet repair solutions.
Removal Instructions
The diverter valve in your Rohl faucet may need replacement if you are experiencing issues with water flow or pressure. Here are the steps to remove the old diverter valve:
- Turn off the water supply to the faucet.
- Remove the faucet handle and any decorative caps or covers to access the valve.
- Use a wrench or pliers to carefully unscrew and remove the diverter valve from the faucet body.
- Inspect the valve for any damage or debris that may be causing the issue.
- Clean the valve seat and surrounding area to prepare for the replacement.
Line Flushing Procedure
After replacing the diverter valve, it’s essential to flush the lines to ensure proper functioning of the faucet. Follow these steps to flush the lines:
- Open the water supply and let the water run through the faucet for a few minutes to clear any air or debris.
- Close the faucet and check for any leaks or irregularities in the water flow.
- If everything looks good, your Rohl faucet should be back to its optimal performance.
Rohl Faucet Warranty Information
When it comes to purchasing a new faucet, it’s important to consider the warranty information. Rohl offers a limited lifetime warranty on their faucets, which covers manufacturing defects for the original owner. It’s important to note that the warranty does not cover abuse, improper finish maintenance, or wear and tear. In this section, we’ll take a closer look at the coverage details and the claim process for Rohl faucet repairs.
Coverage Details
The Rohl limited lifetime warranty covers manufacturing defects for the original owner. This means that if your faucet fails due to a defect in materials or workmanship, Rohl will replace or repair the faucet free of charge. However, it’s important to note that the warranty does not cover damage caused by misuse, abuse, or improper installation. Additionally, the warranty only applies to the original owner and is non-transferable.
Claim Process
If you need to make a warranty claim for your Rohl faucet, the process is relatively simple. First, you’ll need to contact Rohl customer service and provide them with proof of purchase and a description of the problem. If the issue is covered under warranty, Rohl will either repair or replace the faucet free of charge. In some cases, they may require you to send the faucet to their repair facility for evaluation. Once the evaluation is complete, they will either repair or replace the faucet and send it back to you.
In conclusion, understanding the warranty information for your Rohl faucet is important in case you need to make a claim for repairs. Remember that the warranty only covers manufacturing defects for the original owner, and it’s important to follow the proper claim process to ensure a smooth and hassle-free repair experience.
Seeking Professional Help
For effective Rohl faucet repair troubleshooting, consider seeking professional help from certified plumbers. They can efficiently diagnose and fix any issues, ensuring your faucet functions smoothly and efficiently. Save time and hassle by entrusting the repair to experienced professionals.
When To Call An Expert
When troubleshooting Rohl faucet issues, there are times when seeking professional help becomes necessary. If the problem persists despite your efforts or if you are unsure about the repair process, it’s time to consider contacting a professional technician.
Finding A Qualified Technician
When looking for a qualified technician to repair your Rohl faucet, ensure they have experience with this specific brand. Check for certifications and customer reviews to gauge their expertise. Additionally, verify that the technician offers warranty on their work to guarantee quality service.
Rohl Faucet Repair Resources
Discover valuable Rohl Faucet Repair Resources to assist you in troubleshooting and resolving any issues with your Rohl faucet. Whether you are facing leaks, low water pressure, or other concerns, these resources will guide you through the repair process.
Troubleshooting Guides
Access comprehensive Rohl faucet troubleshooting guides to help diagnose and fix common faucet problems. These guides provide step-by-step instructions to address issues such as dripping faucets, inconsistent water flow, or unusual noises.
Customer Support Services
Get in touch with Rohl’s customer support services for personalized assistance with your faucet repair needs. Their knowledgeable team can provide guidance on troubleshooting specific issues, ordering replacement parts, or scheduling professional repairs.
Frequently Asked Questions
How To Remove Rohl Faucet Cartridge?
To remove a Rohl faucet cartridge, first, turn off water supply. Then, remove handle and cartridge carefully. Test faucet and clean hot side inlet.
Does Rohl Have A Lifetime Warranty?
Yes, Rohl offers a limited lifetime warranty for their products. However, the warranty only covers manufacturing defects and is limited to the original owner. It does not cover abuse, improper maintenance, or wear and tear.
Why Is Water Suddenly Not Coming Out Of My Faucet?
The faucet may not have water due to a closed valve under the sink or a clogged, dislodged, bent, or broken fixture. Check the valve and inspect the faucet for any blockages or damage. If needed, consider replacing the faucet.
How To Replace A Faucet Cartridge Single Handle?
To replace a faucet cartridge single handle, follow these steps:
- Turn off water supply.
- Remove handle and retaining nut.
- Pull out old cartridge.
- Insert new cartridge.
- Reassemble handle and test for leaks.
Conclusion
Troubleshooting Rohl faucet repair can be a straightforward process with the right guidance. By identifying common issues and following the appropriate steps, you can effectively address faucet problems and ensure long-term functionality. Whether it’s a cartridge replacement or addressing water flow issues, understanding the troubleshooting process can help you maintain your Rohl faucet with ease.
")


