Ventilator alarms indicate potential issues that need immediate attention. Troubleshooting involves identifying and resolving the underlying cause quickly.Ventilator alarms are crucial for patient safety, alerting medical staff to possible problems. Common alarm types include high-pressure, low-pressure, and apnea alarms. High-pressure alarms may signal obstructions or increased airway resistance, while low-pressure alarms often indicate disconnections or leaks. Apnea alarms activate if the ventilator detects a lack of patient breaths.
Quick troubleshooting involves checking connections, ensuring the airway is clear, and verifying settings. Proper training and regular maintenance help prevent frequent alarms, ensuring optimal ventilator performance and patient care. Always consult the ventilator manual and follow hospital protocols for specific troubleshooting steps.
Introduction To Ventilator Alarms
Ventilator alarms are critical for patient safety. These alarms alert healthcare professionals to potential issues. Understanding these alarms is vital for providing effective care.
Importance Of Alarms
Ventilator alarms play a crucial role in patient care. They ensure the patient receives adequate ventilation. Alarms alert caregivers to immediate problems. Quick responses can prevent serious complications.
- Safety: Alarms enhance patient safety by signaling issues.
- Efficiency: They help in timely intervention.
- Monitoring: Continuous monitoring ensures proper ventilation.
Common Alarm Types
Ventilators have various alarm types. Each alarm indicates a different issue. Knowing these alarms helps in quick troubleshooting.
| Alarm Type | Description |
|---|---|
| High Pressure | Indicates a blockage or patient cough. |
| Low Pressure | Indicates a disconnect or leak. |
| Apnea | Indicates no breath detected. |
| High Respiratory Rate | Indicates patient is breathing too fast. |
- High Pressure Alarm: Check for blockages or patient coughing.
- Low Pressure Alarm: Check for disconnects or leaks.
- Apnea Alarm: Ensure patient is breathing.
- High Respiratory Rate Alarm: Assess patient condition.
Basic Troubleshooting Steps
Ventilator alarms can be stressful. Knowing basic troubleshooting steps helps you stay calm. This section covers initial assessment and standard checks. Follow these steps to resolve common issues quickly.
Initial Assessment
Begin by checking the patient. Ensure they are stable. Look for signs of distress. Check their breathing pattern and color. Confirm the ventilator settings match the medical order.
Next, listen to the alarm. Different alarms mean different issues. Identify if it’s a high or low-pressure alarm. Note the frequency and type of sound.
Observe the ventilator screen. Look for error messages or indicators. The screen can provide clues about the problem. Write down any codes or messages for reference.
Standard Checks
Perform these standard checks to troubleshoot common issues:
- Check the Circuit: Ensure all connections are secure. Look for kinks or disconnections in the tubing.
- Inspect Filters: Confirm filters are clean and not blocked. Replace if necessary.
- Evaluate Humidifiers: Check the water level and ensure proper function.
- Review Alarms Settings: Verify that alarm settings match the patient’s needs.
If the issue persists, refer to the ventilator’s manual. Manufacturer guidelines offer specific troubleshooting steps. Always follow safety protocols during troubleshooting.
| Issue | Possible Cause | Solution |
|---|---|---|
| High-Pressure Alarm | Tube blockage | Clear the blockage |
| Low-Pressure Alarm | Disconnection | Reconnect the tube |
| Apnea Alarm | No breath detected | Check patient and ventilator |
Pressure Alarms
Ventilator pressure alarms alert healthcare providers to potential issues. These alarms are crucial for patient safety. Understanding their causes can help in quick troubleshooting.
High Pressure Causes
High pressure alarms indicate resistance in the airway. This can be due to several factors:
- Secretions: Mucus blocking the airway.
- Patient Coughing: Increased pressure during a cough.
- Tubing Kinked: Bent tubing obstructing airflow.
- Water in Tubing: Condensation causing blockages.
Check the patient and equipment to identify and resolve the cause.
Low Pressure Solutions
Low pressure alarms suggest a leak or disconnection. Address these common causes:
- Disconnected Tubing: Reconnect any loose tubing.
- Leak in Circuit: Inspect for holes or tears.
- ET Tube Dislodged: Ensure the tube is correctly positioned.
- Cuff Deflation: Inflate the cuff to seal the airway.
Regular checks can prevent low pressure alarms.
| Pressure Alarm Type | Common Causes | Actions |
|---|---|---|
| High Pressure |
|
|
| Low Pressure |
|
|
Volume Alarms
Ventilator alarms play a crucial role in patient safety. Volume alarms are essential in monitoring the patient’s ventilation status. They help detect issues related to the volume of air delivered to the patient. Understanding and troubleshooting these alarms is vital for healthcare providers.
Low Volume Issues
Low volume alarms indicate that the ventilator is delivering less air than required. This could be due to several reasons:
- Leak in the Circuit: Check for disconnections or holes in the tubing.
- Patient Disconnection: Ensure the patient is properly connected to the ventilator.
- Blocked Airway: Look for mucus plugs or other obstructions.
To troubleshoot low volume issues, follow these steps:
- Inspect the ventilator circuit for leaks or disconnections.
- Ensure the patient is connected securely to the ventilator.
- Suction the patient to remove any airway blockages.
High Volume Fixes
High volume alarms alert that the ventilator is delivering more air than needed. This can happen due to:
- Hyperventilation: The patient may be breathing too fast.
- Changes in Lung Compliance: The lungs might have become more compliant.
- Incorrect Ventilator Settings: Settings may need adjustment.
To address high volume alarms, consider these steps:
- Assess the patient for signs of hyperventilation.
- Check and adjust ventilator settings as needed.
- Consult with a respiratory therapist if unsure about adjustments.
Understanding and troubleshooting volume alarms ensures effective ventilation and patient safety. Always address these alarms promptly to maintain optimal care.
Oxygen Alarms
Ventilators are critical in respiratory care. Oxygen alarms play a vital role. They ensure that patients get the right amount of oxygen. Mismanagement can lead to serious health risks. Troubleshooting oxygen alarms is essential for patient safety.
Oxygen Level Alerts
Oxygen level alerts notify caregivers about abnormal oxygen levels. These alarms indicate high or low oxygen levels in the patient’s blood.
A high oxygen level alert means excess oxygen. This can cause oxygen toxicity. A low oxygen level alert indicates insufficient oxygen. This can lead to hypoxia. Both conditions are dangerous.
- High Oxygen Level: Excessive oxygen can damage lungs.
- Low Oxygen Level: Insufficient oxygen can harm organs.
Regularly check the oxygen sensor. Ensure it is clean and properly placed. Replace faulty sensors promptly. Calibrate the ventilator as per the manufacturer’s instructions.
Oxygen Flow Problems
Oxygen flow problems occur when the oxygen supply is disrupted. These issues can trigger alarms and affect patient care.
Common causes include blocked tubes, kinked lines, or empty oxygen tanks. Regular inspection of the oxygen supply system is crucial.
| Problem | Solution |
|---|---|
| Blocked Tubes | Check and clean the tubes. |
| Kinked Lines | Ensure lines are straightened. |
| Empty Oxygen Tank | Replace the oxygen tank. |
Regular maintenance can prevent most oxygen flow problems. Ensure all connections are secure. Monitor the oxygen supply levels frequently.
Apnea Alarms
Apnea alarms are vital for patient safety. They alert when breathing stops. Quick response is crucial to prevent harm.
Detecting Apnea
Ventilators detect apnea by monitoring breathing patterns. If no breaths are detected for a set period, the alarm sounds.
- Time Threshold: Usually set between 15-20 seconds.
- Sensor Accuracy: Ensures reliable detection.
- Patient Monitoring: Continuous observation is essential.
Responding To Apnea Alarms
Responding to apnea alarms quickly can save lives. Follow these steps:
- Check the Patient: Ensure they are breathing.
- Assess the Equipment: Verify ventilator function.
- Reposition the Patient: Adjust their position if needed.
- Consult Healthcare Team: Notify the medical team immediately.
| Step | Action | Purpose |
|---|---|---|
| 1 | Check the Patient | Ensure they are breathing |
| 2 | Assess the Equipment | Verify ventilator function |
| 3 | Reposition the Patient | Adjust their position if needed |
| 4 | Consult Healthcare Team | Notify the medical team immediately |
Technical Malfunctions
Ventilator alarms are essential for patient safety. Technical malfunctions can trigger these alarms. Understanding the causes helps troubleshoot effectively.
Software Glitches
Software glitches can cause ventilator alarms. These issues arise from various sources:
- Outdated Software: Ensure the ventilator runs the latest version.
- Corrupted Files: Files may corrupt during updates. Reinstalling the software may solve this.
- Configuration Errors: Incorrect settings can trigger alarms. Verify all configurations match the required protocols.
Regular software maintenance is crucial. It reduces the risk of glitches and ensures smooth operation.
Hardware Failures
Hardware failures also cause ventilator alarms. These issues can stem from:
- Power Supply Issues: Check if the power source is stable.
- Sensor Malfunctions: Sensors might fail. Inspect and replace faulty sensors.
- Tubing Blockages: Blocked tubes disrupt airflow. Regularly check and clean the tubing.
Routine hardware checks are vital. They help identify and fix problems before they cause alarms.
| Issue | Cause | Solution |
|---|---|---|
| Software Glitch | Outdated Software | Update to the latest version |
| Hardware Failure | Power Supply Issues | Ensure stable power source |
| Hardware Failure | Tubing Blockages | Regularly clean the tubing |
Technical malfunctions are common causes of ventilator alarms. Understanding these issues helps in troubleshooting and maintaining patient safety.
Preventative Maintenance
Proper preventative maintenance is crucial for ventilator alarms. It ensures equipment functions reliably and minimizes downtime. Regular maintenance helps catch potential issues early. This avoids costly repairs and ensures patient safety.
Routine Checks
Routine checks are essential in maintaining ventilators. These checks should be scheduled frequently. Below is a table of key routine checks:
| Check | Frequency |
|---|---|
| Filter Replacement | Monthly |
| Battery Inspection | Weekly |
| Alarm Functionality | Daily |
These routine checks ensure the ventilator operates correctly. They help identify issues before they become serious. Always document each check for reference.
Staff Training
Staff training is vital for effective ventilator maintenance. Proper training ensures that staff can troubleshoot common issues. Here are key areas for staff training:
- Understanding alarm types and meanings
- Basic troubleshooting steps
- Proper cleaning and maintenance procedures
- Emergency response protocols
Regular training sessions keep staff updated on best practices. This ensures ventilators are maintained correctly and efficiently.
When To Call For Help
Ventilator alarms are vital for patient safety. They alert caregivers to potential issues. But sometimes, you need expert help to resolve alarms. Knowing when to call for help can save lives.
Identifying Critical Issues
Some ventilator alarms signal critical problems. These issues need immediate attention from professionals.
- High Pressure Alarm: This alarm indicates blocked airways or obstructions.
- Low Pressure Alarm: This alarm signals disconnections or leaks.
- Apnea Alarm: This alarm warns that the patient has stopped breathing.
If you see these alarms, call for help right away.
Contacting Support
When you decide to call for help, follow these steps:
- Check the patient’s condition and ensure their safety.
- Document the alarm details, including the time and type of alarm.
- Contact your clinical supervisor or technical support team.
Provide them with the documented details for a quicker resolution.
| Alarm Type | Possible Cause | Action Needed |
|---|---|---|
| High Pressure | Blocked Airway | Call for help |
| Low Pressure | Disconnection | Call for help |
| Apnea | Patient not breathing | Call for help |
Always have emergency contacts ready for quick access. Keep a list of technicians and clinical supervisors handy. This ensures swift action during critical moments.
Frequently Asked Questions
What Are The Three Types Of Ventilator Alarms?
The three types of ventilator alarms are pressure alarms, volume alarms, and apnea alarms. Pressure alarms indicate issues with airway pressure. Volume alarms signal problems with tidal volume delivery. Apnea alarms alert when the patient stops breathing.
What Can Cause A High Pressure Alarm On A Ventilator?
High pressure alarms on a ventilator can be caused by airway obstructions, patient coughing, secretions, or tubing kinks. Adjust settings and check for issues.
What Is The Interpretation Of Ventilator Alarms?
Ventilator alarms indicate potential issues with the patient or machine. High-pressure alarms suggest blockages, while low-pressure alarms hint at disconnections.
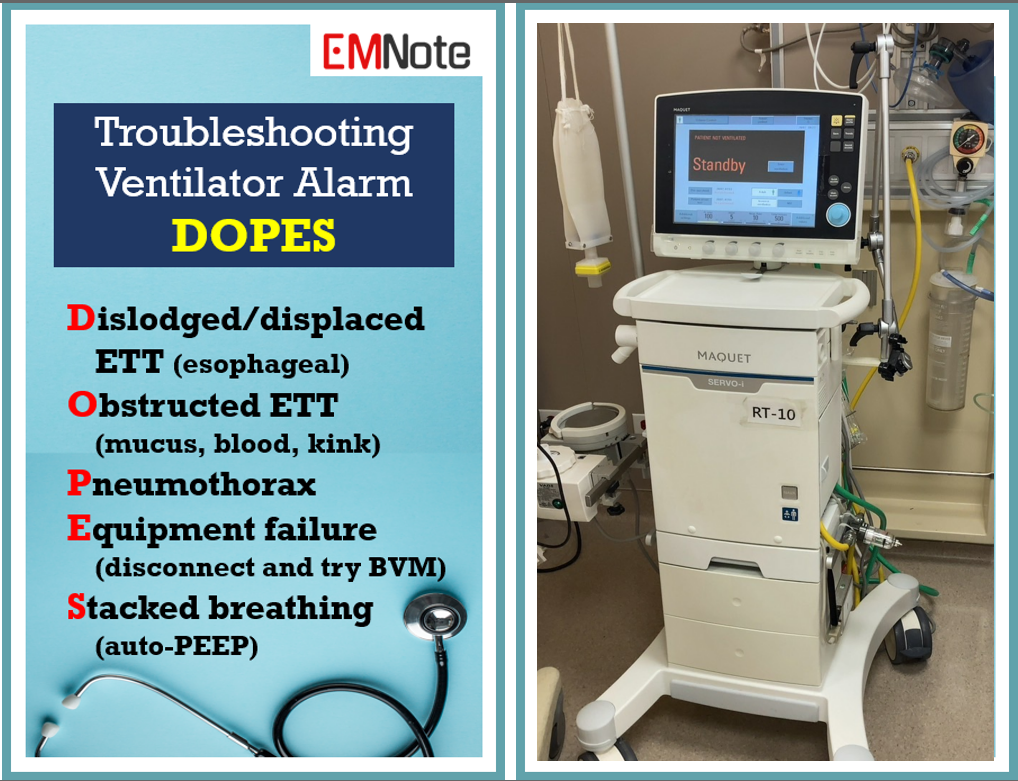
What Is The Mnemonic For Ventilator Troubleshooting?
The mnemonic for ventilator troubleshooting is “DOPES”: Displacement, Obstruction, Pneumothorax, Equipment failure, and Stacked breaths. This helps identify common issues quickly.
What Causes Ventilator Alarm To Go Off?
Ventilator alarms may be triggered by patient disconnection, airway obstruction, or changes in breathing patterns.
Conclusion
Mastering ventilator alarms troubleshooting ensures patient safety and equipment efficiency. Stay updated with best practices and regular training. Understanding alarm causes and solutions boosts confidence and care quality. Keep your skills sharp to handle any situation effectively. Remember, proactive maintenance and swift responses are key to successful ventilator management.
")