Having trouble with your Carrier thermostat? If your thermostat has a blank screen or is not responding, it may be due to a power issue.
Check your electrical box and reset the circuit breaker. If that doesn’t solve the problem, you may need to clean the thermostat or check for dirty sensors. Additionally, make sure the thermostat is programmed correctly and matches the room temperature.
If all else fails, you may need to consider thermostat replacement services. Follow these troubleshooting steps to get your Carrier thermostat working again.
Common Hvac Issues
If you’re experiencing issues with your Carrier thermostat, common problems include a disappearing display, electrical problems, and thermostat switches. Troubleshooting steps involve checking voltage, cleaning the thermostat and disk blade, and cleaning the drain line. For resetting the thermostat, you can select ‘mode’ and then ‘off’, flip the circuit breaker off and then on, and switch the mode to ‘auto’, ‘fan’, ‘cool’, or ‘heat’.
When it comes to HVAC systems, it’s not uncommon to encounter a few issues with the thermostat. In this section, we will discuss some common problems that you might face and how to troubleshoot them.
Thermostat Display Disappearing
If you notice that the display on your Carrier thermostat is disappearing, it could be due to a few different reasons. One possibility is that the batteries need to be replaced. To check this, simply remove the thermostat from the wall and replace the batteries with new ones. If the display comes back, problem solved. Another reason could be a loose wiring connection. In this case, you may need to consult a professional to inspect and fix the wiring.
Electrical Problems
Electrical problems can also cause issues with your Carrier thermostat. One common problem is a blown fuse. To check if this is the issue, locate the fuse box and look for any blown fuses related to the HVAC system. If you find a blown fuse, replace it with a new one of the same type and rating. Additionally, check the circuit breaker panel to ensure the HVAC system is receiving power. If necessary, reset the breaker and see if that solves the problem.
Checking Secondary Drain
Another common issue is a clogged secondary drain. When the secondary drain is clogged, it can cause water to back up and lead to HVAC system problems. To check the secondary drain, locate the drain pipe and inspect it for any clogs or obstructions. If you find any, use a wire brush or a pipe cleaner to remove the blockages. Once the drain is clear, the system should operate as expected.
Changing The Thermostat
If you have tried troubleshooting the thermostat and the issues persist, it may be time to consider changing the thermostat altogether. Before replacing the thermostat, make sure to turn off the power to the HVAC system to avoid any electrical accidents. Remove the old thermostat from the wall and disconnect the wires. Then, install the new thermostat following the manufacturer’s instructions and reconnect the wires. Finally, turn the power back on and test the new thermostat to ensure it is functioning properly.
Checking Voltage
If your HVAC system is not getting enough voltage, it can cause various problems. To check the voltage, you will need a multimeter. Start by turning off the power to the HVAC system and locating the transformer. Use the multimeter to measure the voltage at the transformer. If the voltage is below the specified range, you may need to call a professional electrician to address the issue.
Troubleshooting The Thermostat Switches
If you are experiencing issues with the thermostat switches, such as them not responding or not working properly, you can try troubleshooting them. Start by turning off the power to the system. Then, carefully remove the thermostat cover and inspect the switches for any visible damage or loose connections. If you find any issues, you can try tightening the connections or replacing the switches if necessary. Remember to turn the power back on and test the switches after making any changes.
Cleaning The Thermostat
To ensure that your thermostat is functioning optimally, it is important to keep it clean. Start by turning off the power to the system. Then, use a soft cloth slightly dampened with water or a mild household cleaner to gently clean the thermostat. Avoid using harsh chemicals or abrasive materials that could damage the thermostat. After cleaning, make sure the thermostat is completely dry before turning the power back on.
Cleaning The Disk Blade
If you have a rotary disk blade thermostat, regular cleaning is essential to maintain its accuracy. Start by turning off the power to the system. Carefully remove the thermostat cover and locate the disk blade. Use a soft brush or compressed air to remove any dust or debris that may have accumulated on the disk blade. Make sure to clean both sides of the blade thoroughly. Once the blade is clean, replace the cover and turn the power back on.
Cleaning The Drain Line
Finally, if you are experiencing issues with water not draining properly from your HVAC system, it could be due to a clogged drain line. Start by turning off the power to the system. Locate the drain line and inspect it for any clogs or blockages. If you find any, you can use a wet/dry vacuum or a pipe cleaner to remove the debris. Once the drain line is clear, turn the power back on and check if the water is draining properly.
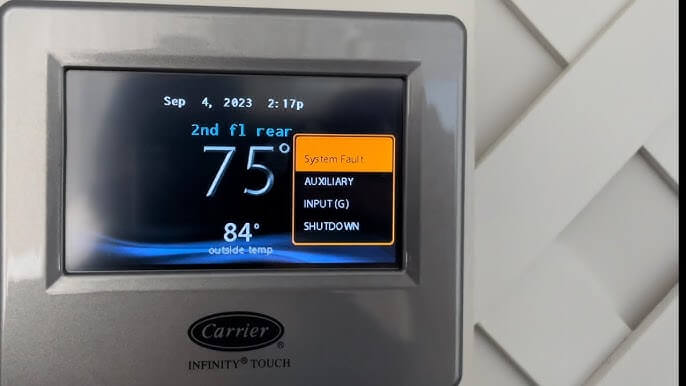
Carrier Unit No Power At Thermostat
If you’re experiencing a Carrier unit with no power at the thermostat, you can troubleshoot the issue by checking for electrical problems, cleaning the thermostat, and testing the voltage. Watch helpful YouTube videos for step-by-step instructions on determining the cause and resolving the problem.
Checking Status Light
If your Carrier thermostat is not receiving power, the first thing you should do is check the status light on the unit. The status light provides valuable information about the power source and any potential issues. Look for any blinking or flashing lights that indicate a problem. A steady light usually means everything is functioning properly, but a blinking light may indicate a power issue.
Testing Control Board
The next step is to test the control board of your Carrier unit. This board is responsible for regulating the power supply to the thermostat. Use a multimeter to check if the control board is receiving the correct voltage. If the voltage is lower or nonexistent, there may be a problem with the control board that needs to be addressed.
Thermostat Inspection
Inspect the thermostat itself for any visible signs of damage or malfunction. Look for loose wires, broken connectors, or any other obvious issues. It’s also important to check the thermostat’s batteries if applicable, as dead batteries can cause a loss of power.
Troubleshooting
If you’ve checked the status light, tested the control board, and inspected the thermostat, but still haven’t found the source of the power issue, it’s time to move on to troubleshooting. Unplug the thermostat from its power source and wait for a few minutes. This can sometimes reset any minor issues that may be affecting the power supply.
Repairing Broken Wire
If all else fails, it’s possible that there is a broken wire somewhere in the system. Inspect the wiring connections and look for any signs of damage or loose connections. If you find a broken or disconnected wire, you may need to repair or replace it to restore power to the thermostat.
Turning The Power Back On
After completing the necessary repairs or troubleshooting steps, it’s time to turn the power back on to the thermostat. Ensure that all connections are secure and properly tightened before restoring power. Flip the circuit breaker back on and check if the thermostat is receiving power.
Testing The Furnace
Once the power is restored to the thermostat, it’s important to test the furnace to ensure it is functioning properly. Set the thermostat to the desired temperature and wait for the furnace to turn on. Pay attention to any unusual noises or malfunctions that may indicate further issues.
Resetting A Carrier Thermostat
If you’re experiencing issues with your Carrier thermostat, resetting it may help resolve the problem. Resetting the thermostat can help restore its functionality and ensure it is working properly. Here are a few methods you can try to reset your Carrier thermostat:
Selecting ‘off’ Mode
To reset a Carrier thermostat, start by selecting the ‘off’ mode. This will shut off the thermostat and allow for a fresh restart. To do this, navigate to the main screen of your thermostat and locate the ‘mode’ button. Press the ‘mode’ button and select ‘off’ from the options. This will turn off the thermostat and prepare it for a reset.
Flipping The Circuit Breaker
Another method to reset a Carrier thermostat is by flipping the circuit breaker. Locate the circuit breaker that powers your thermostat and switch it to the ‘off’ position. Leave it in this position for a few minutes to ensure a complete power cycle. After a few minutes, switch the circuit breaker back on. This action will reset the power supply to the thermostat and may resolve any issues it was experiencing.
Switching The Thermostat Mode
Switching the thermostat mode can also help reset a Carrier thermostat. Once you have turned off the thermostat using the ‘off’ mode, navigate back to the main screen and select a new mode. You can choose between ‘auto’, ‘fan’, ‘cool’, or ‘heat’ mode, depending on your heating and cooling needs. By switching the mode, you are initiating a reset of the thermostat’s settings and allowing it to recalibrate.
Resetting a Carrier thermostat can help troubleshoot common issues such as a thermostat not responding or not matching the room temperature. These simple steps can potentially save you from a service call and get your thermostat back up and running smoothly.
Remember, if you are unsure or uncomfortable performing any of the troubleshooting steps mentioned, it is always best to consult a professional HVAC technician for assistance.
Troubleshooting Tips For Unresponsive Thermostats
When your thermostat stops responding, it can be frustrating and inconvenient. Luckily, there are a few troubleshooting tips you can try before calling a professional. By following these steps, you may be able to get your unresponsive thermostat up and running again.
Checking For Power Issues
One of the first things you should do when troubleshooting an unresponsive thermostat is to check for power issues. A power outage or a tripped circuit breaker could be the culprit behind the unresponsiveness. Start by checking if there is power to your thermostat.
If your thermostat has a display, make sure it is lit up. If it’s not, check the circuit breaker panel to see if any of the breakers are tripped. If you find a tripped breaker, reset it and see if that solves the problem. Additionally, ensure that your thermostat is securely connected to the power source. Sometimes, loose connections can cause the thermostat to appear unresponsive.
Cleaning Sensors
Another common cause of an unresponsive thermostat is dirty sensors. Your thermostat uses temperature sensors to detect the current temperature in your home. Over time, these sensors can gather dust, dirt, and lint, which may affect their accuracy and responsiveness.
To clean the sensors, start by turning off the power to your thermostat. Gently remove the thermostat cover and locate the sensors. You can use a soft cloth or a gentle brush to wipe away any debris from the sensors. Make sure to be cautious and avoid applying too much pressure, as you don’t want to damage the sensors. Once clean, reassemble the thermostat and turn the power back on to see if the issue is resolved.
Replacing Batteries (if Applicable)
Some thermostats rely on batteries to power their operation. If your thermostat has a battery compartment, the unresponsiveness could be a sign of low battery power. In this case, replacing the batteries may solve the problem.
To replace the batteries, start by turning off the power to your thermostat. Locate the battery compartment on the thermostat and open it. Remove the old batteries and replace them with fresh ones, making sure to follow the correct polarity. Close the battery compartment, reassemble the thermostat, and turn the power back on to see if the issue is resolved.
Inspecting Wiring Connections
If your thermostat is still unresponsive, it’s essential to inspect the wiring connections. Loose or damaged wires can disrupt the communication between your thermostat and HVAC system, resulting in unresponsiveness.
To inspect the wiring connections, start by turning off the power to your thermostat. Carefully remove the thermostat cover to expose the wiring behind it. Check each wire connection for any signs of looseness or damage. If you find any issues, tighten the loose connections or replace the damaged wires. Once done, reassemble the thermostat and turn the power back on to see if the problem is resolved.
Resetting The Thermostat
If all else fails, resetting the thermostat may be the solution. Resetting the thermostat will clear any temporary programming or settings that may be causing the unresponsiveness.
To reset the thermostat, start by turning off the power to your thermostat. Locate the reset button, which is usually located on the thermostat’s control panel or inside a small hole. Use a paperclip or a similar tool to press and hold the reset button for a few seconds. Release the reset button and turn the power back on. Your thermostat should now be reset and ready to use.
By following these troubleshooting tips, you may be able to revive your unresponsive thermostat without the need for professional assistance. However, if the issue persists, it’s recommended to contact a qualified HVAC technician to diagnose and resolve the problem.
Frequently Asked Questions
How Do I Reset My Carrier Thermostat?
To reset your Carrier thermostat, follow these steps:1. Select ‘mode’ from the main screen. 2. Select ‘off’. 3. Flip the circuit breaker that powers your thermostat to the ‘off’ position. 4. Flip the circuit breaker back on. 5. Switch the thermostat mode from ‘off’ to ‘auto’, ‘fan’, ‘cool’, or ‘heat’.
How Do I Know If My Carrier Thermostat Is Bad?
To determine if your carrier thermostat is bad, look out for these signs:
1. No power to the thermostat. 2. AC or furnace doesn’t turn on. 3. Heater or AC won’t turn off. 4. Temperature on the thermostat doesn’t match the room. 5. Unresponsiveness of the thermostat. 6. Short cycling. 7. Forgetting programmed settings. In such cases, consider thermostat replacement services.
What Is A Common Problem With Thermostat?
A common problem with a thermostat is dirty sensors. Dust, dirt, and lint can accumulate in the thermostat housing and block the sensors. To fix this, remove the cover and clean the parts inside using a soft-bristled brush.
How Do I Fix An Unresponsive Thermostat?
To fix an unresponsive thermostat, follow these steps: 1. Check if the thermostat has power. 2. Reset the circuit breaker that powers the thermostat. 3. Clean the thermostat sensors to remove any dirt or dust. 4. Check if the thermostat matches the room temperature. 5. If the problem persists, consider replacing the thermostat.
How Do I Reset My Carrier Thermostat?
To reset a Carrier thermostat, select ‘mode’ from the main screen, then select ‘off’. Flip the circuit breaker that powers your thermostat to the ‘off’ position, and then flip it back on. Switch the thermostat mode from ‘off’ to ‘auto’, ‘fan’, ‘cool’, or ‘heat’.
Conclusion
If you’re facing issues with your Carrier thermostat, don’t worry! We’ve provided a comprehensive guide on troubleshooting common problems. From a blank screen to an unresponsive thermostat, we’ve covered it all. Simply follow the steps mentioned in our blog post to resolve these issues.
Remember, cleaning the thermostat and checking voltage are important steps in the troubleshooting process. By following our tips, you can get your thermostat up and running in no time.
")


How can I check battery strength in the carrier TC-PAC01-A thermostat?
To check the battery strength in the Carrier TC-PAC01-A thermostat, follow these steps:
Access the Thermostat Menu: Press the “Menu” button on your thermostat to access the main menu.
Navigate to Settings: Use the arrow buttons to scroll to the “Settings” option and press “Select.”
Select Battery Status: Scroll through the settings until you find the “Battery Status” option and select it.
Check Battery Level: The screen should display the current battery level. If the battery is low, you may need to replace it to ensure your thermostat functions properly.
If you can’t find the “Battery Status” option or if your model has different steps, refer to the user manual or Carrier’s customer support for specific instructions.
I have a carrier thermostat that is always on, even when the mode is set to ‘off.’ When I unplug the thermostat box from the wall, the heater turns off. When I plug it back in, the heater turns on, even when the thermostat box mode is set to ‘off.’ What should I do?
Thank you for reaching out! It sounds like your Carrier thermostat may have a wiring issue or a stuck relay causing the system to stay on even when it’s set to ‘off.’ Here are a few steps you can take to troubleshoot:
I hope this helps! Let me know if you have any updates or need further assistance.
– TroubleshootingLAB