To reset a Daikin One+ smart thermostat, open Settings, tap the menu at the top right, select “Settings,” navigate to System Settings, choose the desired configuration, select System Components, then Thermostat, and finally, select “Restart Thermostat.” Other troubleshooting steps for the Daikin One+ thermostat include checking the power supply, resetting the breaker switch if necessary, and ensuring proper installation and servicing of the equipment. Additionally, there are resources available for professionals on the Daikin One website.
1. Understanding Daikin One+ Thermostat Troubleshooting Basics
When it comes to the functionality of your Daikin One+ thermostat, understanding the basics of troubleshooting is essential. This advanced thermostat provides a range of features and controls, ensuring optimal comfort in your home or office. However, like any electronic device, it may encounter issues that require troubleshooting. By familiarizing yourself with the Daikin One+ thermostat interface, identifying common thermostat issues, and understanding the importance of troubleshooting for proper functionality, you can ensure that your thermostat operates smoothly and efficiently.
Familiarize Yourself With The Daikin One+ Thermostat Interface
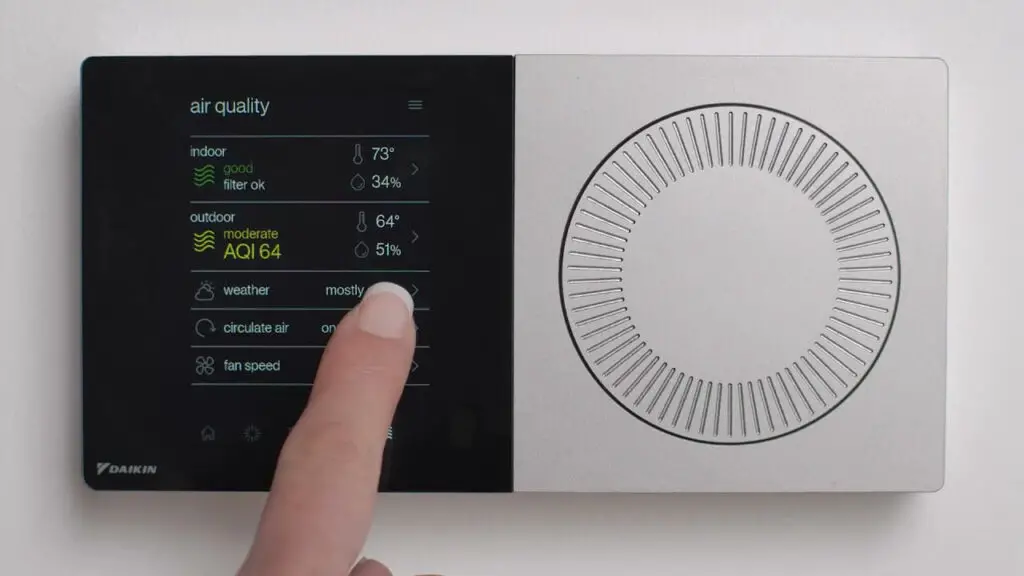
Familiarizing yourself with the Daikin One+ thermostat interface is the first step in troubleshooting any issues. This smart thermostat is designed with a user-friendly interface, making it easy to navigate and adjust settings. The main screen displays important information like temperature, humidity levels, and system status. By understanding how to access different functions and make adjustments, you’ll be better prepared to troubleshoot any potential issues that may arise.
Identify Common Thermostat Issues
Identifying common thermostat issues is crucial for effective troubleshooting. Some of the common issues that you may encounter with the Daikin One+ thermostat include:
- Temperature discrepancies between the thermostat and the actual room temperature
- Inaccurate humidity readings
- Connection problems with the Wi-Fi network
- The system not responding to commands
- Malfunctioning sensors
By being aware of these common issues, you can quickly troubleshoot and resolve any problems that may affect the performance of your thermostat.
Importance Of Troubleshooting For Proper Functionality
Troubleshooting is essential to ensure the proper functionality of your Daikin One+ thermostat. By addressing any issues promptly, you can avoid discomfort or inconvenience caused by temperature variations, inaccurate readings, or connectivity problems. Troubleshooting also helps to extend the lifespan of your thermostat by preventing further damage or wear and tear. Regular troubleshooting can detect and resolve issues before they become more severe, minimizing the need for expensive repairs or replacements.
To troubleshoot your Daikin One+ thermostat effectively, refer to the manufacturer’s manual or online resources for specific instructions. If the issue persists or you are unsure about troubleshooting on your own, it is always recommended to consult a professional HVAC technician for assistance.
2. Resetting Your Daikin One+ Smart Thermostat
If you’re experiencing issues with your Daikin One+ smart thermostat, resetting it can often help resolve the problem. Resetting the thermostat will allow you to start fresh and clear any errors or glitches that may be affecting its performance. Follow these steps to reset your Daikin One+ thermostat:
Accessing The Settings Menu
To reset your Daikin One+ thermostat, you’ll first need to access the settings menu. Locate the menu button, which is typically located at the top right corner of the thermostat’s screen. Tap on the menu button to open the settings menu.
Navigating To System Settings
Once you’re in the settings menu, navigate to the system settings option. This is where you’ll find the different configurations available for your thermostat. Look for the system settings option and tap on it to proceed.
Choosing The Desired Configuration
In the system settings menu, you’ll find various configurations for different components of your Daikin One+ thermostat. For the purpose of resetting the thermostat, select the “Thermostat” configuration under the “System Components” option. This will bring up the settings specific to the thermostat itself.
Restarting The Thermostat
Finally, to complete the reset process, select the “Restart Thermostat” option. This will initiate the restart process, clearing any temporary memory and restoring the thermostat to its default settings. Allow the thermostat a few moments to restart and initialize.
By following these steps, you can easily reset your Daikin One+ smart thermostat, potentially resolving any issues or glitches that may have been affecting its performance. Remember, resetting your thermostat is a simple troubleshooting step that can be done easily at home.
3. Calibrating Your Daikin One+ Thermostat
The calibration of your Daikin One+ thermostat is a crucial step to ensure accurate temperature readings and optimal performance. By calibrating the thermostat, you can fine-tune its settings and make adjustments to improve its accuracy. In this section, we will discuss the importance of thermostat calibration, provide a step-by-step guide to calibrating your Daikin One+ thermostat, and explain how calibrating your thermostat can help optimize its performance.
Importance Of Thermostat Calibration
Calibrating your thermostat is essential to maintaining a comfortable and energy-efficient indoor environment. A properly calibrated thermostat ensures that the temperature readings displayed on the thermostat match the actual temperature in your home. This accuracy is crucial for effective heating and cooling, as it allows the thermostat to accurately control your HVAC system. Calibrating your thermostat also helps prevent temperature swings and ensures that your system operates efficiently, reducing energy waste and potentially lowering utility bills.
Step-by-step Guide To Calibrating The Thermostat
- Start by accessing the menu settings on your Daikin One+ thermostat. You can do this by tapping the menu button located at the top right of the thermostat screen.
- In the menu settings, navigate to the System Settings option and select it.
- Within the System Settings, choose the thermostat configuration.
- Look for the option to calibrate the thermostat and select it.
- Follow the on-screen instructions to perform the calibration process. This may involve adjusting the temperature reading by a certain value.
- Once the calibration is complete, check the temperature readings on the thermostat to ensure they match the actual room temperature.
Ensuring Accurate Temperature Readings
After calibrating your Daikin One+ thermostat, it’s important to verify the accuracy of the temperature readings. You can do this by comparing the thermostat readings with those of a separate thermometer placed in the same room. If there is a discrepancy, it may indicate a need for further calibration or adjustment.
Optimizing Thermostat Performance
Calibrating your Daikin One+ thermostat not only ensures accurate temperature readings but also optimizes its overall performance. With precise calibration, the thermostat can better control your HVAC system, resulting in better comfort and energy efficiency. By fine-tuning the thermostat’s settings, you can make adjustments that will maximize the effectiveness of your heating and cooling system, ultimately providing a comfortable environment and reducing energy consumption.
4. Troubleshooting Power Supply Issues
When it comes to troubleshooting power supply issues with your Daikin One+ thermostat, there are a few key steps you can take to identify and resolve the problem. By checking for tripped circuit breakers, resetting the breaker switch, and identifying any electrical panel issues, you can ensure that your thermostat has a steady power supply for optimal performance.
Checking For Tripped Circuit Breakers
One common power supply issue is a tripped circuit breaker. To check for this, follow these steps:
- Locate your electrical panel. This is usually found in the basement, utility room, or garage.
- Open the panel door and look for the breaker labeled for your thermostat.
- If the breaker is in the “off” position, switch it to the “on” position.
Resetting The Breaker Switch
If your circuit breaker is not tripped but your thermostat is not receiving power, you can try resetting the breaker switch. Here’s how:
- Locate the breaker labeled for your thermostat in the electrical panel.
- Switch the breaker to the “off” position.
- Wait for a few seconds, then switch the breaker back to the “on” position.
Identifying And Resolving Electrical Panel Issues
If checking and resetting the breaker switch does not restore power to your thermostat, there may be underlying electrical panel issues. In this case, it is recommended to contact a qualified electrician to assess and resolve the problem.
Restoring Power To The Thermostat
Once you have resolved any power supply issues, it’s important to ensure that power is restored to your Daikin One+ thermostat. Check the display panel to confirm that it is receiving power and functioning properly.
By following these troubleshooting steps, you can address power supply issues with your Daikin One+ thermostat and ensure that it is working efficiently to keep your home comfortable.
5. Professional Resources For Daikin One+ Thermostat Troubleshooting
Accessing Professional Resources And Support
If you’re experiencing issues with your Daikin One+ thermostat and need professional assistance, there are various resources available to help you tackle the problem. Daikin offers excellent support through its website, where you can find a dedicated section for professionals. By accessing these resources, you can get valuable troubleshooting tips, repair advice, and guidance to resolve any technical difficulties you may be facing.
Warranty Information And Service Options
Daikin provides warranty coverage for their One+ thermostat, offering peace of mind for customers. To ensure you understand your warranty coverage and explore available service options, check Daikin’s official website for detailed information. Knowing the terms and conditions of your warranty will help you determine the best course of action for troubleshooting and resolving any issues you encounter.
Troubleshooting Assistance Specific To Your Device
Every device is unique, and troubleshooting methods can vary based on specific models and configurations. Daikin recognizes this and provides device-specific troubleshooting assistance through their professional resources. By leveraging these resources, you can access detailed guides, manuals, and step-by-step instructions tailored to your Daikin One+ thermostat. Following these instructions will enable you to address common issues and resolve them efficiently.
Importance Of Professional Installation And Repair
Professional installation and repair play a crucial role in the performance and reliability of your Daikin One+ thermostat. Improper installation or servicing can lead to recurring issues and may even void your warranty. To ensure your thermostat functions optimally and remains covered by the warranty, it’s essential to rely on certified technicians for installation and repairs. This guarantees that your thermostat is set up correctly and any issues are addressed professionally, giving you peace of mind and efficient operation.
Conclusion
When it comes to troubleshooting the Daikin One+ thermostat, accessing professional resources is key to resolving technical difficulties effectively. By leveraging the support available and understanding warranty terms, you can ensure your thermostat operates optimally and enjoy a comfortable environment in your home or office.
Frequently Asked Questions
How Do You Reset A Daikin One+ Smart Thermostat?
To reset a Daikin One+ smart thermostat, go to Settings and tap the menu at the top right. Select “Settings” and navigate to System Settings. Choose the desired configuration, such as system components and thermostat. Finally, select “Restart Thermostat. “
How Do I Calibrate My Daikin One Touch Thermostat?
To calibrate your Daikin one-touch thermostat, go to Settings and select “Menu. ” Then, navigate to System Settings, choose the desired configuration, and select “Thermostat” under System Components. Finally, choose “Restart Thermostat” to complete the calibration.
How Do I Use My Daikin One Smart Thermostat?
To use your Daikin One Smart Thermostat, open Settings and tap the menu at the top right. Select “Settings” and navigate to System Settings. Choose the configuration you want, like system components and thermostats. Finally, select “Restart Thermostat. “
Why Am I Not Getting Power To My Thermostat?
If you’re not getting power to your thermostat, check the power supply. Look for a tripped circuit breaker in your electrical panel and reset it if necessary. This is usually the main issue causing a lack of power to the thermostat.
How Do I Reset My Daikin One+ thermostat?
To reset your Daikin One+ Thermostat, open the Settings menu, navigate to System Settings, select Thermostat, and tap on “Restart Thermostat. “
Conclusion
If you’re experiencing issues with your Daikin One+ thermostat, troubleshooting can help you quickly identify and resolve the problem. By following the step-by-step instructions for resetting the thermostat and checking the power supply, you can ensure that your thermostat is functioning properly.
Additionally, accessing professional resources and online videos can provide valuable insights and assistance. Remember to properly install and calibrate your thermostat to prevent any inaccuracies. With these troubleshooting tips, you can optimize the performance of your Daikin One+ thermostat.
")


Not helpful if the display is lit but there are not words or stmbolz
If the display on your Daikin One+ thermostat is lit but not showing any text or symbols, try these steps:
Reset the thermostat by turning it off and back on.
Check the wiring connections to ensure they’re secure.
Power cycle the unit by turning off the power at the breaker for 30 seconds, then turning it back on.
If the display remains blank, contact Daikin support for further assistance.