To troubleshoot a Genie Model 7055 garage door opener, check for any obstructions or loose wires in the path between the sensors. Also, ensure that the sensors and motor head are clean and properly connected. If the opener is still not working, it may be due to a dying motor. Adjust the limits of the door opener if it stops before fully opening. Verify that the opener is receiving power, and listen for any unusual motor sounds. If the problem persists, consult the Genie support website or contact the manufacturer for further assistance.
Common Garage Door Opener Problems
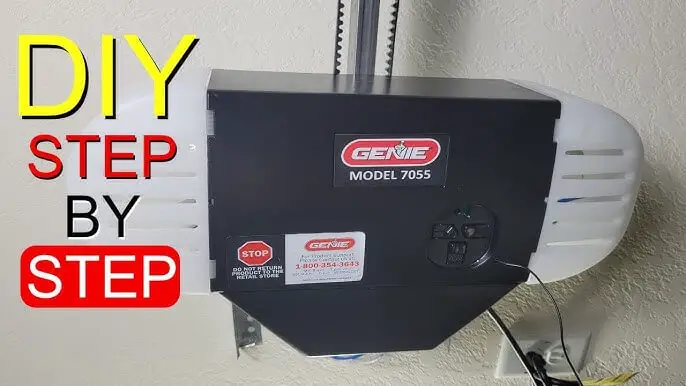
Having trouble with your Genie Model 7055 garage door opener? Don’t worry, we’ve got you covered. In this section, we will discuss some of the most common garage door opener problems and how to troubleshoot them. Let’s dive right in!
Garage Door Only Moves A Short Distance Before Reversing
If your garage door only moves a short distance before reversing, it can be frustrating. Thankfully, this issue can be easily resolved by adjusting the opener’s limit settings. Here’s what you need to do:
- Locate the limit adjustment screws on the opener. These are usually found on the side or back of the unit.
- Using a screwdriver, turn the limit adjustment screws clockwise to increase the travel distance of the door. Start with small increments, testing the door’s movement after each adjustment.
- Continue adjusting the screws until the door opens and closes smoothly, without reversing prematurely.
Remote Control Not Working
If your remote control is not working, there are a few possible causes. Here’s what you can do to troubleshoot the issue:
- Check the batteries on the remote control. Replace them if necessary.
- Make sure that the remote control is within range of the opener. Stand closer to the garage door and try again.
- If the remote control still doesn’t work, it may need to be reprogrammed. Consult your Genie Model 7055 manual for instructions on how to do this.
Keypad Not Working
If your keypad is not working, follow these steps to troubleshoot the problem:
- Check the batteries in the keypad and replace them if needed.
- Reset the keypad by pressing and holding the “Program” button for 10 seconds until the LED light turns off.
- Reprogram the keypad by following the instructions in your Genie Model 7055 manual.
Blinking Lights On The Opener
If you notice blinking lights on your Genie Model 7055 opener, it indicates a possible malfunction. Here’s what you can do to address the issue:
- Check for any obstructions in the path of the door. Remove any objects that may be blocking the sensors.
- Ensure that the lenses of the sensors are clean and free from dirt or debris.
- Inspect the wires connecting the sensors and motor head for any signs of damage or looseness. Tighten or replace them as needed.
Garage Door Not Closing Or Opening Fully
If your garage door is not closing or opening fully, it may be a problem with the opener’s limit settings. Here’s how you can troubleshoot this issue:
- Check if the limit settings are properly set. Adjust them as needed to ensure the door travels the full distance without stopping prematurely.
- Inspect the tracks and rollers of the garage door for any obstructions or damage. Clean or repair them as necessary.
- If the issue persists, it’s recommended to contact a professional technician to diagnose and fix the problem.
By following these troubleshooting tips, you should be able to resolve common garage door opener problems with your Genie Model 7055. If the issues persist or you need further assistance, don’t hesitate to reach out to Genie’s customer support. Happy troubleshooting!
Troubleshooting Steps
To ensure your Genie Model 7055 garage door opener is working correctly, you may need to perform a few troubleshooting steps. These steps can help identify and fix common issues with the opener. Follow the steps below to troubleshoot the problem effectively:
Check For Any Obstructions In The Garage Door’s Path
When your Genie garage door opener stops working, the first thing to check is whether there are any obstructions in the garage door’s path. These obstructions can prevent the door from closing properly or cause it to reverse after only moving a few inches. Clear any debris or objects that may be blocking the door’s path, allowing it to close smoothly.
Clean The Sensor Lenses And Ensure There Are No Loose Wires
Dirty sensor lenses or loose wires can cause issues with your Genie garage door opener. To fix this problem, clean the sensor lenses using a soft cloth and ensure there are no loose wires at the sensors or motor head. This simple step can often resolve sensor-related issues and ensure the smooth operation of your garage door opener.
Replace Batteries In The Remote Control
If the remote control for your Genie garage door opener is not working, try replacing the batteries. Weak or dead batteries can cause the remote control to malfunction, preventing it from activating the opener. Replace the batteries with fresh ones and test the remote control to see if it resolves the problem.
Reset The Garage Door Opener
If none of the above steps solve the problem, resetting the garage door opener may be the solution. To reset the opener, locate the reset button on the motor head and hold it down for a few seconds until the lights on the opener turn off and then back on. This will reset the opener’s programming and can often resolve various issues.
Check The Motor For Overheating Or Signs Of Damage
If your Genie Model 7055 garage door opener still isn’t working correctly, check the motor for any signs of overheating or damage. Overheating motors can cause the opener to malfunction and require replacement. Additionally, inspect the motor for any visible damage, such as loose wires or worn-out components. If any issues are found, consult a professional for further assistance.
By following these troubleshooting steps, you can resolve common issues with your Genie Model 7055 garage door opener and ensure smooth operation. Remember to always prioritize safety when working with your garage door opener and consult a professional if you are unsure about any repairs or replacements.
Understanding Blinking Light Codes
If you are experiencing issues with your Genie Model 7055 garage door opener, understanding the blinking light codes can provide valuable troubleshooting information. The blinking light patterns can indicate the root cause of the problem, helping you identify and address any issues efficiently.
Meaning Of Different Flashing Light Patterns
When troubleshooting your Genie Model 7055 garage door opener, the blinking light codes can convey various meanings. Here’s a breakdown of the different flashing light patterns:
| Blinking Light Pattern | Meaning |
|---|---|
| 1 Blink | Controller or motor fault: This code indicates a problem with the controller or motor of your garage door opener. It could be due to a faulty component or a wiring issue. |
| 2 Blinks | Limit switch error: This code suggests that there is an error with the limit switches. It could be a misalignment or a malfunctioning switch. |
| 3 Blinks | Obstruction detected: If you see three blinks, it means that the safety sensors have detected an obstruction in the path of the garage door. Check for any objects blocking the sensors or interfering with their operation. |
| 4 Blinks | Emergency release activated: This code indicates that the emergency release handle has been pulled, disengaging the opener from the garage door. Make sure the handle is fully pushed back into the engaged position. |
How To Interpret The Blinking Codes To Identify The Problem
Interpreting the blinking codes is crucial in identifying the problem with your Genie Model 7055 garage door opener. Here’s how you can decode the blinking codes:
- Count the number of blinks: Observe the blinking pattern and count the number of blinks. This will help you determine the category of the problem.
- Refer to the blinking code table: Match the number of blinks with the respective meaning in the blinking light pattern table provided above. This will give you a clear idea of what might be causing the issue.
Troubleshooting Steps Based On The Blinking Codes
Once you have identified the problem using the blinking codes, follow these troubleshooting steps to address the issue:
Controller or motor fault (1 Blink)
- Check the wiring connections between the controller and motor. Ensure all connections are secure and properly seated.
- If the wiring appears to be intact, consider contacting Genie customer support for further assistance. It may be necessary to replace a faulty component.
Limit switch error (2 Blinks)
- Inspect the position and alignment of the limit switches. Make any necessary adjustments to ensure they are properly set.
- If the switches are aligned correctly but the problem persists, it is advisable to seek professional help to diagnose and fix the issue.
Obstruction detected (3 Blinks)
- Remove any objects or debris that may be obstructing the path of the safety sensors.
- Inspect the safety sensor wiring for any damage or loose connections. Repair or replace as needed.
- Reset the safety sensors by unplugging the opener and plugging it back in.
Emergency release activated (4 Blinks)
- Locate the emergency release handle on the garage door opener and ensure it is fully pushed back into the engaged position.
- If the handle is already in the engaged position but the blinking continues, try disengaging and re-engaging the handle to ensure it is properly engaged.
By following these troubleshooting steps based on the blinking codes, you can effectively diagnose and resolve issues with your Genie Model 7055 garage door opener. Remember to refer to your product manual or consult Genie customer support for additional guidance if needed.
Resetting And Reprogramming The Garage Door Opener
Is your Genie Model 7055 garage door opener not functioning properly? Don’t worry, we’ve got you covered. In this guide, we will walk you through the process of resetting and reprogramming your garage door opener to get it back up and running smoothly. Follow the step-by-step instructions below to troubleshoot and resolve any issues you may be experiencing.
Step-by-step Guide To Resetting The Opener
If your Genie Model 7055 garage door opener is not responding or acting erratically, resetting it can often resolve the issue. Follow these simple steps:
- Locate the “Learn” button on the motor unit of your garage door opener.
- Press and hold the “Learn” button for approximately 10 seconds until the indicator light next to the button turns off.
- Release the “Learn” button.
- Your garage door opener has now been successfully reset.
Programming The Remote Control And Keypad
Once you have reset your Genie Model 7055 garage door opener, you will need to reprogram your remote control and keypad. Follow these instructions:
- Press and release the “Learn” button on the motor unit of your garage door opener.
- Within 30 seconds, press and hold the button on your remote control that you want to program.
- Release the button on your remote control when the indicator light on the motor unit blinks once.
- Repeat this process for each remote control and keypad you wish to program.
Tips For Successful Reprogramming
To ensure the successful reprogramming of your Genie Model 7055 garage door opener, keep the following tips in mind:
- Make sure you are within range of the motor unit when programming your remote control and keypad.
- Check the batteries in your remote control and keypad to ensure they are fully charged.
- Clear any obstructions that may be blocking the signal between the motor unit and the remote control/keypad.
- Refer to the Genie Model 7055 Troubleshooting Manual for more detailed instructions specific to your opener.
By following these troubleshooting steps and reprogramming your Genie Model 7055 garage door opener, you’ll be back to enjoying the convenience of a fully functional opener in no time.
Contacting Genie Support And Professional Services
When To Reach Out For Professional Assistance
If you’ve tried troubleshooting your Genie Model 7055 garage door opener but are still encountering issues, it may be time to seek professional assistance. While there are many common problems that can be resolved through DIY efforts, certain situations may require the expertise of Genie support and professional services. It’s important to recognize the signs that indicate professional intervention is necessary.
- If you’ve followed the troubleshooting steps outlined in the Genie Model 7055 manual, but the problem persists.
- If you’re unsure about the cause of the issue or lack the technical knowledge to identify and resolve the problem.
- If you suspect that the problem may be due to faulty components or wiring that requires specialized equipment or expertise to diagnose and fix.
- If attempting any further troubleshooting may pose a risk to your safety or the proper functioning of the garage door opener.
How To Contact Genie Customer Support
If you’ve determined that you need assistance from Genie customer support, contacting them is a straightforward process. Here are a few steps to follow:
- Visit the official Genie website at www.geniecompany.com and navigate to the “Support” section.
- Look for the “Contact Us” or “Customer Support” page.
- You’ll find a variety of contact options, including phone numbers and email addresses, depending on your region.
- Choose the contact method that is most convenient for you.
- Be prepared to provide specific details about your Genie Model 7055 troubleshooting efforts and the issue you are facing. This will help the customer support team understand your situation better and provide more accurate recommendations or solutions.
Finding Authorized Service Providers In Your Area
If the Genie customer support team determines that your issue requires the assistance of a professional technician, they may recommend contacting an authorized service provider in your area. Here’s how to find one:
- Visit the official Genie website at www.geniecompany.com.
- Navigate to the “Support” section and look for the “Find a Service Provider” or similar option.
- Enter your location details, such as your ZIP code or city, to search for authorized service providers in your area.
- The website will provide you with a list of authorized service providers, along with their contact information and customer reviews where available.
- Choose a service provider that suits your needs and contact them to schedule a service appointment.
Frequently Asked Questions
How Do I Reset My Genie 7055?
To reset your Genie 7055 garage door opener, follow these steps: 1. Ensure the garage door is fully closed. 2. Locate the “Learn” button on the opener motor head. 3. Press and hold the “Learn” button for about 10 seconds until the indicator light goes off. 4. Release the button, and the opener is now reset. If you’re still experiencing issues, refer to the Genie garage door opener troubleshooting guides for further assistance.
What Would Cause A Genie Garage Door Opener To Stop Working?
Common causes for a Genie garage door opener to stop working are blocked sensors, dirty eyes, loose wires, or faulty sensors. Transmitters (remotes) will not close the door and it will only move a short distance before reversing. It could also be due to low voltage or a dying motor.
What Does A Flashing Red Light Mean On A Genie Garage Door Opener?
A flashing red light on a Genie garage door opener indicates a malfunction. Clean the lenses and check for any obstructions or loose wires.
Why Is My Garage Door Opener Malfunctioning?
A malfunctioning garage door opener is typically caused by a blocked path between the sensors, dirty eyes, loose wires, or faulty sensors. Check the batteries, ensure you are close to the garage, and clear the antenna’s path. If the issue persists, it may be due to a dying motor. Consider replacing your motor if it is old or overheating.
Why Is My Genie Garage Door Opener Stops Working Suddenly?
There can be multiple reasons for your Genie garage door opener to stop working suddenly. It could be due to a blocked path between the sensors, dirty eyes, loose wires at the sensors or motor head, or malfunctioning sensors.
Conclusion
To troubleshoot your Genie Model 7055 opener, start by checking for any obstructions or loose wires that may be causing a malfunction. Clean the lenses of the sensors and ensure that they are properly aligned. If the opener still isn’t working, try resetting the opener or checking the batteries in the remotes.
Remember, a red flashing Safe-T-Beam LED indicator indicates a malfunction. By following these simple troubleshooting steps, you can get your Genie Model 7055 opener back in working order in no time.
")


How to tighten the belt on a 7055?
To tighten the belt on a Brother 7055, follow these steps carefully:
Power Off the Printer: Before beginning any maintenance, ensure the printer is turned off and unplugged to avoid any electrical hazards.
Accessing the Belt: Open the printer’s casing carefully to access the belt mechanism. This usually involves removing screws or clips, depending on the printer model.
Inspect the Belt: Check the condition of the belt for any signs of wear or damage. A worn-out belt may need replacement instead of just tightening.
Adjustment Mechanism: Identify the tension adjustment mechanism near the belt. This could be a tension screw or a lever depending on the printer’s design.
Tightening the Belt: Use a screwdriver or the appropriate tool to tighten the tension adjustment mechanism. Make small adjustments and check the tension frequently until it feels appropriately tight.
Testing: After tightening, manually move the print head or any moving parts controlled by the belt to ensure smooth operation without excessive resistance.
Securing: Once satisfied with the tension, securely fasten any screws or clips that were removed to access the belt.
Power On and Test: Plug in the printer, power it on, and perform a test print to ensure the belt tension adjustment did not affect print quality negatively.
Maintenance Schedule: Consider adding belt tension checks to your printer’s regular maintenance schedule to prolong the life of the belt and maintain optimal print quality.
If you encounter any difficulties or are unsure about any step, refer to the printer’s manual for specific instructions or consult a professional technician for assistance.
Two months ago my exterior keypad stopped working. Changed the batteries and still did not work. Ordered a new keypad and programmed it per instruction and it still doesn’t work
In the mean time i noticed my car remotes were only working intermittently, changed batteries on remotes and no help. ordered 2 new remotes and programmed them. When I finished programming them the door opened. Just left to go to the store and it wouldn’t work. I pulled out into the street and tried again and it worked. Same issue when I got home. It worked when I pulled into the drive but then wouldn’t work to close the door. I pushed the button a few more times and it finally closed. I am lost and don’t know what to do next. HELP-HELP
Since you’ve already changed the batteries and even replaced the remotes and keypad, the problem might be related to interference or a wiring issue. Here’s what you can try next:
Give these steps a try and let me know if you notice any improvements. Hope this helps!
Best,
TroubleshootingLAB