Goodman Control Board Troubleshooting: Master the Power to Fix Any Issue
To troubleshoot a Goodman control board, check for loose connections and reset the board if necessary. Ensure proper power supply is reaching the board for efficient functioning.
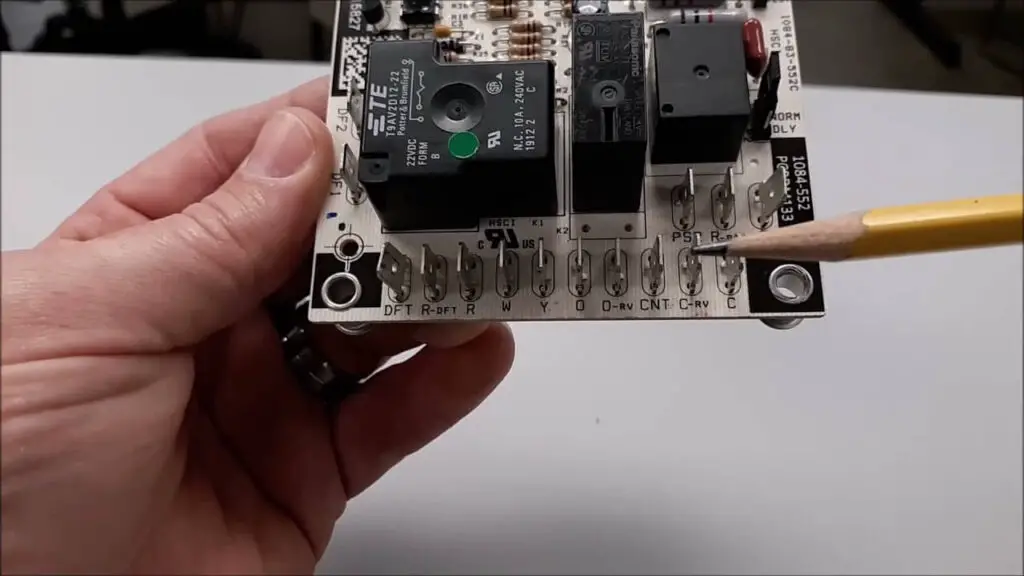
Goodman control boards are crucial components in HVAC systems, responsible for regulating and coordinating various functions. When experiencing issues, understanding common troubleshooting steps can help identify and resolve the problem promptly. By following a systematic approach and conducting thorough checks, you can effectively diagnose and fix control board issues.
In this guide, we will explore key troubleshooting tips to help you address any problems with your Goodman control board efficiently and effectively.

Common Goodman Control Board Issues
Faulty Capacitors
A common issue with Goodman control boards is faulty capacitors, which can cause the system to malfunction.
Wiring Problems
Wiring problems are another common issue that can affect the Goodman control board, leading to connectivity issues.
Defective Relays
Issues with defective relays can also arise, impacting the proper functioning of the control board.
Tools Needed For Troubleshooting
When troubleshooting a Goodman Control Board, having the right tools at hand is essential for accurate diagnosis and repair.
Multimeter
- A multimeter is crucial for measuring voltage, current, and resistance levels on the control board.
- Ensure it is set to the correct range before testing to avoid incorrect readings.
Screwdriver Set
- A set of screwdrivers with various sizes and types will help in accessing the control board securely.
- Always use the right screwdriver that fits the screws to prevent damage.
Insulation Displacement Connector Tool
- This tool is used to help make proper connections without damaging the control board or wiring.
- Ensure it is of good quality to avoid creating additional issues during troubleshooting.
Diagnostic Steps And Procedures
When troubleshooting Goodman control board issues, it’s essential to follow a systematic approach to identify and address any problems. The diagnostic steps and procedures outlined below will help you effectively troubleshoot the control board, ensuring a swift and accurate resolution to any issues that may arise.
Power Off And Safety Precautions
Before starting any diagnostic procedures, ensure that the power to the HVAC system is turned off to prevent any electrical hazards. It is crucial to follow all safety precautions to avoid any potential injuries or damages.
Visual Inspection Of Control Board
Begin the diagnostic process by conducting a thorough visual inspection of the control board. Check for any visible damage, loose connections, or burnt components. Look for any signs of discoloration or corrosion, as these can indicate potential issues with the control board.
Testing Capacitors And Relays
After the visual inspection, proceed to test the capacitors and relays on the control board. Use a multimeter to measure the capacitance of the capacitors and test the continuity of the relays. Look for any discrepancies in the readings, as this can indicate faulty components that may need to be replaced.
Interpreting Error Codes
When it comes to troubleshooting issues with your Goodman control board, one of the most helpful tools is understanding the error codes it displays. These codes provide valuable information about the specific problems your system is experiencing, making it easier to identify and resolve issues quickly. In this section, we will guide you through the process of deciphering the LED flash codes and understanding the error code patterns.
Deciphering Led Flash Codes
The LED flash codes on Goodman control boards are a series of light patterns that indicate different system malfunctions. Each flash code represents a specific error, allowing you to pinpoint the root cause of the problem. To interpret the LED flash codes correctly, follow these steps:
- Locate the diagnostic LED on your control board – usually found near the center of the unit.
- Note the number of flashes and the pause between each flash.
- Refer to the Goodman control board manual or the manufacturer’s website for a complete list of error codes.
- Match the number of flashes to the corresponding error code to identify the issue.
Understanding the LED flash codes will help you troubleshoot your Goodman control board more effectively, giving you a head start in resolving any problems that arise.
Understanding Error Code Patterns
While the LED flash codes provide specific error information, understanding the overall error code patterns can give you additional insights into the nature of the problem. Here are some common error code patterns and their possible meanings:
| Error Code Pattern | Possible Meaning |
|---|---|
| Single Flash | Flame sensed when no flame should be present, indicating a possible gas valve issue. |
| Two Flashes | Pressure switch open with the inducer on, suggesting a blockage or malfunction in the exhaust vent. |
| Three Flashes | Pressure switch closed with the inducer off, which may indicate a problem with the pressure switch or ignition control. |
| Four Flashes | Limit switch open, signaling an overheating issue that needs to be addressed to ensure safe operation. |
By understanding these error code patterns, you can quickly assess the severity of the problem and take appropriate action. Keep in mind that these patterns are general guidelines, and it is always recommended to refer to the manufacturer’s documentation for accurate diagnosis and troubleshooting steps.
Replacing The Control Board
Replacing the control board in your Goodman HVAC system can be a daunting task, but with the right knowledge and guidance, you can easily complete this task yourself. In this section, we will discuss the steps involved in replacing the control board, from sourcing the right replacement to installation and calibration.
Sourcing The Right Replacement
Before you start, it’s important to source the correct replacement control board for your Goodman system. This will ensure compatibility and proper functioning of your HVAC unit. To find the right replacement control board, follow these steps:
- Contact Goodman: The first step is to reach out to Goodman, the manufacturer of your HVAC system. They will be able to provide you with the exact part number for the control board you need.
- Online retailers: There are numerous online retailers that specialize in HVAC parts. These retailers often have a wide selection of Goodman control boards, making it easy to find the right one for your system. Be sure to verify the part number before making a purchase.
- Local HVAC suppliers: Another option is to visit local HVAC suppliers in your area. They may have the control board you need in stock, or they can order it for you.
Installation And Calibration
Once you have obtained the correct replacement control board, you are ready to proceed with the installation and calibration. Follow these steps to ensure a successful replacement process:
- Turn off power: Before you begin, make sure to turn off the power supply to your HVAC system. This will ensure your safety during the installation process.
- Remove the old control board: Start by carefully removing the old control board from your HVAC unit. Take note of the wire connections to ensure proper reconnection with the new board.
- Install the new control board: Carefully place the new control board in the designated spot and secure it properly. Ensure all wire connections are securely attached to the corresponding terminals on the new board.
- Calibration: Once the new board is installed, it’s important to calibrate it to ensure proper functioning. Follow the manufacturer’s instructions for calibration, which may involve setting specific DIP switch configurations or adjusting certain settings.
- Testing: After calibration, it’s time to test your HVAC system. Turn on the power and check if the control board is functioning correctly. Monitor the system for any unusual behavior or error codes, which might indicate a calibration issue.
With these steps, you can successfully replace the control board in your Goodman HVAC system. Remember to always exercise caution and consult the manufacturer’s documentation for specific instructions related to your particular model. By following these guidelines, you can ensure the smooth operation of your HVAC system for years to come.
Frequently Asked Questions On Goodman Control Board Troubleshooting
What Are The Common Signs Of A Malfunctioning Goodman Control Board?
Common signs of a malfunctioning Goodman control board include frequent power outages, unresponsive buttons, and error messages on the display.
How Can I Reset My Goodman Control Board?
To reset your Goodman control board, turn off the power for a few minutes, then turn it back on. Alternatively, consult the user manual for specific reset instructions.
What Should I Do If My Hvac System Stops Working?
If your HVAC system stops working, check the Goodman control board for any visible issues or error codes. If unsure, it’s best to contact a professional technician for assistance.
How Often Should The Goodman Control Board Be Inspected?
It is recommended to have your Goodman control board inspected by a qualified technician annually to ensure it is functioning properly and to catch any potential issues early.
Can I Replace The Goodman Control Board Myself?
While it is possible to replace the Goodman control board yourself, it is recommended to seek the assistance of a trained professional to avoid any potential issues or voiding the warranty.
Conclusion
Troubleshooting your Goodman control board can be done effectively by following the steps outlined in this blog post. By understanding the common issues and utilizing the recommended solutions, you can ensure that your HVAC system operates optimally. With the right knowledge and approach, you can easily resolve any control board issues, saving time and money in the process.


