The Hayward Aquarite Troubleshooting Guide provides step-by-step instructions to diagnose and resolve common issues with the AquaRite salt system. From diagnosing power and salt level problems to addressing LED light issues, this guide offers comprehensive solutions to ensure optimal performance.
Whether you’re experiencing flashing or illuminated LEDs, inaccurate salt readings, or a lack of power, the troubleshooting guide will help you identify the problem and provide the necessary steps to fix it. By following the instructions in this guide, you can maintain a properly functioning AquaRite system and enjoy clean and clear pool water.
Understanding The Hayward Aquarite System
Are you facing issues with your Hayward Aquarite system? Don’t worry, we’ve got you covered! In this guide, we will help you understand the Hayward Aquarite system and provide troubleshooting tips to resolve any problems you may be experiencing. Let’s dive in!
How Does the Hayward Aquarite System Work?
The Hayward Aquarite system is a state-of-the-art salt chlorine generator that converts salt into chlorine to sanitize your swimming pool. It works by using electrolysis to break down the salt molecules, releasing chlorine gas. This chlorine gas then dissolves in the water, effectively sanitizing it. The process is simple and efficient, ensuring crystal-clear water for your pool.
Important Components Of The Hayward Aquarite System
The Hayward Aquarite system consists of several important components that work together to provide optimal performance. These components include:
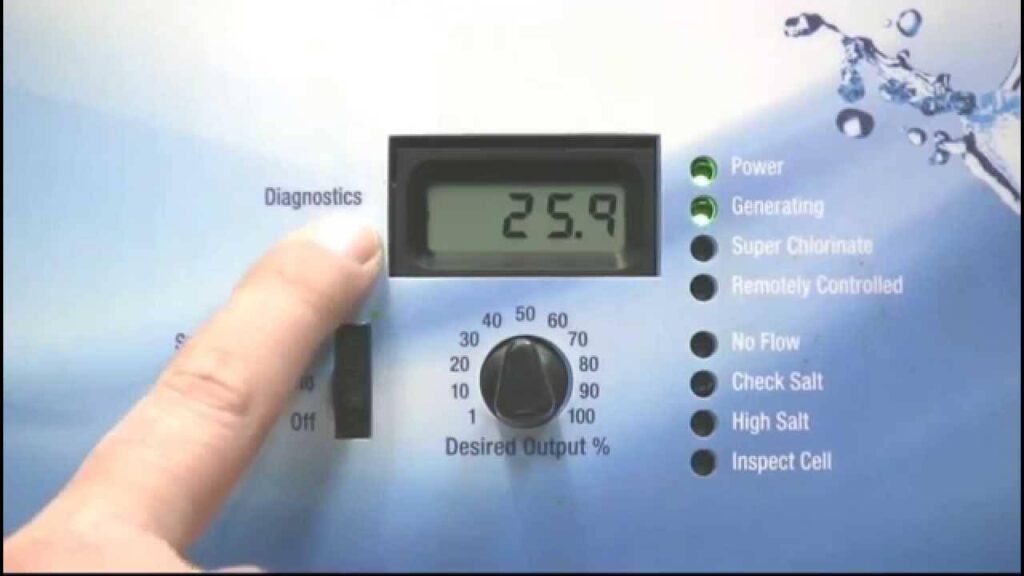
Control Panel: The control panel is the brain of the Aquarite system. It allows you to adjust settings, monitor chlorine levels, and diagnose any issues that may arise.
Salt Cell: The salt cell is the heart of the system. It contains a series of titanium plates coated with a special material that facilitates the electrolysis process. As water passes through the cell, chlorine is produced and distributed into the pool.
Flow Switch: The flow switch is a vital safety feature that ensures the system only operates when water is flowing through the cell. This prevents damage to the cell and helps maintain proper chlorine levels.
Power Supply: The power supply provides the necessary electrical current for the electrolysis process to occur. It is important to ensure the power supply is functioning correctly for the system to operate effectively.
Sensor Probes: Sensor probes measure the salt levels in the pool water. These readings are sent to the control panel, allowing you to monitor and maintain the appropriate salt concentration.
The Benefits Of Using A Hayward Aquarite System
The Hayward Aquarite system offers several advantages that make it a popular choice among pool owners:
Saltwater Sanitization: The Aquarite system eliminates the need for traditional chlorine tablets or liquid, as it generates chlorine from salt. This results in softer, gentler water that is more comfortable for swimmers.
Cost-effective: By using salt instead of traditional chlorine, the Aquarite system can save you money in the long run. Salt is less expensive than chlorine tablets, and the system requires less maintenance.
Automatic Operation: Once the Aquarite system is set up and calibrated, it operates automatically, ensuring that your pool is consistently sanitized without the need for manual intervention.
Environmentally Friendly: The use of salt and the elimination of harsh chemicals makes the Aquarite system more environmentally friendly. It reduces the discharge of harmful chemicals into the environment.
By understanding how the Hayward Aquarite system works and familiarizing yourself with its important components, you will be better equipped to troubleshoot any issues that may arise. Stay tuned for our upcoming guide on Hayward Aquarite troubleshooting, where we will address common problems and provide solutions to keep your pool running smoothly.
Common Issues Faced With The Hayward Aquarite System
Low Chlorine Production
If you are experiencing low chlorine production with your Hayward Aquarite system, there are a few possible causes. First, check the salt level to ensure it is within the recommended range. Low salt levels can lead to insufficient chlorine production. If the salt level is correct, you may need to clean the salt cell. Over time, calcium and other minerals can build up on the cell, inhibiting chlorine production. Refer to the manufacturer’s instructions for proper cleaning procedures.
Incorrect Salt Reading
If your Hayward Aquarite system is displaying an incorrect salt reading, there are a few things you can check. First, ensure that the salt cell is clean and free from any debris or mineral buildup. If the cell is clean and the salt reading is still incorrect, you may need to recalibrate the system. Refer to the manufacturer’s instructions for the recalibration process.
If you notice flashing or illuminated lights on the control panel of your Hayward Aquarite system, it could indicate a problem with the system. One possible cause is a faulty thermistor. The thermistor is responsible for regulating the temperature of the system and can fail over time. To identify a faulty thermistor, check if the system is not generating power or if the chlorinating light is not on. If you suspect a faulty thermistor, you may need to replace it to resolve the issue.
How To Identify A Faulty Thermistor
To identify a faulty thermistor in your Hayward Aquarite system, look for the following symptoms: no power and chlorinating light, or no power to the salt cell. The thermistor is a critical component of the system and is typically the only part that fails. It is recommended to replace the thermistor if these symptoms are present.
If you are experiencing flow switch issues with your Hayward Aquarite system, there are a few steps you can take to troubleshoot the problem. First, check the flow switch for any debris or obstructions that may be preventing proper flow. Clean the flow switch if necessary. If the flow switch appears to be clean and functioning properly, you may need to check the wiring connections or consult a professional for further assistance.
Troubleshooting Steps For Low Chlorine Production
Low chlorine production is a common issue that pool owners may face with their Hayward Aquarite salt system. When your pool water is not adequately chlorinated, it can lead to algae growth and poor water quality. To ensure your pool stays clean and healthy, it is essential to troubleshoot and address any low chlorine production problems promptly. In this guide, we will discuss the troubleshooting steps you can take to resolve low chlorine production in your Hayward Aquarite system.
Checking Salt Levels And Adjusting If Necessary
The first troubleshooting step for low chlorine production is to check the salt levels in your pool. Salt is essential for the proper functioning of the Aquarite system, as it is used to generate chlorine. To check salt levels, you can use a salt testing kit or a digital salt tester. If the salt levels are below the recommended range, you will need to add salt to your pool.
Adjusting the salt levels is crucial to ensure proper chlorine production in your Aquarite system. The recommended salt level for the Aquarite system is typically between 2700 to 3400 parts per million (ppm). If the salt levels are too low, you can add salt to the pool by following the manufacturer’s instructions. Alternatively, if the salt levels are too high, you may need to dilute the pool water with fresh water.
Cleaning Or Replacing The Salt Cell
If your Aquarite system is still experiencing low chlorine production after adjusting the salt levels, the next step is to clean or replace the salt cell. The salt cell is a vital component of the Aquarite system responsible for generating chlorine from the salt in the pool water. Over time, the salt cell can become coated with scale or debris, which can impede chlorine production.
To clean the salt cell, you can use a mild acid solution and a soft brush to remove any buildup. Follow the manufacturer’s instructions for proper cleaning techniques. If cleaning does not improve chlorine production, it may be necessary to replace the salt cell entirely. Consult the Aquarite system manual or contact a professional for guidance on replacing the salt cell.
Inspecting And Cleaning The Flow Switch
The flow switch is another component that can affect chlorine production in your Aquarite system. A malfunctioning flow switch can disrupt the water flow and prevent the system from generating chlorine. To troubleshoot low chlorine production, inspect and clean the flow switch.
Inspect the flow switch for any blockages or debris that may be hindering its proper functioning. You can use a soft cloth or a small brush to clean the switch. Make sure the flow switch is connected securely and positioned correctly according to the manufacturer’s instructions.
Verifying Proper Water Balance And Stabilizer Levels
In addition to checking salt levels and cleaning the salt cell and flow switch, it is essential to verify proper water balance and stabilizer levels. Imbalanced water chemistry can inhibit chlorine production and impact the effectiveness of your Aquarite system.
Test the water balance using a pool water testing kit or strips to ensure the pH, alkalinity, and calcium hardness levels are within the recommended range. Adjust the water chemistry as needed to maintain proper balance.
Furthermore, check the stabilizer levels (also known as cyanuric acid) in your pool water. Stabilizer helps protect chlorine from breaking down due to sunlight exposure. If the stabilizer levels are too low, adding stabilizer can help improve chlorine efficiency.
Resolving Incorrect Salt Reading
Calibration Process For Accurate Salt Reading
To resolve incorrect salt readings on your Hayward Aquarite system, you may need to calibrate the salt level for accurate readings. Follow these steps to properly calibrate your system:
- Turn off the power to the Aquarite control center.
- Press and hold the diagnostic button on the control center for three seconds, until the “Total Salt” LED starts flashing.
- Release the diagnostic button and press it again to cycle through the salt level options (low, medium, high, and super-chlorinate).
- Once the desired salt level option is displayed, press the diagnostic button once more to set the calibration. The control center will then begin to recalibrate the salt level.
- Wait for the control center to complete the recalibration process, which may take a few minutes.
- After recalibration is complete, turn the power back on and check the salt reading on the control center display. It should now be accurate.
Troubleshooting Steps For Inaccurate Readings
If recalibration does not resolve the issue and you are still getting incorrect salt readings, follow these troubleshooting steps:
- Check the salt cell for any visible damage or buildup. Clean the cell if necessary.
- Inspect the flow switch and ensure that it is functioning properly. Clean or replace the flow switch if needed.
- Verify that the water chemistry is balanced and within the recommended parameters. Imbalanced water chemistry can affect the accuracy of salt readings.
- Check the connections between the control center and the salt cell. Ensure that they are secure and free from corrosion.
- Inspect the control center panel for any error codes or indicators that may indicate a malfunction. Refer to the Hayward Aquarite troubleshooting guide for specific error code explanations.
- If none of these steps resolve the issue, consider contacting a professional for further assistance.
Inspecting And Cleaning The Salt Cell For Better Performance
Regular inspection and cleaning of the salt cell can help improve the performance and accuracy of your Hayward Aquarite system. Follow these steps for proper inspection and cleaning:
- Turn off the power to the Aquarite control center.
- Remove the salt cell from the plumbing by loosening the unions or connectors.
- Inspect the cell for any visible debris, scale, or calcium buildup. Use a soft brush or cell cleaning tool to scrub away any deposits.
- Rinse the cell thoroughly with clean water to remove any remaining debris.
- Inspect the cell blades for any signs of corrosion or wear. Replace the cell if necessary.
- Reinstall the salt cell back into the plumbing, ensuring that the unions or connectors are tightened securely.
- Turn the power back on and monitor the salt readings on the control center display. The clean salt cell should contribute to more accurate readings.
By following these steps, you can resolve incorrect salt readings on your Hayward Aquarite system, ensuring that your pool water remains properly balanced and chlorinated. Remember to refer to the Hayward Aquarite troubleshooting guide for any specific error codes or issues you may encounter.
Fixing Flashing Or Illuminated Lights On The Control Panel
Understanding the Meaning of Different LED Light Indicators:
When your Hayward Aquarite control panel is displaying flashing or illuminated lights, it’s important to understand the meaning behind these LED light indicators. Here are the most common LED light indicators and their meanings:
| LED Light Indicator | Meaning |
|---|---|
| Power LED Not On | The system is not receiving power. Check the power source and reset the control panel if necessary. |
| Check if the Salt LED is illuminated | The salt level in the pool is lower than the set threshold. Check the salt level and add salt if needed. |
| A high-salt LED is illuminated | The salt level in the pool is higher than the set threshold. Test the water and adjust the salt level accordingly. |
| The Cell LED is Flashing | There is an issue with the salt cell. Inspect the cell for any debris or damage, and clean or replace it if necessary. |
| The Cell LED is illuminated | The cell needs to be replaced in order for the control panel to read the salt level accurately. |
Troubleshooting Steps for Common LED Light Issues:
If you’re experiencing issues with the LED lights on your Hayward Aquarite control panel, follow these troubleshooting steps:
- Check the power source and ensure that the system is receiving power. If the power LED is not on, reset the control panel.
- Test the salt level in the pool using a salt test kit. If the Check Salt LED is illuminated, add salt to the pool to reach the desired level.
- If the High Salt LED is illuminated, it means that the salt level in the pool is higher than the set threshold. Test the water and adjust the salt level accordingly.
- If the Inspect Cell LED is flashing, there may be debris or damage in the salt cell. Inspect the cell and clean or replace it if necessary.
- If the Inspect Cell LED is illuminated, it means that the cell needs to be replaced in order for the control panel to read the salt level accurately.
Resetting the Control Panel and Resolving Electrical Faults:
Resetting the control panel can help resolve certain electrical faults that may be causing the flashing or illuminated lights. Here are the steps to reset the Hayward Aquarite control panel:
- Turn off the power to the control panel.
- Wait for a few minutes, then turn the power back on.
- Press the “Reset” button on the control panel to reset it.
- Allow the system to go through its startup sequence and check if the LED lights have returned to normal.
- If the issue persists, consult the Hayward Aquarite troubleshooting guide or contact a professional for further assistance.
By understanding the meaning of different LED light indicators, following the troubleshooting steps, and resetting the control panel, you can effectively fix any flashing or illuminated lights on your Hayward Aquarite control panel.
Identifying And Resolving Faulty Thermistor
The Hayward Aquarite system is a popular choice for maintaining a clean and balanced pool water. However, like any electronic device, it is not immune to faults and errors. One of the common issues that pool owners face with the Aquarite system is a faulty thermistor. The thermistor plays a crucial role in the system’s functionality, and when it malfunctions, it can lead to various problems. In this troubleshooting guide, we will explore how to identify and resolve a faulty thermistor in your Hayward Aquarite system.
Understanding The Role Of The Thermistor In The Aquarite System
The thermistor in the Hayward Aquarite system serves an essential function in regulating the temperature and performance of the system. It measures the temperature of the water and sends the information to the control unit. Based on this information, the control unit adjusts the chlorine production and other settings to maintain optimal water conditions. The thermistor ensures that the system operates efficiently and effectively.
Symptoms Of A Faulty Thermistor
Identifying a faulty thermistor is crucial in troubleshooting the Aquarite system. Here are some common symptoms of a faulty thermistor:
- No power and chlorinating light
- No power to the salt cell
If you notice any of these symptoms, the thermistor in your Aquarite system likely needs to be replaced.
Replacement Process For A Faulty Thermistor
Replacing a faulty thermistor in your Hayward Aquarite system is a relatively straightforward process. Here are the steps you need to follow:
- Turn off the power to the Aquarite system and disconnect it from the power source.
- Locate the thermistor in the control unit. It is usually attached to the circuit board.
- Carefully disconnect the wires connected to the faulty thermistor.
- Remove the faulty thermistor from the control unit.
- Install the new thermistor in the same position, ensuring proper alignment.
- Reconnect the wires to the new thermistor, making sure they are securely attached.
- Turn on the power to the Aquarite system and test if the new thermistor is functioning correctly.
By following these steps, you can easily replace a faulty thermistor in your Hayward Aquarite system and restore its optimal performance.
Troubleshooting Flow Switch Issues
When it comes to troubleshooting your Hayward Aquarite system, one of the common issues you may encounter is flow switch problems. The flow switch is an essential component that monitors the flow of water through the system and ensures that the salt cell only operates when there is adequate water flow. In this section, we will help you understand the function of the flow switch, common issues that may arise, and how to clean or replace the flow switch for optimal performance.
Understanding The Function Of The Flow Switch
The flow switch plays a crucial role in the Hayward Aquarite system as it helps protect the salt cell from damage caused by insufficient water flow. It functions by detecting whether there is enough water flow through the system to activate the salt cell for chlorine generation. If the flow switch detects a low or no water flow, it will prevent the salt cell from operating, preventing any potential damage. Therefore, it is essential to ensure that the flow switch is functioning correctly to maintain the efficiency of your Aquarite system.
Common Issues With The Flow Switch
Several common issues may arise with the flow switch in your Hayward Aquarite system. These include:
- Flow switch error messages on the control panel
- Inconsistent flow switch readings
- No water flow was detected despite proper water circulation
- Intermittent flow switch operation
- Flow switch stuck in the closed or open position
Identifying these common issues can help you troubleshoot and resolve flow switch problems effectively.
Cleaning Or Replacing The Flow Switch For Optimal Performance
To ensure the optimal performance of your flow switch, regular maintenance is crucial. Cleaning the flow switch can help remove any debris or buildup that may affect its functionality. Here’s a step-by-step guide to cleaning the flow switch:
- Turn off the power to your Aquarite system to avoid any potential accidents.
- Locate the flow switch, which is typically located on the piping near the salt cell.
- Disconnect the flow switch from the piping by unscrewing the nuts or bolts.
- Carefully remove the flow switch from the piping and inspect it for any visible debris or buildup.
- If you notice any debris or buildup, use a soft brush or cloth to gently clean the flow switch.
- Once cleaned, reattach the flow switch to the piping and tighten the nuts or bolts securely.
- Turn on the power to your Aquarite system and monitor the flow switch operation to ensure it is functioning correctly.
If, after cleaning the flow switch, you are still experiencing issues, it may be necessary to replace the flow switch. You can purchase a compatible replacement flow switch from a Hayward-authorized dealer or supplier. Follow the manufacturer’s instructions for replacing the flow switch, ensuring it is installed correctly and securely.
By understanding the function of the flow switch and addressing common issues by cleaning or replacing it when necessary, you can ensure the optimal performance of your Hayward Aquarite system.
Frequently Asked Questions
How Do I Reset My Hayward Aquarite Board?
To reset your Hayward AquaRite board, replace the cell to accurately read the salt level. Refer to the Hayward AquaRite Troubleshooting Guide for more details.
What Are The Symptoms Of The Thermistor In Aquarite?
Symptoms of a bad thermistor in AquaRite include no power, chlorinating light not working, and no power to the salt cell.
How Do I Reset My Aqua Rite?
To reset your Aqua Rite, follow these steps:
- Turn off the power to the system.
- Wait for 10 seconds.
- Turn the power back on.
- Press and hold the “Diagnostic” button for 3 seconds.
- Release the button and your Aqua Rite will be reset. Make sure to consult the troubleshooting guide for more details.
Why Is My Hayward Aqua Rite Salt Reading Incorrect?
The Hayward Aqua Rite salt reading may be incorrect due to a faulty thermistor or a need to replace the cell. Resetting the Aqua Rite board or recalibrating the salt chlorine generator may also help. Refer to the Hayward AquaRite Troubleshooting Guide for more information.
How Do I Reset My Hayward Aquarite Board?
To reset your Hayward AquaRite board, you can follow the step-by-step instructions provided in the user manual. It usually involves accessing the control panel and navigating through the settings menu to find the reset option.
Conclusion
To troubleshoot Hayward Aquarite, follow the steps mentioned in this guide. From checking power and salt levels to inspecting the cell, understanding the symptoms and resetting the system, this guide covers it all. By following these troubleshooting tips, you can ensure the proper functioning of your Hayward Aquarite system and maintain a clean and healthy pool.
Say goodbye to any issues and enjoy a hassle-free pool experience with these simple steps. For more detailed instructions, refer to the official Hayward Aquarite Troubleshooting Guide.
")


My board says hot. The water isn’t hot. If the thermistor is bad how can I get a new one for the board? Thanks
If your Hayward Aquarite board indicates “hot” but the water isn’t actually hot, it’s possible that the thermistor (temperature sensor) is faulty. To replace it, you’ll typically need to order a replacement thermistor compatible with your specific Hayward Aquarite model. Hayward’s customer service or their official website should have information on replacement parts. Alternatively, you can check with local pool supply stores that carry Hayward products. Make sure to have your model number and any other relevant information ready when contacting them. Good luck!