To troubleshoot Laars Mini Therm boiler issues, first check the thermostat and circulator pump. Then inspect the motor temperature, pressure gauge, water temperature, and burner.
Laars offers a limited warranty for the Mini-Therm JX boilers for one year, covering manufacturing defects. The boiler operates with a single-loop system and a circulator that creates pressure to move water through the system. Facing issues with your Laars Mini Therm boiler in Austin, Texas?
Troubleshooting boiler problems can be daunting, but with the right approach, you can identify and resolve issues efficiently. Laars Mini Therm boilers come with a limited warranty for the first year, providing assurance against manufacturing defects. Understanding how the boiler operates and conducting thorough checks can help you diagnose and resolve common issues effectively. In this guide, we’ll explore essential troubleshooting steps and delve into the working mechanism of Laars Mini Therm boilers to help you address any concerns promptly and effectively.
Introduction To Laars Mini Therm Boiler Issues
When it comes to your Laars Mini Therm boiler, it’s essential to be aware of common issues that may arise. Timely troubleshooting is crucial to ensure your boiler operates efficiently and effectively.
Common Symptoms Of Malfunction
- No heat or hot water
- Strange noises from the boiler
- Flame going out frequently
- Increased energy bills
Importance Of Timely Troubleshooting
Ensuring each H3 heading adheres to HTML syntax, it’s important to address boiler issues promptly to prevent further damage and inconvenience. Regular maintenance and quick identification of problems can save you time and money in the long run.
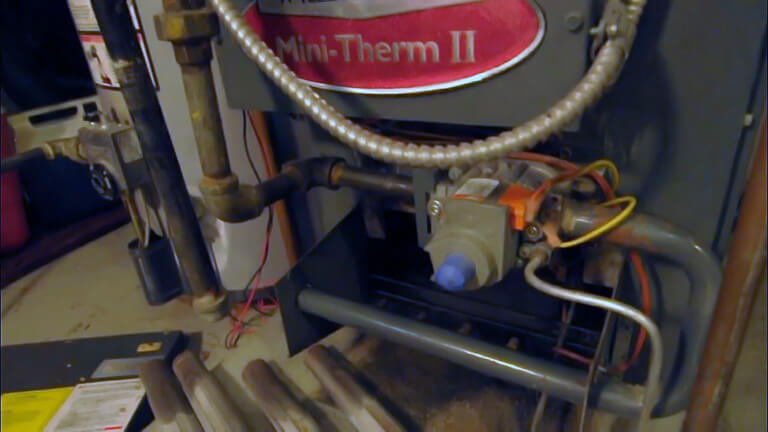
Pilot Light Problems
If you have a Laars Mini Therm boiler, you may experience issues with the pilot light. The pilot light is a small flame that ignites the burner in your boiler. If it goes out, your boiler won’t work. In this section, we’ll discuss how to troubleshoot pilot light problems and when to call a professional.
Troubleshooting The Pilot Light
If your pilot light won’t stay lit, there are a few things you can try before calling a professional. Here are some troubleshooting steps you can follow:
- Check the gas supply: Make sure the gas valve is open and that there is gas flowing to the boiler.
- Clean the pilot light: Use a wire brush to clean the pilot light and the surrounding area. This will remove any debris that may be preventing the pilot light from staying lit.
- Check the thermocouple: The thermocouple is a safety device that detects if the pilot light is on. If it’s not working correctly, it can shut off the gas supply to the boiler. Check to see if the thermocouple is loose or needs to be replaced.
- Adjust the pilot light: If the pilot light is too small, it may not stay lit. Adjust the pilot light so that it’s about 1/4 inch high.
When To Call A Professional
If you’ve tried troubleshooting the pilot light and it still won’t stay lit, it’s time to call a professional. A qualified technician will be able to diagnose the issue and make any necessary repairs. Don’t try to fix the problem yourself if you’re not comfortable working with gas or electricity. It’s better to be safe than sorry.
In conclusion, pilot light problems are a common issue with Laars Mini Therm boilers. If you’re experiencing issues with your pilot light, follow the troubleshooting steps we’ve outlined above. If you’re still having problems, call a professional. Don’t try to fix the problem yourself if you’re not comfortable working with gas or electricity.
Error Codes And Interpretations
When it comes to troubleshooting your Laars Mini Therm boiler, understanding the error codes is crucial for effective resolution. Decoding common error messages and taking the necessary steps after identifying an error code can help you address issues promptly and ensure your boiler operates smoothly.
Decoding Common Error Messages
Here are some common error codes you may encounter with your Laars Mini Therm boiler:
| Error Code | Interpretation |
|---|---|
| ERR 101 | Ignition failure |
| ERR 202 | Flame loss during operation |
| ERR 303 | High limit switch open |
| ERR 404 | Flame rod failure |
Steps After Identifying An Error Code
- Step 1: Take note of the error code displayed on the boiler’s control panel.
- Step 2: Refer to the boiler’s manual to understand the meaning and potential causes of the error code.
- Step 3: Perform basic troubleshooting, such as checking for fuel supply, inspecting the ignition system, and ensuring proper ventilation.
- Step 4: If the issue persists, contact a qualified technician for further diagnosis and repairs.
Flame Sensor Failures
Flame sensor failures can cause your Laars Mini Therm boiler to malfunction, leading to heating issues and potential safety concerns. Identifying and addressing flame sensor issues is crucial for ensuring the efficient operation of your boiler.
Identifying Flame Sensor Issues
If you suspect a flame sensor problem in your Laars Mini Therm boiler, there are a few signs to look out for. These may include intermittent heating, frequent system shutdowns, or error codes related to flame detection. Additionally, a visual inspection of the flame sensor for signs of corrosion or damage can help identify potential issues.
Diy Fixes For Flame Sensor
Before calling a professional, there are a few DIY fixes you can attempt to address flame sensor failures in your Laars Mini Therm boiler. Start by carefully cleaning the flame sensor with a soft cloth or fine-grit sandpaper to remove any buildup of soot, dirt, or debris that may be interfering with its function. Ensure that the sensor is properly positioned and aligned with the flame for optimal detection.
If cleaning the sensor does not resolve the issue, checking the wiring connections and ensuring they are secure and free from corrosion can help troubleshoot potential electrical issues affecting the flame sensor. However, if the problem persists, it is advisable to seek professional assistance to diagnose and address the underlying cause of the flame sensor failure.
Circulator Pump Checks
When it comes to troubleshooting a Laars Mini Therm boiler, ensuring the proper function of the circulator pump is crucial for the system’s overall performance. The circulator pump is responsible for moving hot water from the boiler through the piping system to provide heating throughout the building. Here are the essential checks and solutions for circulator pump issues.
Ensuring Proper Pump Function
To ensure proper pump function, start by checking if the circulator pump is operating when the thermostat calls for heat. Listen for any unusual noises or vibrations, which could indicate a problem with the pump. Additionally, verify that the pump is receiving power and that the electrical connections are secure. Properly functioning pumps will help maintain consistent heat distribution throughout the building.
Resolving Circulator Pump Issues
If the circulator pump is not running, first, check for any obstructions or airlocks in the system that may be preventing the flow of water. Bleed the air out of the system, if necessary, to ensure proper water circulation. Inspect the pump for signs of wear or damage, such as leaking seals or a malfunctioning motor, and replace any faulty components as needed. Additionally, checking the pump pressure and adjusting it to the recommended levels can resolve performance issues.
Heat Exchanger Troubleshooting
When it comes to your Laars Mini Therm boiler, the heat exchanger plays a crucial role in the efficient transfer of heat. However, like any other component, it may encounter issues over time. Here are some common problems with the heat exchanger and tips for troubleshooting and maintenance.
Signs Of Heat Exchanger Problems
- Uneven Heating: If some areas of your home are not receiving sufficient heat, it could indicate a problem with the heat exchanger.
- Strange Noises: Unusual sounds such as rattling or banging coming from the boiler may signal a malfunction in the heat exchanger.
- Increased Energy Bills: A faulty heat exchanger can lead to decreased efficiency, resulting in higher energy consumption and increased bills.
- Visible Damage: Any visible cracks, corrosion, or deterioration on the heat exchanger should be addressed immediately.
Cleaning And Maintenance Tips
To ensure the optimal performance of your heat exchanger, regular cleaning and maintenance are essential. Here are some tips to keep it in top condition:
- Regular Inspections: Schedule periodic inspections to check for any signs of corrosion, leaks, or damage.
- Cleaning: Use a non-acidic cleaner to remove any buildup or debris from the heat exchanger surfaces.
- Professional Servicing: Consider hiring a professional for annual servicing to conduct a thorough cleaning and inspection of the heat exchanger.
- Water Treatment: Implement water treatment measures to prevent corrosion and scale buildup within the heat exchanger.
Pressure Concerns In Laars Boilers
One of the most common issues with Laars boilers is pressure-related problems. The optimal pressure settings for Laars boilers are crucial to ensure their proper functioning. In this section, we will discuss how to fix pressure-related issues in Laars boilers.
Optimal Pressure Settings
The optimal pressure setting for a Laars boiler is between 12 and 15 psi. If the pressure is too low, the system will not function properly, while high pressure can cause the relief valve to open and release water. It is essential to check the pressure gauge regularly and adjust the pressure if necessary.
Fixing Pressure-related Issues
If you are experiencing pressure-related issues with your Laars boiler, there are several things you can do to fix them. Here are some troubleshooting tips:
- Check the pressure gauge to see if the pressure is within the optimal range.
- If the pressure is too low, check the water supply and ensure it is turned on and functioning correctly.
- If the pressure is too high, bleed the radiators to release excess pressure.
- If bleeding the radiators does not work, check the expansion vessel for leaks or damage and replace if necessary.
- If the expansion vessel is not the issue, check the pressure relief valve and replace if necessary.
By following these steps, you can fix pressure-related issues in your Laars boiler and ensure it is working optimally. Remember to always check the pressure gauge regularly to prevent any future problems.
Water Temperature Irregularities
When your Laars Mini Therm boiler is experiencing water temperature irregularities, it can disrupt the comfort and efficiency of your heating system. Addressing these issues promptly is crucial to ensure optimal performance.
Assessing Water Temperature
Begin by checking the water temperature settings on your boiler to determine if they align with your desired comfort levels. Use a thermometer to measure the actual water temperature coming from the boiler compared to the set temperature on the controls.
Adjusting Temperature Controls
If you notice discrepancies between the set temperature and the actual water temperature, you may need to adjust the temperature controls on your Laars Mini Therm boiler. Follow the manufacturer’s instructions to recalibrate the settings and ensure they are accurate.
Warranty And Professional Support
When it comes to troubleshooting your Laars Mini Therm boiler, understanding your warranty and knowing when to seek professional help are crucial aspects. Let’s delve into these topics to ensure you are equipped to address any issues that may arise.
Understanding Your Warranty
If you encounter issues with your Laars Mini Therm boiler, the warranty can provide essential coverage. Here’s a breakdown of the warranty details:
- First Year Limited Warranty: Laars warrants all parts of Mini-Therm JX boilers, including the circulating pump, to be free from manufacturing defects for one year.
When To Seek Professional Help
While some boiler issues can be resolved independently, certain situations require professional expertise. Here are signs that indicate the need for professional support:
- Complex Problems: If you encounter complex issues beyond basic troubleshooting.
- Gas Leaks: Any signs of gas leaks should prompt immediate professional assistance.
- Unusual Noises: Strange noises coming from the boiler may indicate internal damage.
- Consistent Errors: If error codes persist despite troubleshooting attempts, seek professional help.
Preventative Maintenance For Longevity
Proper maintenance is key to ensuring the longevity of your Laars Mini Therm boiler. By following a regular maintenance schedule and avoiding common installation errors, you can keep your boiler running efficiently for years to come.
Regular Maintenance Schedule
- Schedule professional maintenance annually
- Inspect and clean heat exchanger
- Check for leaks and corrosion
- Test safety controls regularly
- Monitor water pressure and temperature
Avoiding Common Installation Errors
- Ensure proper venting and combustion air
- Follow manufacturer’s installation instructions
- Properly size the boiler for your space
- Check for gas leaks during installation
- Verify correct electrical connections
Frequently Asked Questions
How Do You Diagnose A Boiler Problem?
To diagnose a boiler problem, check the thermostat, ensure the circulator pump is running, monitor motor temperature, and inspect temperature/pressure gauge. Also, check for low pressure, water temperature, main/pilot burner, overheating, and unusual noises.
What Is The Pressure On A Laars Boiler?
The pressure on a Laars boiler typically ranges between 12 to 15 psi. Regularly check the pressure gauge for optimal performance.
What Is The Warranty On A Laars Mini Therm?
The warranty on a Laars Mini Therm boiler is one year for all parts, including the circulating pump.
How Does A Laars Boiler Work?
A Laars boiler works by circulating water through a single loop system with a circulator. When the circulator turns on, it creates a difference in pressure, causing the water to flow out of the boiler and around the loop. The boiler is designed to be used with a primary/secondary and multiple boiler system to prevent operating problems caused by improper installation.
Conclusion
In troubleshooting your Laars Mini Therm boiler, remember to check the thermostat and circulator pump. Ensure proper installation to avoid operating issues. Monitor the temperature, pressure, and burner performance for optimal functioning. Regular maintenance and attention to details can prevent future problems with your boiler.
")


