If your Maytag ice maker is not working, check if the On/Off switch located on the bottom of the ice maker is turned on. You can access the switch by lifting and opening the ice maker door.
Other potential causes for your ice maker not working could be a blocked water dispenser, issues with the water supply line, or a clogged water filter. Having a functioning ice maker is essential for many households, especially during the hot summer months.
However, if you’re facing issues with your Maytag ice maker and it’s not producing ice, it can be quite frustrating. Fortunately, troubleshooting the problem can help you identify the underlying issues and find suitable solutions. We will outline some troubleshooting steps to help you address common problems with your Maytag ice maker. By following these suggestions, you can potentially fix the issue and have your ice maker working again in no time.
Introduction To Maytag Ice Maker Troubleshooting
Is your Maytag ice maker giving you trouble? Don’t worry, we’ve got you covered. In this article, we will provide you with an in-depth overview of common ice maker problems and explain the importance of troubleshooting these issues. Ice maker problems can be frustrating and inconvenient, but with the right knowledge, you can easily identify and resolve them. So, let’s dive into the world of Maytag ice maker troubleshooting and get your ice maker back up and running in no time!
Overview Of Common Ice Maker Problems
When it comes to Maytag ice makers, there are several common problems that may occur. Knowing what these problems are can help you troubleshoot and fix them quickly. Here are some of the most common ice maker issues:
- Ice maker not producing ice
- Ice cubes are small or misshapen
- Ice maker making strange noises
- Water leakage from the ice maker
- Ice tastes or smells strange
The Importance Of Troubleshooting Ice Maker Issues
Troubleshooting ice maker issues is crucial for several reasons. First and foremost, it saves you the hassle and cost of calling a repair technician. By identifying and resolving the problem yourself, you can potentially save time and money. Additionally, troubleshooting allows you to quickly get your ice maker back to its optimal performance, ensuring you always have a steady supply of ice.
Moreover, troubleshooting ice maker issues can prevent further damage to other components. Ignoring a problem or allowing it to persist can lead to more significant issues down the line. By addressing the issue promptly, you can prevent further damage and potentially extend the lifespan of your ice maker.
In conclusion, troubleshooting ice maker problems is essential for maintaining the functionality and longevity of your Maytag ice maker. By identifying and resolving common issues, you can save time, money, and prevent further damage. In the next sections, we will delve deeper into each of the common ice maker problems mentioned earlier and provide you with step-by-step instructions to troubleshoot and fix them.
Troubleshooting Steps For No Ice Production
Looking for troubleshooting steps for no ice production? Check out our comprehensive guide to Maytag ice maker troubleshooting, where you’ll find easy-to-follow steps to get your ice maker working again. Don’t let a lack of ice ruin your day!
Checking The Ice Maker’s Power And Settings
If your Maytag ice maker is not producing any ice, the first step is to check the power supply and settings. Here’s what you can do:
- Make sure the ice maker is plugged in and receiving power. If not, check the circuit breaker and reset if necessary.
- Ensure that the ice maker is turned on. Locate the On/Off switch on the bottom of the ice maker, which can be accessed by lifting and opening the ice maker door.
- Verify that the ice maker is set to the “On” position. Sometimes, it could accidentally be switched off, causing no ice production.
Inspecting The Water Supply Line
The water supply line plays a crucial role in the ice-making process. If there’s an issue with the water supply, it can lead to no ice production. Follow these steps to inspect the water supply line:
- Locate the water supply line connected to the ice maker. It should be securely attached to both the ice maker and the water source.
- Check for any kinks or bends in the water supply line that may be obstructing the water flow. Straighten the line if necessary.
- Ensure that the water valve supplying water to the ice maker is fully open. Sometimes, a partially closed valve can restrict water flow and result in no ice production.
- Inspect the water filter if your Maytag ice maker has one. If it’s clogged or overdue for replacement, it can affect ice production. Replace the filter if needed.
Unclogging The Ice Maker
If your Maytag ice maker is not producing ice or the ice cubes are smaller than usual, it could be due to a clog in the supply line. Here’s how you can unclog the ice maker:
- Turn off the ice maker and unplug it from the power source for safety.
- Carefully inspect the supply line for any obstructions or ice buildup. If you spot any, use a hairdryer on low heat or a warm cloth to thaw the ice.
- Gently remove any debris or foreign objects that may be causing the clog. Be cautious not to damage any parts in the process.
- Once cleared, plug the ice maker back in and turn it on. Allow it to cycle through and produce ice.
Examining The Water Inlet Valve
The water inlet valve controls the flow of water into the ice maker. If it’s faulty or not functioning properly, it can lead to no ice production. Follow these steps to examine the water inlet valve:
- Locate the water inlet valve, typically found at the back of the refrigerator or behind the lower kickplate. Consult your Maytag ice maker’s manual for specific instructions.
- Inspect the valve for any visible signs of damage or leaks. If you notice any issues, the valve may need to be replaced.
- Check that the water inlet valve is receiving sufficient water pressure. Low water pressure can cause inadequate water flow to the ice maker.
- If the water inlet valve is not functioning or is damaged, consider contacting a professional appliance repair service to address the issue.
Fixing Manual Ice Makers
Having trouble with your Maytag ice maker? Learn how to troubleshoot and fix common issues with manual ice makers in this helpful guide. From checking water supply lines to unclogging the ice maker, we’ve got you covered. Keep your ice maker running smoothly with these tips!
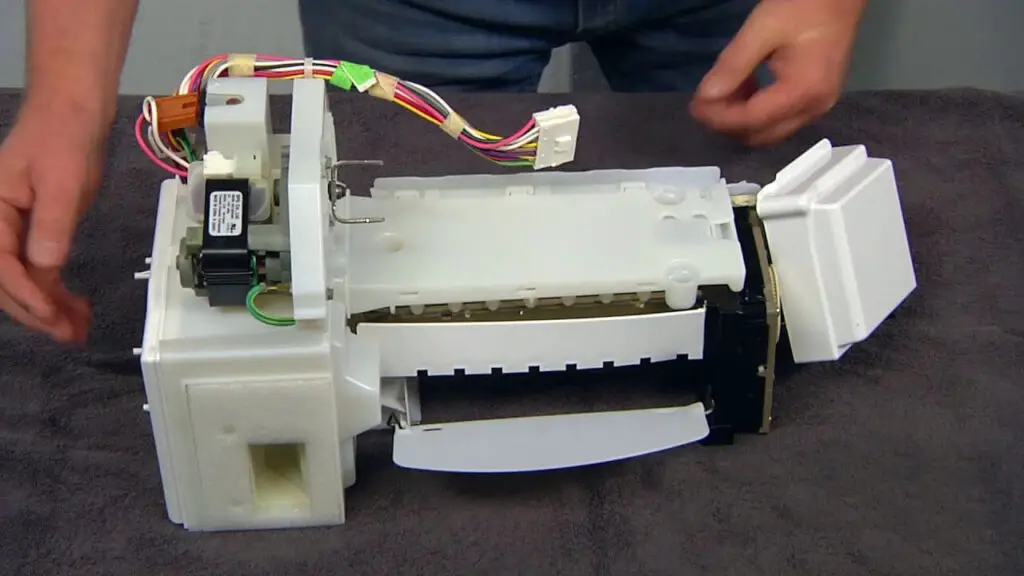
Understanding The Components Of A Manual Ice Maker
A manual ice maker consists of several components that work together to produce ice. These components include:
1. Ice mold: The ice mold is where the water is poured to create ice cubes. It is usually made of plastic or metal and is shaped in the form of small cavities or compartments.
2. Water fill valve: The water fill valve is responsible for filling the ice mold with water. It is connected to the water supply line and is controlled by a switch or lever.
3. Thermostat: The thermostat is a temperature-sensitive device that regulates the freezing process of the ice maker. It is usually located inside the ice mold and ensures that the water freezes properly.
4. Ejector arm: The ejector arm is attached to a motor and is responsible for pushing the ice cubes out of the mold once they are frozen. It moves in a cyclical motion to release the ice cubes into a collection bin.
Steps To Troubleshoot And Fix Common Issues
If your manual ice maker is experiencing problems, here are some steps you can take to troubleshoot and fix common issues:
1. Check the water supply: Ensure that the water supply line connected to the ice maker is not blocked or frozen. If it is, thaw the line or remove any obstructions to restore the water flow.
2. Inspect the water fill valve: If the ice mold is not filling with water, the water fill valve may be faulty. Use a multimeter to test the valve for continuity. If it does not have continuity, it may need to be replaced.
3. Test the thermostat: If the ice maker is not freezing the water properly, the thermostat may be malfunctioning. Use a thermometer to check the temperature inside the ice mold. If it is not reaching the freezing point, replace the thermostat.
4. Check the ejector arm: If the ice cubes are not being expelled from the mold, the ejector arm may be stuck or broken. Inspect the arm for any obstructions or damage. If necessary, replace the ejector arm.
Replacing Faulty Parts In A Manual Ice Maker
If troubleshooting does not resolve the issue with your manual ice maker, you may need to replace certain parts. Here are the steps to replace faulty components:
1. Identify the faulty part: Based on the symptoms and troubleshooting results, determine which component of the ice maker needs to be replaced. This could be the water fill valve, thermostat, or ejector arm.
2. Obtain the replacement part: Contact the manufacturer or a reliable appliance parts supplier to purchase the appropriate replacement part for your specific ice maker model.
3. Disconnect power and water supply: Before replacing any parts, make sure to turn off the power to the ice maker and shut off the water supply. This will prevent any accidents or damage during the replacement process.
4. Remove the faulty part: Follow the manufacturer’s instructions or refer to a repair manual to safely remove the faulty component from the ice maker. This may involve unscrewing screws, disconnecting wires, or detaching hoses.
5. Install the new part: Carefully install the replacement part, ensuring that it is securely connected and aligned with the other components. Follow the instructions provided with the replacement part to ensure proper installation.
6. Restore power and water supply: Once the new part is installed, restore power to the ice maker and turn on the water supply. Test the ice maker to ensure that it is now functioning correctly and producing ice as expected.
By understanding the components of a manual ice maker, troubleshooting common issues, and replacing faulty parts if necessary, you can successfully fix problems with your manual ice maker and enjoy a steady supply of ice.
Troubleshooting Bottom Freezer Ice Makers
Bottom freezer ice makers can encounter specific problems that may prevent them from producing ice. In this section, we will discuss how to identify these problems and troubleshoot them effectively.
Identifying Problems Specific To Bottom Freezer Ice Makers
When it comes to troubleshooting bottom freezer ice makers, there are a few problems that are specific to this type of ice maker. These problems include:
- Slow ice production or no ice at all
- Ice cubes that are smaller than usual
- Excessive frost build-up in the freezer
- Water leaking from the ice maker
Checking The Freezer Temperature
The first step in troubleshooting a bottom freezer ice maker is to check the temperature of the freezer. A freezer temperature that is too warm can prevent the ice maker from producing ice. Follow these steps to check the freezer temperature:
- Open the freezer door and locate the temperature control knob.
- Turn the knob to the coldest setting.
- Wait for a few hours and check the temperature with a thermometer.
- If the temperature is not between 0°F and 5°F (-18°C and -15°C), adjust the knob accordingly.
Clearing Obstructions In The Ice Chute
If the ice cubes are not dispensing properly from the ice chute, there may be obstructions that are blocking the path. Follow these steps to clear any obstructions in the ice chute:
- Unplug the refrigerator and locate the ice chute.
- Inspect the chute for any ice build-up or foreign objects.
- Use a small brush or cloth to remove any ice or debris.
- Plug the refrigerator back in and test the ice dispenser.
Examining The Ice Level Control Board
The ice level control board is responsible for monitoring the ice level in the ice maker and controlling the ice production. If there are issues with the ice level control board, it can affect the ice production. Follow these steps to examine the ice level control board:
- Locate the ice level control board in the ice maker assembly.
- Inspect the board for any visible signs of damage or burnt components.
- If there are any issues with the board, it may need to be replaced.
- Contact a professional appliance repair service for further assistance.
By following these troubleshooting steps, you can effectively identify and resolve common problems with bottom freezer ice makers. Remember to always exercise caution when working with electrical appliances and consult a professional if you are unsure.
Expert Tips For Successful Maytag Ice Maker Replacement
Replacing a Maytag ice maker can be a daunting task, but with the right knowledge and guidance, it can be a smooth and successful process. In this section, we will provide you with expert tips to ensure a successful Maytag ice maker replacement. From finding the correct replacement ice maker to preventing common installation mistakes, we’ve got you covered.
Finding The Correct Replacement Ice Maker
When it comes to replacing your Maytag ice maker, it is crucial to find the correct replacement that is compatible with your specific refrigerator model. Here are some steps to help you find the right replacement:
- Identify your refrigerator model number. This can usually be found on a sticker or plate inside the refrigerator.
- Search for the model number on the Maytag website or other trusted appliance part retailers.
- Verify the compatibility of the replacement ice maker with your refrigerator model.
Step-by-step Guide For Removing And Installing A New Ice Maker
Once you have the correct replacement ice maker, follow these step-by-step instructions to remove the old ice maker and install the new one:
- Unplug the refrigerator from the power source.
- Locate the ice maker inside the freezer compartment. It is usually attached to the freezer wall with screws or brackets.
- Remove the screws or brackets holding the ice maker in place.
- Disconnect the wiring harness and water supply line from the ice maker.
- Carefully remove the old ice maker from the freezer.
- Install the new ice maker by reversing the above steps. Make sure to connect the wiring harness and water supply line properly.
- Plug the refrigerator back into the power source.
- Allow the new ice maker to cycle and produce ice.
Preventing Common Installation Mistakes
When replacing your Maytag ice maker, it is important to avoid common installation mistakes that can lead to issues down the line. Here are some tips to prevent these mistakes:
- Read the installation instructions provided with the replacement ice maker carefully before starting the installation process.
- Ensure all connections are secure and properly tightened to prevent water leaks.
- Allow the new ice maker to fully cycle and produce a few batches of ice before using it to ensure proper functionality.
- If you encounter any difficulties during installation, consult the Maytag product help or contact a professional appliance repair service for assistance.
Frequently Asked Questions
Is There A On Off Switch For A Maytag Ice Maker?
The On/Off switch for a Maytag ice maker is located on the bottom and can be accessed by opening the ice maker door.
Why Did My Maytag Refrigerator Stop Making Ice?
If your Maytag refrigerator stopped making ice, there could be a few reasons. Check if the water dispenser is blocked, the water supply line is faulty, or the water filter is clogged. Unclog the ice maker by thawing any frozen water in the line.
How Do You Unclog A Maytag Ice Maker?
To unclog a Maytag ice maker, locate the On/Off switch at the bottom of the ice maker door and turn it off. Remove any ice cubes or obstructions, and check for frozen water in the supply line. Use warm water or a hairdryer to thaw the clog.
Turn the ice maker back on, and it should start producing ice again.
How Do I Know If My Ice Maker Is Clogged?
If your ice maker isn’t producing ice or the ice is smaller than usual, it may be clogged. Check for a frozen water supply line or a blockage in the supply line. Make sure the ice maker is on and the water pressure is sufficient.
If the problem persists, consult the user manual or contact a professional for assistance.
Why Did My Maytag Refrigerator Stop Making Ice?
A: There are several reasons your ice maker may stop working suddenly, such as a blocked water dispenser, issues with the water supply line, or a clogged water filter.
Conclusion
If you’re facing issues with your Maytag ice maker, there are several troubleshooting steps you can take to resolve the problem. Check for any clogs or frozen water in the supply line, ensure the ice maker is turned on, and verify the freezer temperature and water pressure.
Additionally, inspect the water inlet valve, ice maker module, and ice level control board. By following these suggestions, you can get your Maytag ice maker back to producing ice efficiently.
")


