To troubleshoot a Porter Cable air compressor, check for leaks and ensure proper power supply. Issues may also arise due to worn-out parts or improper maintenance practices.
Porter Cable air compressors are reliable tools, but like any mechanical equipment, they may encounter problems over time. By following a systematic troubleshooting process, you can identify and resolve issues to keep your air compressor running smoothly. From checking for leaks to examining the pressure switch and motor operation, understanding these common problems can help you effectively troubleshoot your Porter Cable air compressor.
This guide will provide you with valuable insights on troubleshooting your air compressor, ensuring its optimal performance and longevity.
Common Issues With Porter Cable Air Compressor
Porter Cable air compressors are known for their reliability and performance, but like any machinery, they can encounter issues over time. Understanding the common problems that may arise with your Porter Cable air compressor can help you troubleshoot effectively and ensure smooth operation. Here, we will discuss some of the Common Issues with Porter Cable Air Compressor and how to address them.
Power issues can prevent your Porter Cable air compressor from starting or running properly. This could be due to a faulty power source, damaged power cord, or issues with the power switch.
Pressure problems are common in air compressors and may manifest as fluctuations in pressure output or the compressor not reaching the desired pressure levels. This could be caused by leaks, clogs in the air filter, or issues with the pressure regulator.
Leakage concerns can lead to loss of air pressure and inefficient operation of your air compressor. Common areas where leaks may occur include fittings, hoses, connectors, or even in the tank itself.
Please let me know if you need any further assistance.
Power Issues
Power issues can commonly occur with Porter Cable air compressors, impacting their performance. Troubleshooting these power-related problems is crucial for ensuring your compressor operates efficiently.
Electrical Supply Check
Begin by checking the electrical supply to the air compressor to identify any underlying issues affecting its power source.
Motor Capacitor Inspection
Inspect the motor capacitor to determine if it is functioning properly and providing the necessary power to the compressor.
Pressure Problems
If your Porter Cable air compressor is experiencing pressure problems, it can significantly impact its performance. It’s essential to troubleshoot and resolve these issues to ensure the smooth operation of your air compressor. Pressure problems can arise due to various factors, including issues with the pressure switch and air filter. In this guide, we’ll walk you through the steps to troubleshoot pressure-related issues with your Porter Cable air compressor.
Pressure Switch Examination
The pressure switch plays a crucial role in regulating the air compressor’s pressure levels. To troubleshoot potential issues with the pressure switch, follow these steps:
- Turn off the air compressor and disconnect it from the power source.
- Locate the pressure switch, usually positioned near the motor.
- Inspect the pressure switch for any signs of damage or wear.
- Check the electrical connections to ensure they are secure and free from corrosion.
- If you notice any damage or irregularities, consider replacing the pressure switch with a new unit.
Air Filter Assessment
A clogged or dirty air filter can impede the airflow and lead to pressure problems. Follow these steps to assess and address potential air filter issues:
- Locate the air filter housing on your Porter Cable air compressor.
- Remove the air filter and inspect it for dirt, debris, or blockages.
- If the air filter appears dirty or clogged, clean it using compressed air or consider replacing it with a new filter.
- Ensure that the air filter housing is securely sealed to prevent any air leaks.
- Regularly check and maintain the air filter to prevent pressure-related issues in the future.
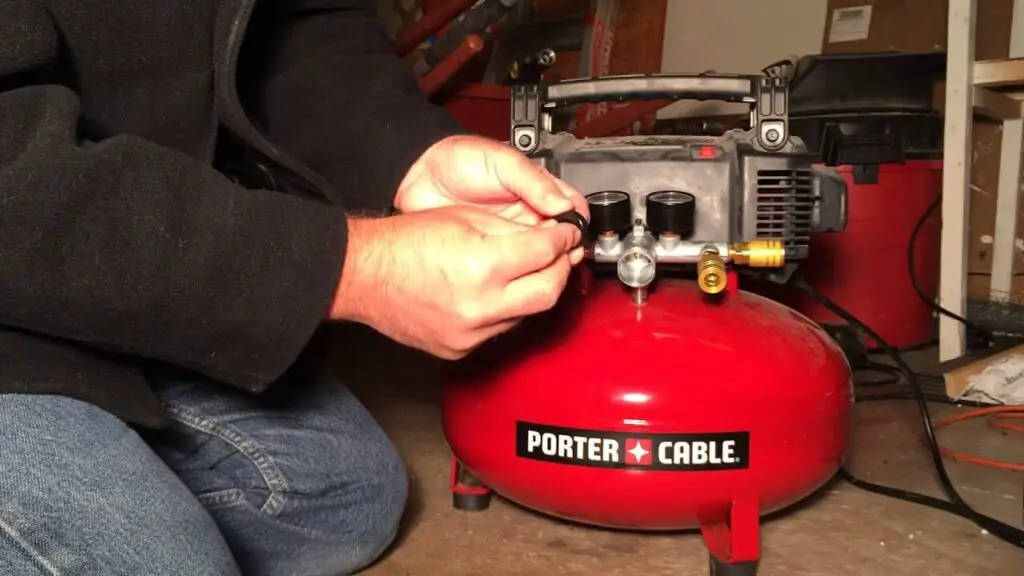
Leakage Concerns
One of the common issues that users may encounter with Porter Cable air compressors is air leakage. Leakage can affect the performance and efficiency of the compressor, leading to wasted energy and decreased output. However, identifying and resolving these leaks can be a straightforward process.
Checking For Air Leaks
To start troubleshooting air leaks, it’s essential to perform a thorough check of the entire compressor system. Begin by inspecting all connections, joints, and fittings for any visible signs of leakage. Look out for hissing sounds or a decrease in air pressure, as these are clear indications of leaks.
If you suspect a leak but cannot identify its source visually, there are a few techniques you can use to pinpoint the problem areas. First, apply a soapy water solution around the suspected areas. Any air leaks will result in the formation of bubbles, allowing you to locate and fix the issues efficiently. Alternatively, you can use a handheld air leak detector to detect any escaping air.
Inspecting Seals And Valves
In addition to checking visible connections, pay close attention to the seals and valves on your Porter Cable air compressor. Over time, these components can wear out or become damaged, causing air leaks. Inspect the seals and valves thoroughly for any signs of wear, cracks, or misalignment.
If you notice any issues with the seals or valves, they may need replacement. It’s crucial to refer to the manufacturer’s manual or seek professional help to ensure proper installation and compatibility with your compressor model. Regularly replacing worn-out seals and valves can significantly reduce the likelihood of air leaks and enhance the longevity of your compressor.
Remember, effectively troubleshooting air leaks ensures optimal performance and extends the lifespan of your Porter Cable air compressor. By regularly checking for leaks and inspecting seals and valves, you can maintain a steady and efficient airflow, saving both time and energy.
Maintenance And Prevention
Regular maintenance and prevention measures are essential for keeping your Porter Cable air compressor in optimal working condition. By following these simple steps, you can ensure efficient and trouble-free performance, prolong the lifespan of your machine, and avoid costly repairs.
Regular Oil Level Check
Checking the oil level in your Porter Cable air compressor should be a regular part of your maintenance routine. This simple yet crucial task helps to prevent damage to vital components, ensures smooth operation, and extends the life of your compressor.
To check the oil level, follow these steps:
- Start by locating the oil fill cap or dipstick on your air compressor. It is usually located on the side or top of the compressor.
- Remove the oil fill cap or pull out the dipstick and wipe it clean with a cloth or paper towel.
- Insert the dipstick back into the oil fill hole without screwing it in. Remove it again and check the oil level. Ensure that the oil adheres to the manufacturer’s recommended level, which is typically indicated by a “Full” or “Fill” mark on the dipstick.
- If the oil level is low, add the recommended oil type gradually, taking care not to overfill.
- Repeat this process periodically to ensure the oil level remains within the recommended range.
Proper Drainage Practices
Proper drainage of the air compressor tank is essential for maintaining the efficiency and longevity of your Porter Cable compressor. Regular draining prevents moisture buildup, extends the life of internal components, and helps to avoid rust and corrosion. Follow these steps to ensure proper drainage:
- Start by shutting off the compressor and unplugging it from the power source.
- Locate the tank drain valve, typically positioned at the bottom of the air compressor tank.
- Place a container or bucket underneath the drain valve to catch any water or debris.
- Slowly open the drain valve to release the accumulated moisture. Allow the tank to fully drain until no more water or condensation exits.
- Once the tank is empty, close the drain valve securely.
- Perform this drainage procedure regularly, especially after each use or if the compressor has been unused for an extended period.
Frequently Asked Questions Of Porter Cable Air Compressor Troubleshooting
How Do I Troubleshoot My Porter Cable Air Compressor?
To troubleshoot your Porter Cable air compressor, start by checking for power supply issues, inspecting the air filter, checking the pressure switch, and examining the tubing for leaks.
Why Is My Porter Cable Air Compressor Not Starting?
If your Porter Cable air compressor is not starting, check the power source, ensure the pressure switch is working properly, and inspect the motor capacitor for any signs of damage.
What Should I Do If My Porter Cable Air Compressor Is Overheating?
If your Porter Cable air compressor is overheating, check for proper ventilation, inspect the cooling fan, clean or replace the air filter, and ensure the compressor oil level is correct.
How Can I Fix A Leaky Air Hose On My Porter Cable Air Compressor?
To fix a leaky air hose on your Porter Cable air compressor, start by locating the leak, disconnecting the hose, trimming the damaged section, and reattaching or replacing the hose using hose clamps or compression fittings.
Why Is My Porter Cable Air Compressor Making Unusual Noises?
If your Porter Cable air compressor is making unusual noises, it could be due to loose components, worn-out bearings, a faulty pressure relief valve, or issues with the motor. Inspect these parts and replace or repair them as necessary.
Conclusion
Troubleshooting your Porter Cable air compressor can be a straightforward process with the right knowledge and guidance. By identifying and addressing common issues such as leaks or inadequate pressure, you can ensure optimal performance and longevity for your equipment. Additionally, regular maintenance and proper usage are key in preventing future problems.
Remember to refer to your user manual for specific instructions and seek professional help when needed.
")


I was given an older Porter-Cable pancake air compressor, a 6-gallon 150 psi oil-free compressor. I took it apart and cleaned what I could get to.
It was not cutting off; it ran all the time. So, I replaced some hose clamps and replaced the outlets where the air hose connects just to make sure it was not that. I found one was bad. I replaced some of the parts that are part of the manifold behind the pressure adjustment valve. It worked good for about a year, but now it is leaking air somewhere, I have sprayed soap water all over it and while it is not running, it doesn’t show any bubbles. While it is running, bubbles are seen coming out of the on-off switch and somewhere under the black plastic enclosure, but I cannot find it when I take it apart.
Should I go ahead and replace the pressure control switch to be on the safe side? The guy who gave it to me said he thought the gauges leaked because they are corroded on the inside, you can barely see the pressure amount. One gauge is larger than the other one. One is a 200psi and the other is a 300psi gauge.
Sorry, I can’t give any better information, I am new to all of this, and I don’t know the terminology or the names of the parts.
Thank you very much,
Thank you for sharing your experience! It sounds like you’ve already done a great job troubleshooting and replacing parts to keep your older Porter-Cable compressor running. Let’s address the issues step by step:
1. Air Leaks While Running: If you’re seeing bubbles near the on-off switch and under the plastic enclosure, it’s likely that air is escaping from the pressure control switch or nearby seals. Replacing the pressure control switch is a good step, especially if the compressor has been running for years and the switch shows signs of wear. While replacing it, check for any damaged gaskets or seals around the switch area.
2. Corroded Gauges: Corroded gauges can lead to inaccurate readings and may cause problems with pressure regulation. Replacing both gauges would be a good idea, especially if you’re unsure about their accuracy. Make sure to get gauges that match the specifications of your compressor (e.g., PSI rating).
3. Finding Hidden Leaks: Since you’re seeing bubbles while the compressor is running but not when it’s off, it’s worth closely inspecting the connections and fittings under pressure. Pay attention to areas like the manifold, tubing, and fittings around the pressure adjustment valve. A handheld leak detector can also help locate hidden leaks more precisely than soapy water.
4. General Maintenance Tips:
Don’t worry about the terminology—what you’ve described is clear and helpful! If you need further guidance while replacing parts, your compressor’s user manual or a local hardware expert might provide some extra clarity. Good luck, and feel free to share updates or ask additional questions if needed! 😊