Is your well water system acting up? If you’ve noticed irregular water pressure or sudden pump cycling, the problem might lie with your pressure tank.
Understanding how a pressure tank works and spotting issues early can save you time, money, and frustration. You’ll discover simple troubleshooting tips that anyone can follow to keep your well running smoothly. Ready to fix your water worries? Let’s dive in and get your system back on track.
Common Pressure Tank Issues
Pressure tanks play a vital role in well water systems. They help keep water pressure steady and prevent pumps from running too often. Problems with pressure tanks can cause water issues at home. Understanding common pressure tank problems helps fix them quickly.
Low Water Pressure
Low water pressure can happen if the pressure tank loses air. The tank needs air to push water out. When air escapes, water flow slows down. Sediment build-up inside the tank can also block water flow. Checking air levels and cleaning the tank can restore good pressure.
Tank Constantly Running
The pump may run all the time if the pressure tank is faulty. A broken bladder inside the tank can cause this. Water fills the tank but does not push out properly. This forces the pump to work nonstop. Fixing or replacing the bladder solves the problem.
Waterlogged Tank
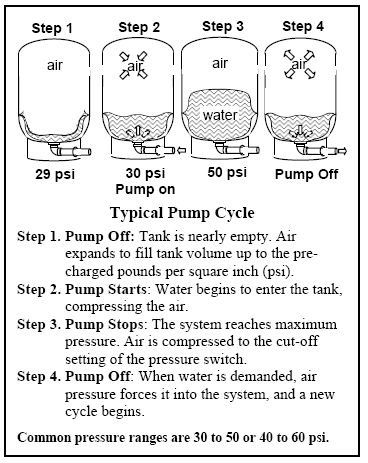
A waterlogged tank means the tank is full of water with no air cushion. This causes the pump to cycle quickly. The tank cannot hold enough air to balance pressure. Draining the tank and refilling it with air can fix waterlogging. Regular checks help avoid this issue.
Air Leaks
Air leaks reduce the pressure tank’s efficiency. Leaks often occur around fittings or the tank’s valve. Air loss means the tank cannot push water properly. Finding and sealing leaks restores air pressure. Use soapy water to find small leaks on the tank surface.
Tools And Materials Needed
Troubleshooting a pressure tank for a well needs the right tools and materials. Having these ready makes the job easier and safer. Each tool plays a key role in checking and fixing the tank. Prepare everything before starting to avoid delays and mistakes.
Pressure Gauge
A pressure gauge shows the tank’s water pressure. It helps find if pressure is too low or high. Use a reliable gauge for clear readings. Attach it to the tank’s valve to monitor pressure changes.
Air Compressor Or Pump
An air compressor or pump adds air to the tank. This keeps the pressure balanced inside. Use a pump that fits your tank size. Check the air pressure often to keep it steady.
Wrenches And Screwdrivers
Wrenches and screwdrivers help open and tighten tank parts. They remove bolts and screws safely. Choose the right size tools for your tank fittings. This prevents damage and ensures a tight seal.
Replacement Parts
Keep common replacement parts ready, like valves and diaphragms. These parts wear out and need changing. Use parts made for your tank model. Having spares saves time during repairs.
Diagnosing Pressure Tank Problems
Diagnosing pressure tank problems is key to keeping your well system running smoothly. A pressure tank stores water and controls the pressure in your pipes. Problems here can cause low water pressure or pump issues. Checking the tank early can save time and money.
This section covers simple steps to find common pressure tank issues. Each step helps you understand the tank’s condition and what needs fixing.
Checking Pressure Levels
Start by checking the tank’s pressure with a pressure gauge. The tank should have a pressure close to the pump’s cut-in pressure. Turn off the pump and drain some water to get an accurate reading. If the pressure is too low or too high, adjust the air charge with an air compressor or release valve.
Inspecting For Leaks
Look for water around the tank base and pipe connections. Small leaks cause big problems over time. Check for rust or corrosion on the tank body. Tighten any loose fittings and replace damaged parts. Leaks reduce tank efficiency and waste water.
Testing The Bladder Or Diaphragm
Inside the tank, a bladder or diaphragm separates water from air. If this part breaks, the tank won’t hold pressure. Tap the tank; a hollow sound means the bladder is intact. A dull sound can mean water fills the entire tank. You can also drain the tank and check for water inside the air side. Replace the bladder if needed.
Examining The Well Pump
The pump works with the pressure tank. Check the pump’s operation and listen for unusual noises. A failing pump may cause pressure drops or cycling issues. Inspect the pump’s wiring and switch for damage. Proper pump function ensures steady water flow and pressure.

Fixing Air Pressure Issues
Fixing air pressure issues in a pressure tank is key to keeping your well system working well. Low or high air pressure can cause pump problems and reduce water flow. Checking and correcting the air pressure helps avoid damage and keeps water delivery steady.
Simple steps like adjusting the tank air pressure, recharging the air charge, or replacing the air valve can solve many problems. These fixes do not need special tools or skills but improve system performance greatly.
Adjusting Tank Air Pressure
First, turn off the pump and drain water from the tank.
Use a tire pressure gauge to check the air pressure at the tank’s valve.
The ideal pressure is usually 2 psi below your pump cut-in pressure.
Add air with an air compressor or pump if pressure is too low.
If pressure is too high, release some air carefully.
Turn the pump back on and check if the system works properly.
Recharging The Air Charge
Over time, the air inside the tank can dissolve into the water.
This reduces air volume and causes pressure problems.
Drain all water from the tank to empty it fully.
Add air to the tank until it reaches the recommended pressure.
Check the pressure with a gauge to ensure accuracy.
This restores the balance and helps the tank work well again.
Replacing The Air Valve
The air valve can leak or break, causing air loss.
Locate the valve on top of the tank.
Unscrew and remove the old valve carefully.
Install a new valve matching the tank’s specifications.
Make sure it fits tightly to avoid future leaks.
Test the tank pressure after replacement to confirm fix.
Repairing Or Replacing The Bladder
The bladder inside a pressure tank plays a key role in maintaining water pressure. Over time, it can wear out or break. Repairing or replacing the bladder can fix many common well water problems. This section explains how to identify bladder failure and guide you through its removal and installation.
Identifying Bladder Failure
A failed bladder causes pressure drops and water surges. The tank may feel waterlogged or heavy. Listen for unusual noises when the pump runs. Check for constant pump cycling. These signs suggest the bladder needs attention.
Removing The Old Bladder
Turn off the power to the pump before starting. Drain the tank completely to avoid spills. Remove the tank cover carefully. Gently pull out the old bladder from inside the tank. Inspect the tank interior for rust or damage.
Installing A New Bladder
Choose a bladder that matches your tank size and pressure rating. Insert the new bladder carefully, avoiding tears or folds. Ensure it seats properly inside the tank. Reattach the tank cover securely. Restore power and test the system for proper pressure.

Addressing Waterlogging Problems
Waterlogging in a pressure tank causes many well system problems. It happens when too much water fills the tank, leaving little or no air inside. This reduces the tank’s ability to maintain pressure. Pumps then run more often, wearing out faster. Fixing waterlogging is key to keeping your well system healthy and efficient.
Draining The Tank
Start by turning off the power to the pump. Open a faucet to release water pressure. Then, find the tank’s drain valve at the bottom. Attach a hose and drain the water completely. Draining removes excess water that causes waterlogging. Make sure the tank is empty before moving on.
Restoring Proper Air-to-water Ratio
After draining, check the tank’s air pressure with a gauge. The air pressure should be 2 psi below the pump cut-on pressure. Add air with an air compressor or pump if needed. The right air-to-water ratio allows the tank to work properly. This keeps the pump cycling smoothly and extends its life.
Maintenance Tips For Longevity
Maintaining your pressure tank is key to a long-lasting well system. Simple care steps help avoid costly repairs and keep water flow steady. Regular attention prevents small issues from becoming big problems.
Regular Pressure Checks
Check the tank pressure often to ensure it stays within the right range. Use a pressure gauge to measure it. Low pressure can cause pump damage. High pressure may lead to leaks. Adjust the air charge as needed for best performance.
Inspecting For Corrosion
Look over the tank surface regularly for signs of rust or corrosion. Corrosion weakens the tank and can cause leaks. Use a flashlight to see hard-to-reach spots. Clean any dirt or debris to prevent moisture buildup. Early detection saves money and extends tank life.
Scheduling Professional Inspections
Have a qualified technician inspect your pressure tank yearly. They check parts that are hard to assess alone. Professionals find hidden problems and fix them early. Routine inspections keep your well system safe and efficient. Trust experts to keep your tank in top shape.
Frequently Asked Questions
What Causes Pressure Tank Failure In Well Systems?
Pressure tanks can fail due to leaks, corrosion, or air charge loss. Worn-out parts and poor maintenance also cause issues. Regular checks help spot problems early.
How To Check Pressure Tank Air Charge Properly?
Use a tire pressure gauge on the tank’s air valve. The air pressure should be 2 psi below the pump cut-in pressure. Adjust if the reading is too low or high.
Why Is My Pressure Tank Waterlogged?
A waterlogged tank has lost its air cushion inside. This causes the pump to cycle too often. Checking the air charge and draining the tank can fix it.
How Often Should A Pressure Tank Be Inspected?
Inspect the pressure tank every 6 months for signs of leaks or rust. Check the air pressure monthly. Timely inspections prevent costly repairs and system failures.
Can A Faulty Pressure Tank Damage My Well Pump?
Yes, a bad pressure tank makes the pump work too hard. This leads to early pump wear or failure. Fixing tank issues protects the pump and saves money.
Conclusion
A pressure tank helps keep your well system stable. It prevents pump damage and saves energy. Checking the tank often avoids costly repairs. Knowing how to spot problems saves time and money. Simple steps can improve water flow and pressure.
A well-maintained pressure tank means a reliable water supply. Take care of your tank to avoid surprises later. Small efforts now bring big benefits for your well. Keep your water system running smooth and steady.
")


