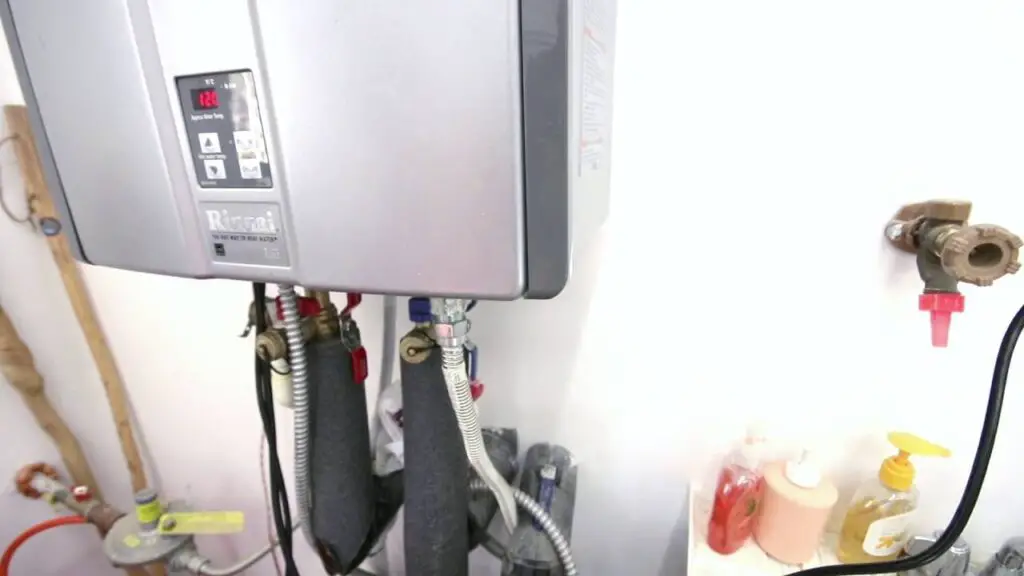
Having trouble with your Rinnai water heater? Ensure that the gas valve is open and all sensors, wiring, fuses, and electrical components are in working order.
Check for condensation or debris on the burners that could prevent ignition. Additionally, inspect the water filter and replace it if necessary, as a clogged filter can lead to cold water. If the heater is not igniting, bleed the gas lines and secure the gas connection.
Remember to lower the temperature setting if you’re experiencing a lack of hot water. Troubleshooting these common issues can help resolve problems with your Rinnai water heater.
Common Issues With Rinnai Water Heaters
When it comes to Rinnai water heaters, there are a few common issues that homeowners may encounter. These issues can include a lack of hot water, water going cold unexpectedly, and the heater not igniting. In this section, we will explore each of these issues in detail and provide troubleshooting tips to help you resolve them.
No Hot Water
If you’re experiencing a complete lack of hot water from your Rinnai water heater, there are a few things you can check. First, ensure that the gas valve is open and that you have paid your gas bill. Sometimes, a closed gas valve or overdue payment can cause the heater to stop providing hot water.
Next, check all sensors, wiring fuses, and electrical components to make sure they haven’t burned out. A faulty sensor or a blown fuse can interrupt the heating process and result in no hot water. If any of these components appear damaged or worn out, they may need to be replaced.
Additionally, inspect the burners for condensation or debris buildup. If there is excess moisture or dirt on the burners, it may prevent them from igniting properly, leading to a lack of hot water. Clean the burners gently using a soft cloth and ensure they are free from any obstructions.
Water Going Cold
If your Rinnai water heater seems to be providing hot water initially but then suddenly goes cold, there may be a few causes for this issue. One potential cause is a clogged water filter. Depending on the model of your water heater, the filter can be located either inside or outside the unit. Regularly check and replace the filter every few months to prevent any clogs that could disrupt the flow of hot water.
Another possible cause of water going cold is a faulty temperature sensor. The temperature sensor is responsible for regulating the water temperature. If it malfunctions or becomes inaccurate, it can cause the water to go cold unexpectedly. In this case, you may need to have the temperature sensor replaced by a professional.
Heater Not Igniting
If your Rinnai water heater fails to ignite, there are a few steps you can take to troubleshoot the issue. One common cause is gas supply problems. Check for obstructions in the gas lines and bleed the lines if necessary, especially if you have recently had a new gas installation. Also, make sure that the gas pressure is correct and meets the manufacturer’s specifications.
Additionally, check the ignition system for any loose connections or faulty wiring. A loose connection or damaged wire can prevent the ignition sequence from starting. If you notice any issues with the wiring, it’s best to consult a professional electrician or Rinnai technician for repairs.
Remember, if you encounter any issues with your Rinnai water heater that you are unable to resolve on your own, it’s always recommended to seek the assistance of a qualified professional. They can diagnose the problem accurately and provide the necessary repairs or replacements to ensure your water heater operates efficiently.
Troubleshooting Steps
When your Rinnai water heater is not working properly, troubleshooting can help identify and resolve the issue. Here are some steps you can take to troubleshoot common problems.
Check Gas Valve And Bill
One common cause of a Rinnai water heater not producing hot water is a closed gas valve or an unpaid gas bill. To check the gas valve, ensure it is open by turning it counterclockwise. Additionally, make sure you have paid your gas bill to ensure uninterrupted gas supply to the heater.
Inspect Sensors And Electrical Components
Sensors, wiring fuses, and electrical components can sometimes malfunction and cause your Rinnai water heater to stop working. To troubleshoot this issue, inspect all sensors, including temperature sensors and flame sensors, for any signs of damage or corrosion. Check wiring connections for loose or disconnected wires. Additionally, examine fuses and circuit breakers to ensure they haven’t burned out. If you find any issues, replace the faulty sensors or electrical components as necessary.
Clean Burners And Igniters
Blocked or dirty burners and igniters can prevent your Rinnai water heater from igniting properly. To resolve this problem, clean the burners and igniters to remove any debris, condensation, or other obstructions. Follow the manufacturer’s instructions for proper cleaning techniques. Regular maintenance and cleaning of burners and igniters can help ensure optimal performance and prevent ignition issues.
By following these troubleshooting steps, you can resolve common problems with your Rinnai water heater and get it back to producing hot water efficiently. Remember to consult the manufacturer’s manual or seek professional assistance if you encounter any difficulties or if the issue persists.
Replacing And Maintaining Parts
When it comes to troubleshooting your Rinnai water heater, one important aspect is replacing and maintaining the necessary parts. By regularly checking and replacing water filters, bleeding gas lines, and securing connections, you can ensure the optimal performance and longevity of your water heater.
Checking And Replacing Water Filter
Regularly checking and replacing the water filter is crucial for the efficient functioning of your Rinnai water heater. The water filter helps prevent dirt, debris, and other impurities from entering the system, which can cause clogs and reduce the heater’s overall performance.
To check and replace the water filter, follow these easy steps:
- Locate the water filter, which may be located either inside or outside the unit, depending on the model.
- Remove the filter housing and take out the old filter.
- Inspect the filter for any signs of clogging or damage. If necessary, clean it or replace it with a new one.
- Reinstall the filter housing and ensure it is securely in place.
Bleeding Gas Lines And Securing Connections
Another important part of maintaining your Rinnai water heater is bleeding the gas lines and securing connections. Over time, air may become trapped in the gas lines, hindering the ignition process and causing your heater to malfunction. Securing connections is essential to prevent any gas leaks that can be hazardous.
Here’s how you can bleed the gas lines and secure connections:
- Locate the gas line and shut off the gas supply leading to the water heater.
- Carefully loosen the gas line connection using a wrench to allow any trapped air to escape.
- Once the hissing sound stops and you smell gas, retighten the gas line connection.
- Inspect all other connections for any signs of wear or leakage. If necessary, tighten or replace any faulty connections.
Note: Be cautious when working with gas lines and consider consulting a professional if you are unsure or uncomfortable performing the tasks.
Additionally, referring to the troubleshooting manual provided by Rinnai can offer valuable insights into specific parts that may need replacing or maintenance. This manual contains detailed instructions, diagrams, and troubleshooting techniques tailored to your specific Rinnai water heater model.
By understanding how to check and replace the water filter, bleed gas lines, and secure connections, you can effectively troubleshoot your Rinnai water heater and ensure it continues to provide consistent, hot water whenever you need it.
Tips To Improve Performance
If you’re experiencing issues with your Rinnai water heater, there are several troubleshooting steps you can take to improve its performance and ensure hot water is consistently available in your home. In this section, we’ll discuss three important tips: adjusting the temperature setting, proper installation, and understanding error codes. By following these tips, you can optimize your Rinnai water heater’s performance and avoid any potential issues.
Lower Temperature Setting
One of the first things you can do to improve your Rinnai water heater’s performance is to lower the temperature setting. By adjusting the temperature to an appropriate level, you can prevent scalding and also save energy. Lowering the temperature also helps to reduce mineral buildup and potential damage to the unit. Refer to the manufacturer’s instructions for your specific Rinnai model to learn how to adjust the temperature setting properly.
Proper Installation
Proper installation is crucial for the optimal performance of your Rinnai water heater. Ensure that the unit is installed by a professional plumber or a qualified technician who is familiar with Rinnai products. Incorrect installation can lead to various issues, such as insufficient water flow, inconsistent temperature, and even damage to the unit. Additionally, make sure that the installation follows local codes and regulations to ensure safety and efficiency.
Understanding Error Codes
Rinnai water heaters are equipped with advanced technology that includes error codes to help diagnose and troubleshoot issues. It’s important to familiarize yourself with these error codes and their meanings to effectively address any problems that arise. Error codes can indicate issues with gas supply, water flow, ventilation, or other components of the unit. Refer to the manufacturer’s manual or online resources provided by Rinnai to understand what each error code means and the recommended actions to resolve them.
By considering these tips, you can enhance the performance of your Rinnai water heater and ensure reliable hot water supply throughout your home. Remember to always refer to the manufacturer’s instructions and consult a professional when needed for any repairs or maintenance.
When To Call A Professional
While some Rinnai water heater troubleshooting tasks can be done on your own, there are certain situations where it is best to call a professional. Complex repairs or replacements and safety concerns are two primary scenarios that require the expertise of a skilled technician.
Complex Repairs Or Replacements
When it comes to complex repairs or replacements, it is essential to call a professional to ensure the job is done correctly. Rinnai water heaters have intricate components and systems that require specialized knowledge and tools to address any issues. Attempting to handle complex repairs or replacements on your own can lead to further damage or even void the warranty.
A professional plumber or technician will have the expertise to diagnose and fix complex problems, such as malfunctioning electronic components, faulty valves, or issues with the heating elements. They will also have access to genuine Rinnai parts and replacements, ensuring long-lasting solutions to keep your water heater running efficiently.
Safety Concerns
The safety of your home and family should always be a top priority. When it comes to Rinnai water heater troubleshooting, certain situations can pose safety concerns that require professional intervention. Ignoring these issues or attempting to fix them without the necessary expertise can result in hazardous consequences.
For instance, if you notice gas leaks, strange odors, or unusual noises coming from your water heater, it is crucial to call a professional immediately. These signs may indicate potential gas leakage or a malfunctioning gas valve, which can lead to fire hazards and carbon monoxide poisoning if not addressed promptly.
Additionally, if you encounter electrical problems, such as frequent tripping of circuit breakers or flickering lights, it’s vital to seek professional assistance. These issues could point to electrical faults within the unit that require the expertise of an electrician to prevent electrical hazards.
By calling a professional to handle complex repairs or replacements and address safety concerns, you can ensure the longevity, efficiency, and safety of your Rinnai water heater.
Frequently Asked Questions Of Rinnai Water Heater Troubleshooting
How Do I Reset My Rinnai Water Heater?
To reset your Rinnai water heater, follow these steps: 1. Turn off the power supply to the unit. 2. Locate the control panel on the water heater. 3. Press and hold the reset button for 5 seconds. 4. Release the reset button. 5. Turn the power supply back on. If you continue to experience issues with your Rinnai water heater, it’s best to contact a professional plumber for assistance.
Why Am I Not Getting Hot Water From My Rinnai Tankless Water Heater?
If you’re not getting hot water from your Rinnai tankless water heater, check the gas valve, ensure you’ve paid your gas bill, and inspect all sensors, wiring fuses, and electrical components. Remove any condensation or debris from the burners. Also, check the water filter and replace it if necessary.
Gas supply issues may prevent the unit from igniting, so bleed the gas lines and secure the connection.
Why Does My Rinnai Tankless Water Heater Keep Going Cold?
If your Rinnai tankless water heater keeps going cold, check the water filter. Replace it every few months if it becomes clogged. Also, ensure there are no obstructions, gas supply issues, or faulty electrical components. Bleed gas lines if necessary and secure gas connections.
Why Is My Rinnai Heater Not Igniting?
Check gas valve, sensors, and burners for any obstructions, debris, or damage. Bleed gas lines if necessary and ensure proper gas supply pressure. Secure gas connection.
How Do I Reset My Rinnai Water Heater?
To reset your Rinnai water heater, follow these steps:
1. Locate the power button on your water heater. 2. Press and hold the power button for 5 seconds. 3. Release the button and wait for the unit to shut down completely. 4. After the unit has shut down, wait for a few seconds and then press the power button again to restart the water heater.
Conclusion
To troubleshoot your Rinnai water heater, make sure to check the gas valve, sensors, wiring fuses, and electrical components. Additionally, check for any condensation or debris on the burners that could prevent ignition. If you’re experiencing cold water, consider replacing the water filter.
Also, ensure proper gas supply and connections to avoid ignition issues. By following these troubleshooting steps, you can ensure your Rinnai water heater is working efficiently. Remember to refer to the Rinnai Tankless Water Heater Troubleshooting Manual for more detailed instructions.
Don’t let hot water issues dampen your day – get your Rinnai water heater back on track with these troubleshooting tips.
")


