You can fix your alarm by vacuuming the sensors or checking the power connection, as firex i4618ac troubleshooting often involves clearing dust or verifying the AC circuit. The most common cause for false alarms or chirping is dust buildup inside the sensing chamber. If the unit continues to chirp or alarm after cleaning, it’s likely reaching the end of its operational life. You should check the date on the back of your unit, as the National Fire Protection Association recommends replacing smoke alarms every 10 years.
Why smoke alarms sound false alerts
The primary reason for unexpected alerts is the accumulation of airborne particles inside the smoke sensing chamber. Smoke alarms detect light scattering caused by smoke, but dust, spider webs, and high humidity mimic these patterns. When the sensor can’t distinguish between particulate matter and smoke, it triggers a false alarm.
A common mistake is failing to vacuum the alarm vents every six months. If you see a buildup of grey lint or cobwebs, the sensor is already compromised. Use a soft brush attachment on your vacuum to clear the chamber without damaging the internal optics.
Another frequent cause is an unstable power supply or a loose connection in the wiring harness. Since this model is hardwired into your home’s electrical system, any power surge can cause the unit to report an error. If the battery backup is old or improperly seated, the unit will chirp to signal it needs attention.
Environmental factors like steam from a bathroom or smoke from a nearby kitchen also cause issues. If the alarm is placed within ten feet of a cooking area, grease particles coat the sensor over time. This buildup makes the device hypersensitive.
If your alarm triggers during routine cooking, relocate the unit at least fifteen feet away from the stove. If the chirping persists after cleaning and battery replacement, the internal sensor has likely reached its end-of-life threshold and requires a full unit replacement.
Clean the sensor chamber
If your alarm is sounding for no reason, you should start by removing the unit from its mounting bracket and cleaning it. Use a vacuum cleaner with a soft brush attachment to clear out any dust from the vents and the internal chamber. Don’t use water, soap, or any chemical cleaners, as these can damage the sensitive electronic components inside the plastic housing.
This fix is intended for users who have noticed their alarm chirping or sounding intermittently without visible smoke. If you notice a heavy layer of dust or debris inside the vents, cleaning it will usually resolve the issue immediately. After vacuuming, press the test button to ensure the unit is functioning correctly. If the alarm continues to sound after a thorough cleaning, the sensor itself may be permanently degraded.
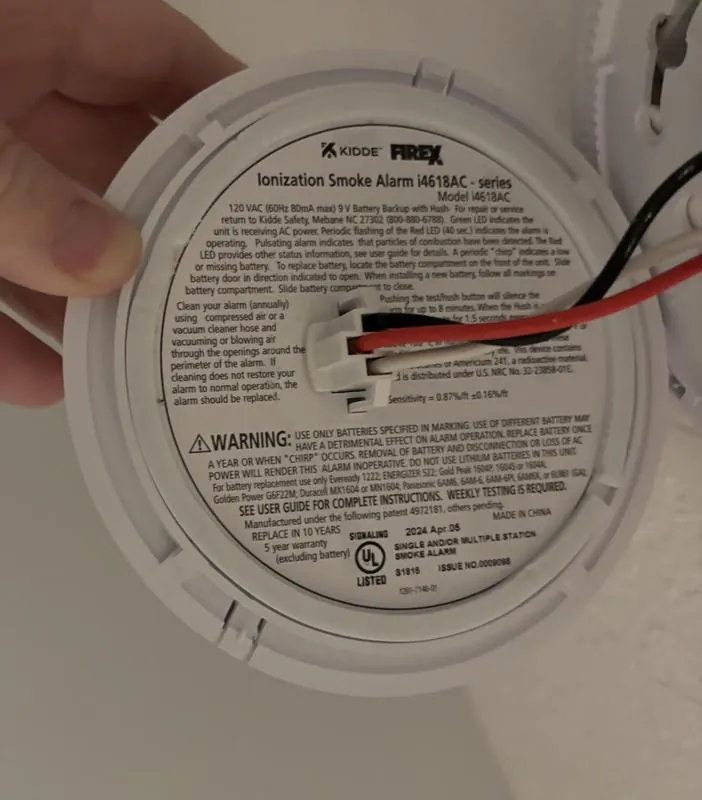
Distinguishing between a dirty sensor and a failing unit is simple. If the alarm sounds a single, sharp chirp every 30 to 60 seconds, it’s likely a low battery or a dirty chamber. If the alarm emits a continuous, loud blast, the sensor is likely faulty or the unit has reached its 10-year expiration date. Check the date stamped on the back of the device; if it’s older than a decade, replace it immediately rather than cleaning it.
If you’re uncomfortable working with electrical fixtures, contact a licensed electrician. Never attempt to open the sealed plastic casing of the alarm, as this voids the warranty and may expose you to internal electrical components that aren’t meant for user repair.
Troubleshooting Firex i4618ac power and battery
If cleaning doesn’t stop the chirping, you must verify the power connection and the backup battery status. Ensure the wiring harness is pushed firmly into the back of the unit and that the alarm is fully locked onto the mounting plate. If the unit is loose, the connection between the house power and the alarm might be intermittent, causing the device to report a fault.
For the backup battery, you should replace the old one with a fresh 9-volt battery at least once a year. Make sure the battery is snapped firmly into the compartment and that the door is closed completely. A low battery will cause a single, short chirp every minute to alert you that the power source is failing.
If the chirping stops after you replace the battery, the issue was simply a power failure. If the unit continues to chirp after you have installed a new battery and ensured a tight connection, the internal electronics have likely failed. In this case, you shouldn’t attempt to repair the internal circuitry yourself, as smoke alarms are life-safety devices that must be replaced if they’re defective.
Replace the alarm unit
In cases where cleaning and battery replacement fail to stop the noise, the alarm has likely reached the end of its service life. Every smoke alarm has an internal expiration date, which you can find printed on the back label. If the unit is older than 10 years, it’s no longer reliable and must be replaced immediately to maintain home safety.
This fix is the only safe option if the device is physically damaged or if the internal diagnostic lights indicate a permanent fault. Replacing the unit is straightforward because most Firex alarms use a standard plug-in harness. You should purchase a new unit that matches the mounting bracket, if possible, to avoid having to drill new holes in your ceiling or wall.
If you aren’t comfortable replacing the hardware yourself, hire a qualified professional to handle the installation. It’s vital to ensure the new unit is properly connected to the AC power and that the backup battery is installed before you mount it. Once the new alarm is in place, press the test button to confirm it’s fully operational.
Mistakes that cause more problems
Using compressed air: Blowing high-pressure air into the sensor often forces dust particles deeper into the optical chamber. This creates a permanent film on the internal mirrors, which can trigger chronic false alarms that eventually force you to replace the entire unit.
Painting the alarm: Never paint the cover or the vents. Even a thin layer of paint seals the intake slots, blocking the airflow necessary for smoke particles to reach the sensor. If you’re renovating, remove the unit entirely before painting the ceiling.
Disabling the power: Unplugging the unit or removing batteries leaves your home without fire protection. If your alarm chirps due to a low battery, replace the cell immediately rather than disconnecting the device.
Ignoring expiration dates: Sensors degrade after 10 years. If the manufacturing date is missing or illegible, assume the unit is expired. Relying on an old device creates a false sense of security while leaving your family vulnerable to undetected smoke.
Managing your smoke alarm maintenance
| If you’re doing this | Do this instead | Why |
|---|---|---|
| Ignoring the chirping | Replace the battery | Chirping means the power is low |
| Washing with water | Vacuum with a brush | Water ruins the electronic circuit |
| Painting the ceiling | Remove the alarm first | Paint blocks the smoke vents |
| Waiting for an alarm | Test it monthly | Testing ensures the sensor works |
Most homeowners wait for the low-battery chirp to act, but this is a dangerous gamble. If your alarm chirps in the middle of the night, you lose the protection of that device until you find a spare battery. Keep a fresh pack in your junk drawer at all times.
When vacuuming, use a soft brush attachment to clear dust from the sensor chamber. If you skip this, trapped particles trigger “nuisance alarms” that eventually lead people to disable the unit entirely.
Finally, know your sensor type. If you have a dual-sensor alarm, replace the unit based on the manufacturer’s recommendations in the owner’s manual, as longevity depends on your specific environment. If the date on the back is missing or illegible, the device is already expired. A simple permanent marker note on the side can save you from guessing the age later.
Frequently asked questions
Can I silence a chirping smoke alarm?
You can silence a chirping alarm by pressing the “hush” or “test” button on the front of the unit. This temporarily mutes the alert, allowing you to check for a low battery or dirty sensor. If the chirping persists after the silence period, the battery may be dead or the unit could have an internal fault.
How long does a smoke alarm battery last?
A fresh 9-volt battery in this model typically lasts for 6 to 12 months, though it should be tested regularly. You should replace the battery at least once a year, even if the alarm isn’t chirping, to ensure it has enough power to function during a real emergency. If you live in an area with extreme temperatures, the battery may drain faster than in a climate-controlled home.
Is it safe to use a vacuum on the sensor?
Yes, it’s safe to use a vacuum cleaner with a soft brush attachment on the exterior vents of your smoke alarm. You must be gentle and avoid pressing the vacuum nozzle directly against the plastic, as this could scratch the casing or damage the internal sensor. Never insert any tools, liquids, or objects inside the sensor chamber, as this will permanently damage the delicate electronics.
Why does my alarm chirp after a new battery?
If the unit chirps after installing a new battery, the AC power connection may be loose or the device may have reached its end of life. Ensure the wiring harness is fully connected and the alarm is locked onto its bracket. If the alarm continues to chirp, check the date on the back to see if it requires replacement.
What happens if the power goes out?
If the AC power goes out, your smoke alarm will automatically switch to the 9-volt backup battery to remain active. The unit will continue to provide protection as long as the battery has a sufficient charge. Once the power returns, the unit will switch back to the main electrical supply, and the battery will continue to serve as a secondary safety measure for the next power outage.
How often should I test my smoke alarm?
You should test your smoke alarm by pressing the test button on the cover, following the frequency recommended in your owner’s manual based on your usage. This ensures that the horn is working and that the internal electronics are still able to detect smoke. If the alarm doesn’t sound when you press the button, replace the battery first; if it still doesn’t sound, replace the entire unit.
Conclusion
If you’ve already cleaned the unit and it’s still acting up, it’s time to head to the hardware store for a fresh replacement. Don’t wait until the middle of the night to find out it isn’t working. You’ll sleep much better knowing your home is protected by a brand-new, reliable device.