John Deere Parking Brake Troubleshooting: Quick Fixes
To troubleshoot John Deere parking brake issues, start by checking for corrosion on the cables, which can cause them to snap or brake pads to stick. Use the emergency brake regularly to prevent corrosion.
If the parking brake isn’t engaging, check the latch and adjust it if it’s loose. Ensure the cables are properly connected and undamaged. Regular maintenance and inspections are essential to keeping the parking brake in proper working condition. When it comes to parking brake troubleshooting for a John Deere tractor, it is important to address any issues promptly to ensure the safety and functionality of the equipment.
A faulty parking brake can compromise the ability to secure the tractor and may pose a risk of accidents or damage. This article will provide guidance on how to accurately troubleshoot common parking brake problems on John Deere tractors, including checking for corrosion on cables, adjusting the latch, and ensuring proper connection and maintenance. By following these steps, tractor owners can maintain a reliable parking brake system and enhance overall operational safety.

Common Issues With John Deere Parking Brakes: Troubleshooting Tips
If you own a John Deere tractor or equipment with a parking brake, it’s important to be aware of common issues that can arise with this system. One major culprit behind parking brake problems is corrosion. Over time, exposure to water and dirt can cause cables to erode, leading to potential failures in the parking brake mechanism. When this happens, cables may snap, and brake pads can stick to the wheels, compromising the effectiveness of the parking brake.
Corrosion: A Major Culprit
To prevent your parking brake from becoming stuck or malfunctioning due to corrosion, it is crucial to take proactive steps to address this issue. Here are some troubleshooting tips to help you deal with parking brake problems caused by corrosion:
1. Regularly use the emergency brake
Using your emergency brake regularly can help prevent corrosion from occurring. By engaging the emergency brake, you ensure that the cables are being moved and exercised, reducing the likelihood of rust or buildup.
2. Inspect and clean the cables
Regularly inspect the parking brake cables for any signs of corrosion or damage. If you notice any rust or buildup, clean the affected areas using a wire brush and a suitable cleaning solution. Be sure to dry the cables thoroughly afterward to prevent further corrosion.
3. Lubricate the cables
Lubricating the parking brake cables is essential for maintaining their smooth operation and preventing corrosion. Apply a suitable lubricant, such as silicone spray or white lithium grease, to ensure the cables move freely without any resistance.
4. Check the brake pads
If you are experiencing issues with your parking brake, it is important to check the condition of the brake pads. Inspect them for wear or sticking that may be caused by corrosion. If necessary, replace the brake pads to ensure optimal performance.
5. Consult a professional
If your troubleshooting efforts do not resolve the parking brake issues, it is recommended to consult a professional for an accurate diagnosis and repair. They have the expertise and tools necessary to identify and fix any underlying problems with your John Deere parking brake.
By following these troubleshooting tips and addressing any corrosion issues promptly, you can ensure that your John Deere parking brake remains in good working condition. Regular maintenance and care will help you avoid costly repairs and keep your equipment operating safely and efficiently.
Quick Fixes For Corroded Parking Brakes
One common issue with parking brakes is corrosion. Water and dirt can cause cables to erode, leading to a failure in the parking brake system. When facing a corroded parking brake, there are a few quick and easy steps you can take to troubleshoot the problem. In this article, we will guide you through the process of resolving parking brake issues caused by corrosion.
Step 1: Check For Corrosion
The first step in troubleshooting a corroded parking brake is to visually inspect the brake components for signs of corrosion. Look for any rust or buildup on the brake cables, calipers, or pads. Ensure that the parking brake lever or pedal is functioning properly and not sticking. If you notice any corrosion or irregularities, it’s likely that the parking brake is in need of cleaning and maintenance.
Step 2: Clean The Parking Brake Components
To clean the parking brake components, begin by applying a rust dissolver or penetrating oil to the affected areas. Allow it to sit for a few minutes to penetrate the corrosion. Then, using a wire brush or abrasive pad, gently scrub away the rust and buildup. Be thorough in your cleaning, ensuring each component is free from corrosion.
After cleaning the components, dry them thoroughly using a clean cloth. Apply a lubricant specifically designed for brake systems to ensure smooth operation. This will help prevent future corrosion and ensure that your parking brake functions effectively.
By regularly inspecting and cleaning your parking brake components, you can prevent issues caused by corrosion and keep your John Deere machine operating smoothly. Remember to always follow the manufacturer’s guidelines and recommendations for maintenance to ensure optimal performance.
Other Potential Causes For Parking Brake Problems
While excessive cable wear is a common cause of parking brake issues, other potential factors can lead to problems with your John Deere parking brake. It’s important to understand these causes to troubleshoot and effectively resolve the issue. Let’s take a closer look at two other common culprits: stuck brake pads and corroded cables.
Excessive Cable Wear
Excessive cable wear is a frequent cause of parking brake malfunctions. Over time, cables can become worn due to normal usage and exposure to harsh environmental conditions. When the cables start to fray or become damaged, it can impact the overall effectiveness of the parking brake system.
To check for excessive cable wear, visually inspect the cables for any signs of fraying, corrosion, or breaks. If you notice any damage, it’s important to replace the cables as soon as possible. Ignoring this issue can lead to further complications and potentially unsafe operating conditions.
Stuck Brake Pads
Another potential cause of parking brake problems is stuck brake pads. When the brake pads get stuck in the engaged position, it prevents the wheels from rotating freely. This can be caused by a variety of factors, including dirt and debris buildup, improper lubrication, or worn brake components.
To troubleshoot stuck brake pads, you can start by inspecting the brake pads for any signs of wear or damage. If the pads appear to be in good condition, the issue may lie in the caliper or brake mechanism itself. In that case, it’s recommended to consult with a professional technician or refer to the manufacturer’s guidelines for further guidance or assistance.
Remember, proper maintenance and regular inspections are key to preventing parking brake issues. By addressing potential causes like excessive cable wear and stuck brake pads, you can ensure the optimal performance and safety of your John Deere parking brake system.
Troubleshooting Steps For Excessive Cable Wear
Excessive cable wear in the parking brake of your John Deere tractor can cause a range of issues, from the brake not engaging properly to the cable snapping. To ensure your parking brake operates smoothly and efficiently, it’s crucial to address excessive cable wear promptly. In this section, we will outline the troubleshooting steps you can take to inspect and replace damaged cables if needed.
Step 1: Inspect The Parking Brake Cables
The first step in troubleshooting excessive cable wear is to thoroughly inspect the parking brake cables for any signs of damage or wear. To do this:
- Locate the parking brake cables on your John Deere tractor.
- Visually inspect the cables from end to end, looking for any signs of fraying, corrosion, or loose connections.
- If you notice any damage or wear, ensure to take note of the specific areas that require attention.
It’s crucial to perform a detailed inspection, as even minor signs of wear can indicate potential issues down the line.
Step 2: Replace Damaged Cables, If Necessary
If the inspection reveals damaged cables, it’s crucial to replace them as soon as possible. Follow these steps:
- Order the appropriate replacement cables for your John Deere tractor model.
- Ensure you have the necessary tools to remove the old cables and install the new ones.
- Refer to the tractor’s manual or an online resource for specific instructions on replacing the parking brake cables.
- Carefully remove the damaged cables, taking note of the routing and connections.
- Install the new cables, making sure to follow the correct routing, and securely connect them.
- Test the parking brake to ensure it engages and disengages smoothly.
Replacing damaged cables will help ensure the parking brake operates effectively and reduce the risk of cable failure or the brake not engaging properly.
By following these troubleshooting steps for excessive cable wear, you can address any potential issues with your John Deere tractor’s parking brake. Regular inspection and maintenance will help prolong the lifespan of your parking brake system, ensuring it performs optimally when you need it most.
Troubleshooting Steps For Stuck Brake Pads
Dealing with a stuck brake pad can be a frustrating experience. It can prevent you from using your equipment efficiently and may even pose safety risks. However, with the right troubleshooting steps, you can easily identify and release the stuck brake pad. Here are the steps to follow:
Step 1: Identify The Stuck Brake Pad
The first step in troubleshooting a stuck brake pad is identifying which brake pad is causing the issue. Start by inspecting all the brake pads on your John Deere equipment. Look for signs of wear, damage, or sticking. If you notice that one of the brake pads is not releasing properly or is stuck in the engaged position, you have found the culprit.
Step 2: Release the Stuck Brake Pad
Once you have identified the stuck brake pad, it’s time to release it. Follow these steps:
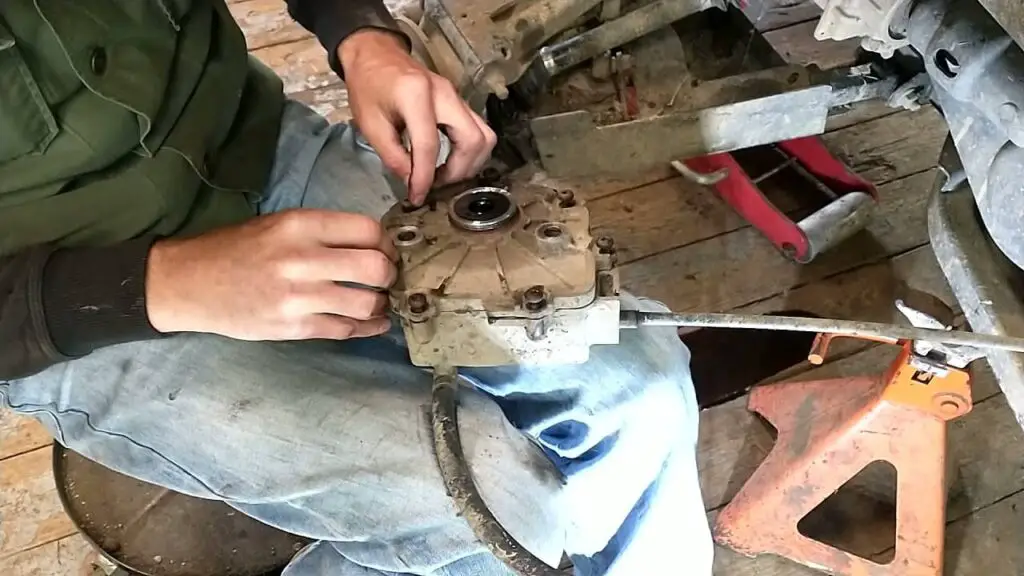
- Using a wrench, loosen the retaining bolts on the brake pad assembly. This will allow you to remove the brake pad from its mount and gain better access.
- Inspect the brake pad and its mounting area for any debris, rust, or corrosion. Clean the area using a wire brush or sandpaper to ensure smooth operation.
- Apply a lubricant, such as a silicone-based grease or anti-seize compound, to the brake pad and its mounting area.
- Ensure that the brake pad is properly aligned with its mount and reattach it using the retaining bolts. Tighten the bolts securely, but avoid over-tightening.
- With the brake pad reinstalled, test the parking brake to ensure it engages and disengages smoothly. If the brake pad still feels sticky or does not release properly, repeat the cleaning and lubrication process.
By following these troubleshooting steps, you can effectively deal with stuck brake pads on your John Deere equipment. Remember to regularly inspect and maintain your parking brake system to prevent future issues.
Frequently Asked Questions
What Would Cause A Parking Brake To Not Work?
Corrosion caused by water and dirt can lead to a parking brake not working. This can result in snapped cables and brake pads sticking to the wheels. To prevent this, regularly use your emergency brake to check for corrosion.
How Do You Unlock The Parking Brake On A John Deere Tractor?
To unlock the parking brake on a John Deere tractor, first check the latch for any looseness and adjust it if necessary. If the latch is secure, try applying and releasing the brake multiple times. You can also try shifting between drive and reverse to slightly move the vehicle and dislodge any rust that may be causing the brake to stick.
How Do You Diagnose Parking Brake Problems?
To diagnose parking brake problems, follow these steps: 1. Inspect the parking brake lever or pedal for any stiffness or sticking. 2. Check the parking brake cable for any signs of damage or wear. 3. Examine the rear drum shoes or brake pads for any excessive wear or damage.
4. If the parking brake is stuck, manually disturb the brakes by applying and releasing the brake multiple times and shifting between drive and reverse. 5. If the parking brake still won’t release, consider checking the latch for any looseness and adjusting it if necessary.
How Do You Fix A Parking Brake That Won’t Release?
To fix a parking brake that won’t release, try manually disturbing the brakes by applying and releasing them multiple times. Shift into drive and reverse, and back between drive and reverse again to slightly move the vehicle back and forth.
This may dislodge rust or corrosion that is causing the brake to stick.
Why Is My Parking Brake Not Working Properly?
One common issue is corrosion, which can cause cables to erode and brake pads to stick. Regularly using the emergency brake can prevent this problem.
Conclusion
If you’re experiencing trouble with your John Deere parking brake, it’s important to address it promptly. One common issue is corrosion, which can cause cables to erode and brakes to fail. To prevent this, use your emergency brake regularly to ensure corrosion hasn’t occurred.
Additionally, be sure to inspect the parking brake lever or pedal, as well as the cable, drum shoes, or brake pads for any signs of damage. If you notice any issues, take the necessary steps to fix them to ensure your parking brake functions properly.


Mine blows a fuse when you release the park brake
That sounds frustrating! A blown fuse when releasing the parking brake could indicate a short circuit or an issue with the brake switch. It might be a good idea to check the wiring or consult your manual for troubleshooting tips. If it keeps happening, you might want to reach out to a mechanic for help!