Is your well pump acting up and causing frustration? A faulty pressure switch might be the hidden culprit.
Understanding how to troubleshoot your pressure switch can save you time, money, and the hassle of calling a professional. In this guide, you’ll discover simple steps to identify and fix common pressure switch problems quickly. Keep reading to get your well pump running smoothly again without unnecessary stress.
Common Pressure Switch Issues
Pressure switches control your well pump’s water pressure. Problems with these switches affect water flow and pump efficiency. Knowing common issues helps you fix them fast. This keeps your water supply steady and your pump safe.
Signs Of A Faulty Pressure Switch
Water pressure drops or fluctuates often. The pump runs too long or stops too soon. You hear clicking noises near the switch. The pump fails to start or stops suddenly. These signs point to a pressure switch problem.
Causes Of Pressure Switch Failures
Dirt and debris can clog the switch contacts. Corrosion damages electrical parts over time. Worn springs inside the switch lose tension. Loose wiring causes poor electrical connections. High water pressure stresses the switch parts. These factors reduce switch life and cause failures.

Tools Needed For Troubleshooting
Troubleshooting a pressure switch for a well pump needs the right tools. Using proper tools saves time and helps find problems quickly. It also keeps you safe during the process. Below are the key tools and safety steps you need.
Essential Equipment
Start with a multimeter to check electrical connections. It helps measure voltage and continuity. A flathead screwdriver is important for opening the switch cover. Needle-nose pliers help adjust or remove small parts. Wire cutters are useful for trimming or stripping wires. A flashlight helps see inside tight or dark spaces. Having a pressure gauge can confirm the pump’s pressure level.
Safety Precautions
Turn off power before starting any checks. Use insulated gloves to protect from electric shock. Keep the work area dry to avoid slips and shocks. Avoid touching live wires or terminals. Work in a well-lit place to prevent mistakes. Always double-check that the power is off before touching parts. Follow these safety steps to protect yourself while troubleshooting.
Step-by-step Troubleshooting Guide
Troubleshooting a pressure switch for a well pump can seem hard. This step-by-step guide makes it simple. Follow these clear steps to find and fix common problems. Each step helps you check the switch carefully and safely.
Inspecting The Pressure Switch
Start by turning off the power to the pump. Remove the cover from the pressure switch. Look for dirt, corrosion, or damage on the switch. Check for signs of water or rust. Make sure the switch is mounted tightly and not loose. A clean and intact switch often works better.
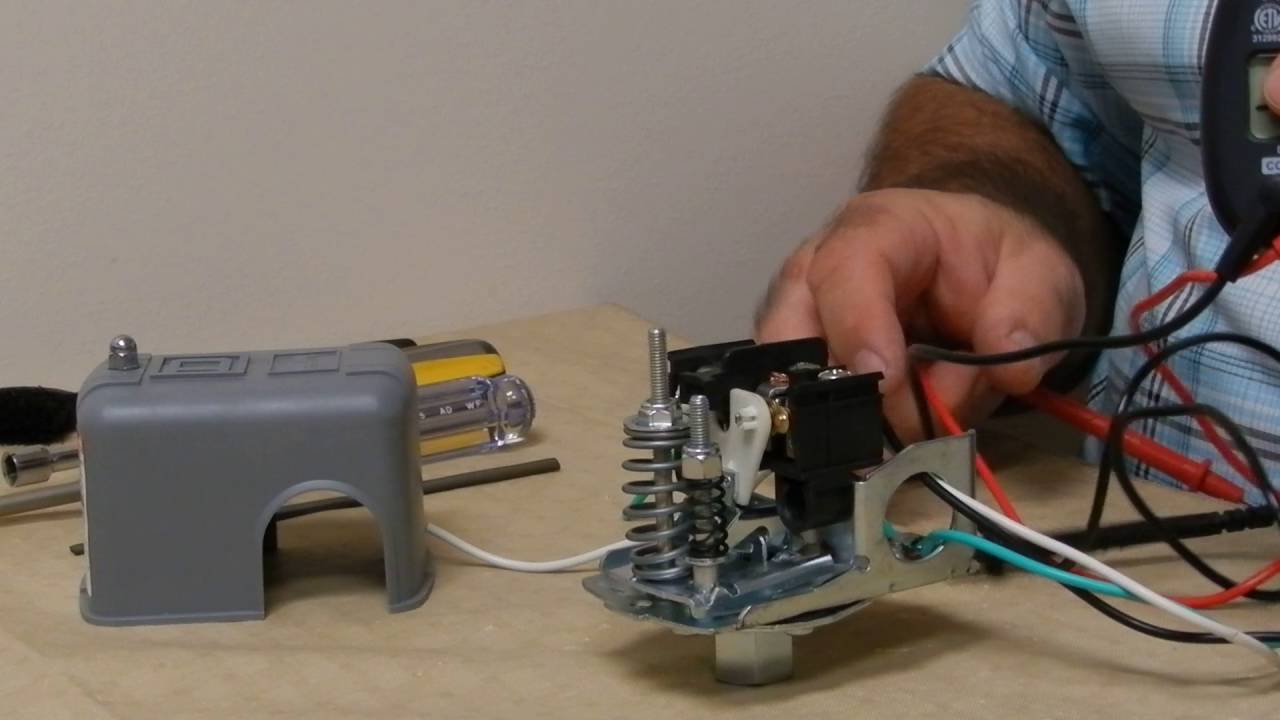
Testing Electrical Connections
Use a voltage tester to check power at the switch. Look at all wires for loose or broken connections. Tighten any loose screws holding wires. Replace wires if they look worn or damaged. Proper electrical contact is key for the switch to work well.
Checking Pressure Settings
Find the pressure adjustment screws on the switch. Use a pressure gauge to read the water pressure. Compare the reading with the switch’s set points. Adjust the screws to raise or lower the cut-in and cut-out pressure. Correct settings keep your pump running smoothly.
Cleaning And Adjusting Contacts
Open the switch to access the contacts inside. Clean the metal contacts gently with fine sandpaper. Remove any built-up dirt or corrosion. Check the contact gap and adjust it if needed. Proper contact function helps the switch control the pump correctly.
Quick Fixes For Common Problems
Pressure switches on well pumps can stop working properly. This causes water flow issues. Many problems are simple to fix. Quick fixes can save time and money. Some fixes need no special tools. Others require small parts. Learning these fixes helps keep your pump working well.
Resetting The Pressure Switch
Resetting the pressure switch often solves minor glitches. Turn off the power to the pump first. Wait a few minutes. Turn the power back on. This can clear small electrical issues. Check if the pump starts normally. This quick step restores function in many cases.
Replacing Damaged Components
Damaged parts cause pressure switches to fail. Look for broken wires or worn contacts. These parts affect the switch’s work. Replace damaged wires or contacts carefully. Use parts made for your pump model. This repair improves switch reliability. Always turn off power before replacing parts.
Adjusting Pressure Cut-in And Cut-out
The pressure switch controls pump start and stop points. These points are called cut-in and cut-out. Adjusting them fixes pressure problems. Remove the cover from the pressure switch. Use a screwdriver to turn the adjustment nuts. Turn clockwise to increase pressure. Turn counterclockwise to decrease it. Set proper cut-in and cut-out for your system. This keeps water pressure steady and pump cycles balanced.
When To Replace The Pressure Switch
Knowing when to replace the pressure switch is key for a well pump. The pressure switch controls the pump’s start and stop. A faulty switch can cause water pressure issues or pump damage.
Timing the replacement avoids costly repairs and keeps water flowing smoothly. Watch the switch’s behavior closely to spot problems early. Proper maintenance also helps the switch last longer.
Signs Replacement Is Necessary
The pressure switch may need replacement if the pump runs too long or not at all. Strange noises near the switch can signal a problem. Water pressure that is too high or too low often points to switch failure.
Corrosion or visible damage on the switch means it may not work right. Frequent cycling on and off can wear the switch quickly. If the pump fails to start, the switch might be broken.
Choosing The Right Replacement Switch
Select a pressure switch that matches your pump’s pressure range and electrical rating. Check the switch’s cut-in and cut-out pressures to fit your system. Use a switch designed for well pump use to ensure durability.
Look for switches with corrosion-resistant parts for longer life. Confirm the electrical specifications match your pump’s requirements exactly. Proper installation of the new switch helps it work correctly and safely.
Maintaining Your Pressure Switch
Maintaining your pressure switch is key to keeping your well pump working well. A well-maintained pressure switch helps avoid sudden pump failures and costly repairs. Regular care keeps water flowing smoothly and your system reliable.
Routine Inspection Tips
Check the pressure switch regularly for dirt and rust. Clean the contacts gently with a soft brush. Look for signs of corrosion or wear on the switch components. Ensure the cover is tightly sealed to keep out dust and moisture. Test the switch by turning the pump on and off. Listen for unusual noises or delayed responses.
Preventive Maintenance Practices
Turn off power before working on the pressure switch. Tighten any loose wires or connections carefully. Replace worn or damaged parts promptly to prevent failure. Adjust the pressure settings according to your pump’s manual. Keep the area around the switch dry and free of debris. Schedule regular checks to catch problems early and extend the switch’s life.

Frequently Asked Questions
What Causes A Pressure Switch To Stop Working On Well Pumps?
Pressure switches can fail due to dirt buildup, worn contacts, or electrical issues. These problems stop the switch from detecting pressure changes. Regular cleaning and checks help avoid failures.
How To Test A Pressure Switch For Well Pump Troubleshooting?
Turn off power, remove cover, and inspect contacts for wear or dirt. Use a multimeter to check electrical continuity. This helps find if the switch is faulty.
Why Does The Well Pump Keep Short Cycling With A Bad Switch?
A bad pressure switch sends wrong signals, causing the pump to turn on and off quickly. This short cycling damages the pump and wastes energy.
How To Adjust Pressure Switch Settings On A Well Pump?
Turn off power, remove the cover, and adjust the nuts on the switch. One nut changes cut-in pressure; the other changes cut-out pressure. Make small changes and test each time.
When Should I Replace The Pressure Switch On My Well Pump?
Replace the switch if it has worn contacts, corrosion, or no longer controls pressure properly. Frequent pump cycling or no pump start are signs. Regular checks extend switch life.
Conclusion
Troubleshooting a pressure switch for your well pump can save time and money. Check for dirt, loose wires, or damaged parts first. Small fixes often solve common issues quickly. Regular maintenance keeps your system working well. Understanding basic steps helps you feel confident and prepared.
Keep your pump running smoothly with simple care. Don’t ignore signs of trouble; act early to avoid bigger problems. This guide helps you handle pressure switch issues easily and safely.
")


