You can resolve most issues with a datamax o’neil e class mark iii printer troubleshooting routine by first checking the media path for debris and ensuring the printer is in the correct mode. Most common problems stem from simple misalignments or loose cables. If your printer has a flashing red light, it usually means the sensor is blocked or the media isn’t loaded correctly. You should always start by performing a hard reset and verifying your connection settings before assuming a hardware failure.
Troubleshooting Datamax E-Class Mark III Errors
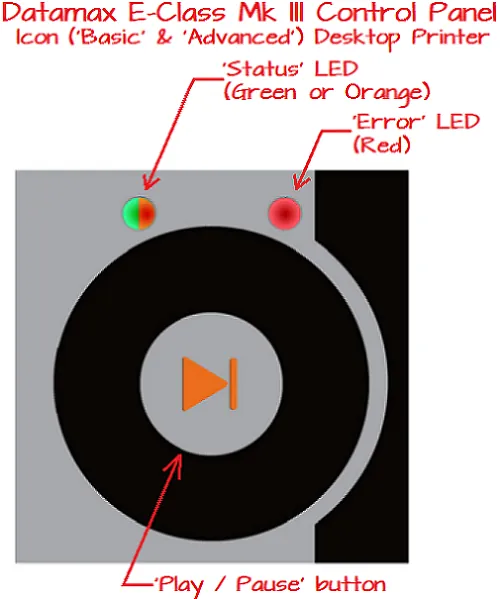
The printer uses a specific set of light sequences to signal its status to the user. A solid green light shows it’s ready, while flashing colors indicate that the device needs attention. Most technical issues arise from the printer failing to detect the label gap or sensing that the media roll is empty when it’s actually full. If the media sensor is dirty, the printer can’t calculate the label length, which causes printing to stop mid-job.
Another common cause involves the communication settings between your computer and the hardware. If the driver settings don’t match the physical configuration of the printer, you’ll experience lag or total connection failure. It’s important to remember that these units are sensitive to static electricity and dust. You can find detailed calibration steps in the official Honeywell printer support portal, which provides the technical specifications for your specific model.
If the printer isn’t responding at all, check the power brick first. A loose power cord is a frequent culprit, especially in busy work environments where cables get pulled or bumped. Ensure the port on the back of the machine is free of dust, as a poor connection here will prevent the printer from waking up. If you see a constant red light despite having paper loaded, you must perform a full sensor calibration to reset the detection logic.
Clean the Media Sensors
Cleaning the sensors is the most effective way to solve persistent “out of paper” errors. Over time, adhesive residue and paper dust build up on the internal sensors, tricking the machine into thinking it’s empty. You should only use a clean, dry cloth or a cotton swab with a tiny amount of isopropyl alcohol. Never use sharp tools or abrasive materials, as these will scratch the plastic sensor covers and permanently damage the detection ability of the unit.
To clean the sensor, open the top cover and remove the media roll. Locate the small slot where the label passes through the sensor assembly. Gently wipe the upper and lower sensor surfaces to remove any buildup. If you’re using black-mark labels, ensure the sensor is aligned with the mark on the back of the liner. Once cleaned, reload the media and close the cover firmly until you hear a click.
This fix is intended for users experiencing constant error lights despite having a full roll of labels. If the error continues after cleaning, the sensor itself may have failed. This is a hardware limit that requires a professional technician to replace internal components. Don’t attempt to open the main printer housing to reach the board, as this voids any remaining warranty and risks electrical shock.
Calibrate the Label Gap
Calibrating the gap is necessary whenever you change label sizes or switch between different types of media. The printer needs to learn the physical distance between labels to avoid printing off the edge of the sticker. If the printer skips labels or prints in the wrong spot, it has lost its synchronization with the media. You can trigger a manual calibration by holding down the feed button while turning the printer on.
Hold the button until the light flashes, then release it to enter the calibration mode. The printer will feed a few labels through the path to measure the gap and the thickness of the material. Once it stops, it has stored these new values in its memory. If the printer struggles to find the gap, ensure your labels aren’t transparent or too thin.
This process is vital if you have switched from standard paper labels to synthetic or thick material. If the printer still fails to detect the gap after three attempts, your media might be incompatible with the sensor’s light intensity. Always check the manufacturer’s media guide to ensure your label stock meets the required opacity levels for this model.
Adjust the Printhead Pressure
Adjusting the printhead pressure helps resolve issues with light or faded print quality. If the text is clear on one side of the label but faint on the other, the pressure is uneven. You can adjust the toggle or screw located near the printhead to increase or decrease the force applied to the ribbon and label. Start with small adjustments, as too much pressure will cause the ribbon to wrinkle or tear.
This fix is only for cases where the print is inconsistent across the width of the label. If the entire label is blank, the issue is likely the ribbon orientation or the driver settings rather than the pressure. Ensure your thermal transfer ribbon is wound correctly with the ink side facing the label. If you notice horizontal white lines running down your labels, the printhead might have damaged elements.
Damaged printhead elements can’t be repaired by the user. If you see persistent lines after cleaning the head with an alcohol swab, you must contact a qualified repair service to replace the printhead. Using low-quality labels or ribbons can cause premature wear on the printhead, so always stick to approved supplies to maximize the life of your equipment.
Avoid Common Troubleshooting Mistakes
Using sharp metal objects to clear jams often scratches the delicate thermal printhead, ruining print quality forever. Always use a soft, lint-free cloth dampened with isopropyl alcohol instead.
Forcing the media cover closed when it doesn’t latch easily will break the plastic hinges. If the cover resists, check for a misaligned label roll or a loose sensor cable before applying pressure.
Changing driver settings without restarting the printer prevents the new configuration from taking effect. If the printer fails to update, power cycle the hardware to force a handshake with the host computer.
Ignoring a flashing red light and repeatedly sending print jobs will cause the queue to crash. If you see a persistent error, clear the queue in your operating system settings first.
Touching the printhead with bare fingers leaves oils behind that attract dust. This residue creates permanent streaks on your labels. If you accidentally touch the surface, clean it immediately to prevent long-term damage.
Improve Printer Reliability
| If you’re doing this | Do this instead | Why |
|---|---|---|
| Leaving the printer on 24/7 | Turn it off after shifts | Saves the printhead life |
| Using generic, cheap labels | Use high-quality paper | Prevents adhesive buildup |
| Pulling labels while printing | Let them feed naturally | Protects the motor gears |
| Cleaning with soap and water | Use isopropyl alcohol | Prevents moisture damage |
Most users mistakenly ignore the accumulation of dust inside the chassis. If your print quality shows vertical white streaks, don’t adjust the darkness settings. Instead, use a can of compressed air to clear the sensors. This simple step prevents the printer from wasting ribbon or ink while trying to detect the label gap.
If you’re currently experiencing a system error, check your local environment for heat and humidity. These printers operate best in standard office temperatures between 60 and 75 degrees Fahrenheit. Extreme heat causes internal sensors to report false errors, while humidity can cause paper jams.
If you have tried these steps and the error remains, you have likely reached the limit of what a user can fix. You’re in the “hardware failure” zone if the status light blinks red even with no media loaded. At this stage, consult a certified technician. Attempting to force a reset on a faulty logic board often triggers a permanent lock-out, which costs more to repair than a simple sensor replacement.
Frequently asked questions
Can I fix a flashing red light on my own?
Yes, you can fix a flashing red light by cleaning the media sensor and performing a factory calibration. This light usually indicates that the printer can’t detect the label gap or that the media roll isn’t properly seated in the guides. Start by wiping the sensor path with an alcohol-based wipe, then reload your labels and hold the feed button during startup to force the printer to re-measure the label length.
How often should I clean the printhead?
You should clean the printhead every time you replace the ribbon or at least once per month if you use direct thermal labels. Dust and adhesive buildup act as an insulator, which prevents the heat from reaching the label and leads to faded or missing print. A quick wipe with a clean, lint-free cloth dipped in isopropyl alcohol will remove residue and keep the print quality sharp.
Why is my printer skipping labels?
Your printer is skipping labels because it has lost the correct gap measurement during the last calibration cycle. This often happens if you change the label roll to a different size or if the sensor is obstructed by paper dust. Perform a manual calibration by holding the feed button while turning the printer on to reset the gap detection values and align the printer with the new stock.
Is it safe to use compressed air inside the printer?
No, it isn’t safe to use compressed air because it can force paper dust and debris deeper into the internal circuit boards and sensor crevices. This can cause electrical shorts or permanently clog the optical sensors that the machine uses to detect the label edges. Always use a soft, dry cloth or a gentle vacuum attachment to remove loose dust from the media compartment instead of blowing it around.
What happens if I keep printing with a dirty sensor?
If you continue to print with a dirty sensor, the printer will eventually fail to detect any labels, causing the print job to hang or error out constantly. This happens because the layer of dust blocks the light beam that the sensor uses to measure the gap between labels. Over time, this forces the printer to default to an error state, requiring a professional cleaning or a sensor replacement to restore function.
How long does a printhead usually last?
A printhead typically lasts for several years under normal conditions, but this depends entirely on the volume of labels printed and the quality of the media used. Using abrasive or low-cost labels will wear down the protective coating on the printhead much faster than approved thermal stock. You can maximize the lifespan by keeping the area clean, avoiding high-heat settings, and ensuring the printhead pressure is balanced correctly for your media.
Conclusion
If these basic checks don’t clear the error, don’t worry. You shouldn’t hesitate to reach out to the manufacturer’s support team for a deeper look at the internal components. They’ll help you determine if a part needs replacing so you can get back to printing your labels as quickly as possible.