Is your garage door not closing properly or reversing unexpectedly? Your garage door sensors might be the culprit.
These small devices play a big role in keeping you and your family safe, but when they act up, it can be frustrating and confusing. Don’t worry—you don’t need to call a technician right away. In this guide, you’ll discover simple, step-by-step troubleshooting tips that anyone can follow.
By the end, you’ll know how to spot common sensor problems and fix them quickly, saving time and avoiding costly repairs. Keep reading to take control of your garage door’s safety and functionality today.
Common Sensor Issues
Garage door sensors are small but vital parts of your door system. They keep the door safe and secure by detecting obstacles. Sometimes, these sensors stop working correctly. Knowing common sensor issues helps you fix problems fast. This keeps your garage door running smoothly and safely.
Sensor Misalignment
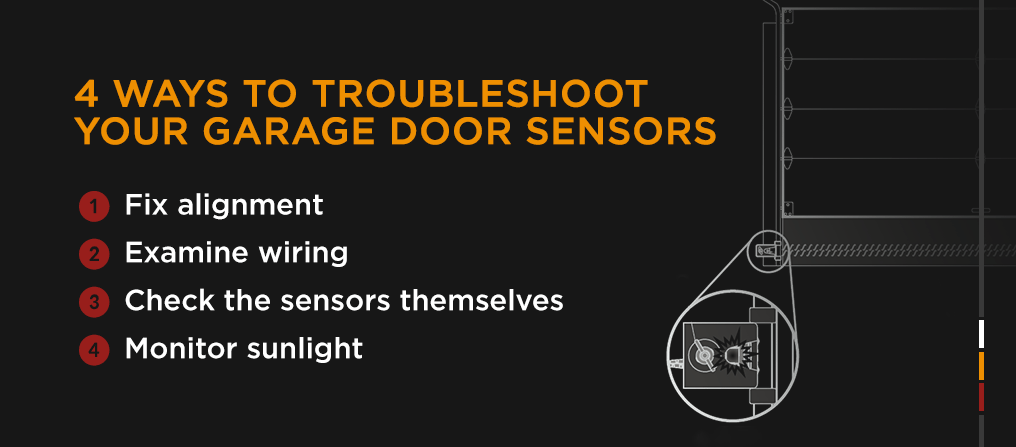
Sensors need to face each other perfectly. If one sensor moves out of place, the door may not close. This misalignment causes the sensors to think something blocks the door. Check if sensors line up straight. Adjust them gently until the indicator light shows a proper connection.
Dirty Sensor Lenses
Dirt, dust, or spider webs can cover sensor lenses. This blocks the sensor’s view and stops it from working. Clean the lenses with a soft cloth and mild cleaner. Avoid harsh chemicals that might damage the sensor. Regular cleaning keeps sensors clear and functional.
Obstructed Sensor Path
Objects in the sensor path stop the garage door from closing. Toys, tools, or debris may block sensors without you noticing. Clear the area in front of the sensors. Make sure nothing stands between the sensors for smooth door operation.
Wiring Problems
Sensor wires can wear out or break over time. Loose or damaged wires cause sensors to fail. Inspect wires for cracks or cuts. Secure any loose connections. If wires look damaged, call a professional to replace them safely.
Quick Diagnostic Steps
Quick diagnostic steps help find common problems with garage door sensors. These steps save time and avoid costly repairs. Follow simple checks to ensure sensors work well. Start by looking at the sensor lights.
Checking Sensor Lights
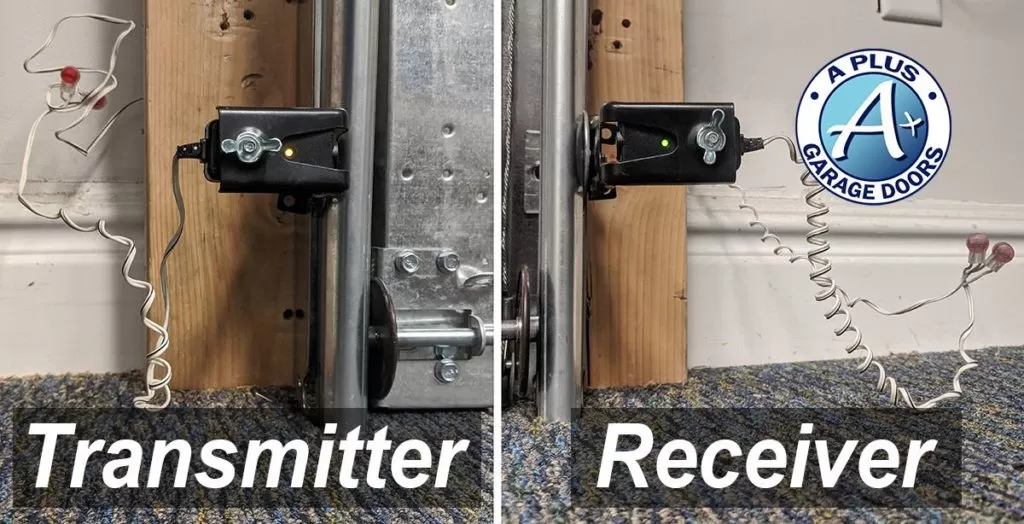
Sensor lights show if sensors get power. Usually, two small lights appear on each sensor. A green light means the sensor works. A red or no light means a problem. Clean the sensor lens gently. Dirt can block the light and cause errors.
Testing Sensor Alignment
Sensors must face each other directly. Misalignment stops the sensor beam. Slowly move one sensor until lights turn green. Use a level tool for better accuracy. Tighten sensor brackets to keep alignment fixed. Test the door after adjusting.
Inspecting Wiring And Connections
Loose or damaged wires cause sensor failure. Check wires near sensors and opener. Look for cuts, frays, or loose ends. Secure loose wires with electrical tape or clips. If wires look damaged, replace them promptly. Proper wiring keeps sensors connected and safe.
Simple Fixes To Try
Garage door sensors can stop working properly for simple reasons. Fixing these issues often takes just a few minutes. Try these easy steps before calling a technician. They can help restore your garage door’s safety and function quickly.
Realigning Sensors
Garage door sensors must face each other directly. Misalignment causes the door to stop or reverse. Gently move each sensor until the indicator light turns green. Use a level tool to check if sensors are straight. This simple fix often restores sensor function immediately.
Cleaning Sensor Lenses
Dirt and dust can block sensor lenses. Wipe lenses gently with a soft cloth. Avoid harsh cleaners that might damage the lens. Clean sensors regularly to prevent issues. Clear lenses help sensors detect objects properly.
Clearing Obstructions
Small objects or debris can block sensor signals. Check the sensor area for leaves, spider webs, or toys. Remove anything in the sensor’s path. Clear space allows the sensor to work without interruption.
Securing Loose Wires
Loose or damaged wires can cause sensor failure. Inspect wires connected to each sensor carefully. Tighten loose connections or replace damaged wires. Secure wires with clips or tape to prevent future problems.
When To Replace Sensors
Garage door sensors keep your door safe and working smoothly. Sensors can wear out or get damaged over time. Knowing when to replace them helps avoid bigger problems. This section explains key signs of sensor failure, how to pick the right replacement, and tips for installation.
Signs Of Sensor Failure
Sensors may stop working properly for many reasons. One sign is the door not closing fully or reversing suddenly. Flickering or dim sensor lights also indicate trouble. Dirt or spider webs blocking sensors cause malfunction. If your garage door doesn’t respond well, sensors might be faulty. Testing sensors regularly helps catch problems early.
Choosing The Right Replacement
Choose sensors that match your garage door model. Check voltage and size before buying replacements. Look for sensors with clear instructions and good reviews. Some sensors come with extra features like better weather resistance. Avoid cheap models that may fail quickly. Quality sensors save money and improve safety.
Installation Tips
Turn off power before starting sensor installation. Clean the sensor area to remove dust and dirt. Mount sensors at the right height, usually 6 inches above the ground. Ensure sensors face each other directly for a strong signal. Secure wires neatly to avoid damage. Test the sensors after installation to confirm proper function.
Preventive Maintenance Tips
Preventive maintenance helps keep garage door sensors working well. It stops problems before they start. Small checks and cleaning can save time and money. Sensors stay accurate and safe with regular care.
Regular Cleaning Schedule
Dust and dirt block sensors from working right. Clean sensors every month with a soft cloth. Avoid using harsh chemicals or water sprays. Keep sensor lenses clear for proper signal transmission.
Routine Sensor Checks
Test sensors once a month to check their response. Use a small object to see if the door stops closing. Make sure the indicator lights on sensors are on. Replace batteries or parts if lights are dim or off.
Protecting Sensors From Damage
Keep sensors away from direct hits or knocks. Avoid parking vehicles or placing items near sensors. Use covers or shields if sensors are in exposed areas. Damaged sensors can cause door malfunctions and safety risks.

Frequently Asked Questions
What Causes Garage Door Sensors To Stop Working?
Sensors may fail due to dirt, misalignment, or wiring problems. Checking these can often fix the issue quickly.
How Do I Realign Garage Door Sensors Properly?
Ensure both sensors face each other directly and are at the same height. Adjust slowly until the indicator light turns solid.
Why Is My Garage Door Not Closing Even With Sensors Clear?
Obstructions or sensor misalignment usually cause this. Clean lenses and realign sensors to restore normal function.
Can Bad Wiring Affect Garage Door Sensor Performance?
Yes, loose or damaged wires can stop sensors from working. Inspect wiring for breaks or loose connections.
How Often Should I Clean Garage Door Sensors?
Clean sensors every few months or when you notice issues. Use a soft cloth to remove dust and dirt.
Conclusion
Troubleshooting garage door sensors can save time and money. Check sensor alignment and clean the lenses first. Ensure wiring is secure and free from damage. Test the sensors by closing the door slowly. Small fixes often solve common sensor issues.
Regular maintenance keeps your door working safely. Don’t ignore warning signs or unusual behavior. Taking quick action prevents bigger problems later. Stay calm and follow simple steps carefully. Your garage door will work smoothly again.
")


