Traeger Grill Troubleshooting: Fixing Common Issues
Having trouble with your Traeger grill? Here are some common issues and their solutions: If your grill isn’t lighting, check the hot rod and replace it if is damaged. if the temperature swings, ensure you’re using high-quality pellets and clean the grill regularly. For startup problems, plug in your grill, fill the hopper with pellets, clean the temperature probe, and turn on the grill. If your grill fails to fire up, check for a tripped GFCI, a bad power outlet, a blown fuse, a bad extension cord, or a break in the power cord.
If the auger is clogged, follow the instructions to clear the jam. Remember to power cycle your grill by turning it off and unplugging it. Seek help from the Traeger community for further assistance.
Common Issues And Solutions For Traeger Grills
When it comes to grilling, Traeger is a trusted name known for its quality and performance. However, like any other appliance, Traeger grills may also encounter issues from time to time. These common issues can be frustrating but understanding how to troubleshoot them can save you time and frustration. In this article, we will explore some of the most common issues that Traeger grill owners face and provide you with practical solutions to get your grill back up and running.
no Power
If your Traeger grill is not powering on, there are a few steps you can take to troubleshoot the issue:
- Check the power source. Ensure that the power outlet you are using is functioning properly.
- Replace the power cord if damaged. If you notice any visible damage to the power cord, it may be causing the issue.
- Reset the breaker if tripped. Sometimes, a tripping breaker can be the culprit. Simply reset the breaker and try turning on the grill again.
temperature Problem
Temperature issues can be a common frustration when cooking on a Traeger grill. Here are some steps you can take to troubleshoot temperature problems:
- Check temperature probe placement. Make sure that the temperature probe is inserted properly in the meat or food you are cooking. Improper placement can result in inaccurate temperature readings.
- Clean the temperature probe. Over time, the temperature probe can accumulate grease and debris, affecting its accuracy. Clean the temperature probe thoroughly to ensure accurate temperature readings.
- Calibrate temperature settings. Use an external thermometer to verify the accuracy of the temperature displayed on the grill. Adjust the grill’s temperature settings accordingly.
wifi Connection
If you are experiencing issues with the WiFi connection on your Traeger grill, follow these steps to troubleshoot:
- Troubleshoot the WiFi connection. Ensure that your grill is within range of the WiFi network and check for any interference that may be affecting the signal.
- Reset WiFi settings. Sometimes, resetting the WiFi settings on your grill can resolve connectivity issues. Consult the user manual for instructions on how to reset the WiFi settings.
- Ensure grill firmware is up to date. Keeping your grill’s firmware updated can help resolve WiFi connectivity issues. Check the Traeger website for any available firmware updates.
auger Jam
An auger jam can prevent the pellets from properly feeding into the firepot, causing issues with your Traeger grill’s performance. Here’s how to troubleshoot an auger jam:
- Clear the auger jam. Carefully remove any obstructions or pellets that may be causing the jam. Make sure to turn off the grill and unplug it before attempting to clear the jam.
- Clean the auger motor. Over time, the auger motor can get dirty and affect its performance. Clean the auger motor thoroughly to ensure smooth operation.
- Replace the auger motor if necessary. If the auger motor is damaged beyond repair, it may need to be replaced. Consult your grill’s user manual or contact Traeger customer support for assistance in finding and replacing the motor.
Maintaining Temperature On Your Traeger Grill
Temperature Swings
Maintaining a steady temperature on your Traeger grill is crucial for achieving perfectly cooked meals. However, you may experience temperature swings, which can affect the outcome of your grilling session. Understanding the causes of temperature swings and knowing how to address them will help you become a master of temperature control on your Traeger grill.
Causes Of Temperature Swings
Temperature swings on your Traeger grill can be caused by various factors. Some common causes include:
- Ignition issues: If your grill is not lighting properly or the hot rod is damaged, it can lead to temperature fluctuations.
- Auger jams: An obstructed auger can disrupt the consistent flow of pellets, resulting in unstable temperatures.
- Leaking air: Air leaks around the grill’s lid or elsewhere can impact temperature control, allowing heat to escape and causing temperature swings.
- Inconsistent pellet quality: Using low-quality or moisture-laden pellets can affect temperature stability.
Adjusting Temperature Settings
To address temperature swings, start by adjusting your temperature settings on the Traeger grill. Make sure you have set the desired temperature accurately according to the recipe or grilling technique you are using. Experiment with different settings to achieve the desired temperature range for your specific needs.
Checking For Air Leaks
To ensure the optimal functioning of your Traeger grill, it is essential to check for air leaks. These leaks can disrupt temperature control and lead to temperature swings. Inspect the grill’s seal, gasket, and vents for any signs of wear or damage. Replace any damaged parts to prevent air leaks and maintain consistent temperature levels.
Importance Of Pellets
Using high-quality pellets is crucial for maintaining a steady temperature on your Traeger grill. Choose pellets specifically designed for grilling, as they provide consistent heat and enhance the flavor of your food. Different types of pellets are available for various grilling needs, from hardwoods like hickory and mesquite to fruitwoods like apple and cherry.
Types Of Pellets For Different Grilling Needs
To achieve the desired flavor profile, consider using different types of pellets for various grilling needs. Here are some popular options:
| Type of Pellet | Best For |
|---|---|
| Hickory | Strong, smoky flavor; ideal for beef, pork, and poultry |
| Mesquite | Bold, earthy flavor; great for red meats and vegetables |
| Apple | Mild, fruity flavor; perfect for pork, poultry, and seafood |
| Cherry | Sweet, fruity flavor; complements pork, poultry, and vegetables |
Storing Pellets Properly
To maintain the quality of your pellets and ensure consistent temperature control, store them properly. Keep the pellets in a cool, dry place in an airtight container or bag. This prevents moisture absorption, which can cause pellets to disintegrate and affect temperature stability. Don’t forget to label the containers to easily identify different pellet types.
Cleaning Pellet Hopper
Regularly cleaning your pellet hopper is essential for maintaining optimal performance and temperature control. Remove any remaining pellets from the hopper and use a vacuum or brush to remove dust, debris, or buildup. This helps prevent any obstructions that could disrupt the pellet flow and cause temperature swings.
Cleaning Your Traeger Grill
A clean grill is a happy grill! Proper cleaning ensures optimal performance and helps maintain temperature consistency. Here’s a step-by-step guide to cleaning your Traeger grill:
- Washing grates and drip tray: Remove the grates and drip tray from the grill. Scrub them clean with warm, soapy water and a brush. Rinse thoroughly and let them dry before placing them back in the grill.
- Removing grease buildup: Clean the grease buildup from the grill’s interior surfaces using a grill brush or scraper. Pay attention to the firepot and areas where grease can accumulate.
- Cleaning firepot and ash accumulation: Remove the firepot and clean out any ash accumulation. Use a vacuum or brush to clean the firepot thoroughly. Make sure no debris or ash is obstructing the airflow.
By following these maintenance steps and troubleshooting tips, you can ensure a well-maintained Traeger grill that consistently delivers excellent grilling results. Happy grilling!
Startup Process For Your Traeger Grill
Starting up your Traeger grill is a crucial step in enjoying delicious meals outdoors. Whether you’re a seasoned grilling pro or a beginner, understanding the startup process is essential for a successful grilling experience. In this section, we’ll walk you through the necessary steps to get your Traeger grill up and running smoothly.
Plug In Your Grill
The first step in the startup process is to ensure that your Traeger grill is properly plugged into a power source. Locate a suitable electrical outlet and connect your grill using the provided power cord. This ensures that your grill has access to the necessary power supply for proper functioning.
Ensure Proper Electrical Connection
Once your grill is plugged in, double-check that the electrical connection is secure. Make sure the power cord is firmly inserted into the outlet and that there are no loose connections. This step ensures that there are no interruptions in the power supply, which can cause issues during the startup process.
Check Power Source
Next, verify that the power source itself is functioning correctly. Check if the outlet is providing power by plugging in another device or using a voltage tester. If there is no power, check your circuit breaker or try a different outlet. It’s important to have a reliable power source to avoid any startup issues.
Fill The Hopper With Pellets
The hopper is where you add the wood pellets that will generate the heat and flavor for your grill. Ensure that the hopper is clean and free of debris before adding any pellets. This helps prevent any blockages or malfunctioning due to pellet buildup. Fill the hopper with the desired flavor and quantity of pellets for your grilling needs.
Choosing The Right Pellets
When selecting pellets for your Traeger grill, consider the type of wood and the flavor profile you want to achieve. Different pellets offer distinct flavors, such as hickory, apple, or mesquite. Experiment with different wood flavors to enhance the taste of your grilled dishes.
Filling The Hopper Properly
Properly filling the hopper is essential for a smooth startup process. Ensure that you fill the hopper to the recommended level, without overfilling. Overfilling the hopper can lead to pellet jamming, which can impact the performance of your grill.
Clean Temperature Probe
The temperature probe is responsible for measuring the internal temperature of your grill. It’s crucial to keep the temperature probe clean to ensure accurate temperature readings. Clean the probe using a mild soap solution and a soft cloth, removing any grease or debris that may affect its functionality.
Removing Debris From Temperature Probe
Regular maintenance includes checking for any debris or residue that might have accumulated on the temperature probe. Use a gentle brush or cloth to remove any buildup and ensure that the temperature probe is clean and ready for accurate temperature readings.
Calibrating Temperature Probe If Necessary
If you suspect that your temperature probe is not providing accurate readings, you may need to calibrate it. Refer to your Traeger grill’s user manual to learn how to calibrate the temperature probe properly. This ensures that you’re grilling at the desired temperature and achieving perfectly cooked meals.
Turning Your Grill On
After completing the necessary preparations, it’s time to turn your Traeger grill on. Follow these steps to activate your grill:
- Ensure that the power switch is in the off position.
- Plug in your grill to the power source.
- Turn on the power switch.
By following these steps, you’ll activate your grill and be ready to start grilling.
Adjusting Temperature Settings
Once your grill is on, you can adjust the temperature settings according to your grilling needs. Most Traeger grills have temperature control options that allow you to set the desired heat level. Refer to your grill’s user manual for specific instructions on adjusting the temperature settings.
Getting The Fire Started
After adjusting the temperature settings, you’ll need to give your grill some time to ignite and reach the desired temperature. The ignition process may vary depending on the model of your Traeger grill.
Time Required For Fire To Ignite
The time it takes for your Traeger grill to ignite and reach the desired temperature can vary. It usually takes around 5 to 10 minutes for the initial fire to ignite. However, factors such as outdoor temperature and pellet type can affect the ignition time. Patience is key during this process.
Troubleshooting Ignition Issues
If you encounter any issues during the ignition process, such as the fire not igniting, there are a few troubleshooting steps you can take:
- Ensure that the hopper is properly filled with pellets.
- Check that the temperature probe is clean and accurately calibrated.
- Verify that the power supply is stable and the grill is properly plugged in.
- Refer to your grill’s user manual or contact Traeger customer support for further assistance.
By following the startup process outlined here and troubleshooting any issues that arise, you’ll be able to enjoy flavorful and perfectly cooked meals on your Traeger grill.
Initial Firing And Shutdown Cycle
Properly Charging The Auger
To ensure your Traeger grill fires up successfully, it’s essential to properly charge the auger. The auger is responsible for transferring the pellets from the hopper to the fire pot, creating the heat and smoke necessary for cooking. Follow these steps to properly charge the auger:
1. Fill the hopper with high-quality wood pellets that are suitable for your desired flavor profile.
2. Ensure that the auger is positioned correctly and securely in the grill.
3. Make sure that the grill is plugged into a working power outlet.
Ensuring Auger Is Functioning Correctly
The auger is a crucial component of your Traeger grill, so it’s important to ensure it’s functioning correctly. Here are some steps to take:
1. Check for any visible obstructions or blockages in the auger tube. Clear any debris to ensure smooth pellet flow.
2. Inspect the motor that drives the auger. Make sure it’s securely attached and functioning properly.
3. Test the auger’s movement by turning on the grill and observing the pellets moving through the auger tube.
Troubleshooting Auger-related Issues
If you encounter any issues with the auger, here are some troubleshooting tips:
1. If the auger is not moving, check the power source and connections to ensure proper electrical supply.
2. Verify that the auger motor is functioning correctly. If necessary, replace the motor according to the manufacturer’s instructions.
3. Look for any signs of damage or wear on the auger, such as broken or chipped components. Replace any damaged parts to ensure optimal performance.
Understanding Grill Smoking
Smoking is an integral part of using a Traeger grill and imparts delicious flavors to your food. Understanding how your grill smokes is crucial for achieving the desired results.
– Traeger grills use indirect heat and convection-style cooking to produce consistent smoke and heat.
– The smoke is generated by burning wood pellets, which are fed into the fire pot by the auger.
– The smoke travels through the cooking chamber, infusing your food with a rich, smoky flavor.
Causes Of Excessive Or Abnormal Smoke
While smoke is desirable, excessive or abnormal smoke can affect the taste and texture of your food. Here are some potential causes to be aware of:
– Using low-quality or damp pellets can result in excessive smoke and a bitter taste.
– Blocked airflow within the grill, caused by an obstructed chimney or dirty components, can result in abnormal smoke production.
– Overfilling the fire pot with pellets can lead to poor combustion and smoldering, resulting in excessive smoke.
Adjusting Smoking Levels
To achieve the desired levels of smoke for your cooking, it’s important to have control over the smoking process. Here’s how you can adjust the smoking levels on your Traeger grill:
1. Use the temperature dial to adjust the heat setting. Lower temperatures result in more smoke production, while higher temperatures reduce smoke output.
2. Experiment with different types of wood pellets to customize the flavor and smoke intensity.
3. Adjust the position of the drip tray and heat diffuser in the cooking chamber to control the airflow. A more open configuration allows for increased smoke production.
Temperature Dial Settings
The temperature dial on your Traeger grill allows you to set and maintain specific cooking temperatures. Here’s what you need to know about the temperature dial settings:
– The temperature dial ranges from smoke (approximately 180°F) to high (approximately 500°F).
– Choosing the right temperature setting depends on the cooking method and the food you’re preparing.
– Smaller, more delicate items may require lower temperatures, while thicker cuts of meat may benefit from higher temperatures for fast searing.
Understanding Temperature Dial Options
The temperature dial on your Traeger grill provides you with various options to control the cooking process. Here’s how to navigate the temperature dial options:
– Smoke: This setting is ideal for low and slow cooking with maximum smoke production.
– 225°F: Perfect for smoking ribs, briskets, and other tougher cuts of meat that benefit from slow cooking.
– 325°F: A versatile setting suitable for roasting, baking, and grilling a wide range of foods.
– 450°F: Ideal for searing and achieving a crispy exterior on steaks, burgers, and other meats.
– High: This setting allows for a quick preheat or can be used for high-temperature grilling and searing.
With a clear understanding of the temperature dial options, you can easily adjust the heat to achieve the desired cooking results on your Traeger grill.
Traeger Grill Models And Replacement Parts
Overview Of Traeger Grill Models
Traeger grills are known for their exceptional quality and reliable performance. They offer a wide range of models to suit every grilling enthusiast’s needs. Whether you’re looking for a compact portable grill like the Traeger Tailgater or a larger model like the Traeger Pro Series, there’s a Traeger grill for everyone. Each model is designed with precision engineering and innovative features to provide a truly exceptional grilling experience.
Features And Specifications
Traeger grills come with a host of impressive features and specifications that set them apart from other grills on the market. These grills are equipped with a digital temperature control mechanism, allowing you to easily set and maintain your desired temperature. They also feature a versatile cooking surface that allows for grilling, smoking, baking, roasting, and barbecuing. Additionally, Traeger grills come with a handy hopper that holds the wood pellets, providing a consistent and smoky flavor to your food.
Choosing The Right Model For Your Needs
When selecting a Traeger grill, it’s important to consider your specific grilling requirements. If you often travel or enjoy tailgating, the portable Traeger Tailgater model might be the perfect fit for you. On the other hand, if you frequently host large gatherings or enjoy experimenting with different recipes, the Traeger Pro Series with its ample cooking space and advanced features might be more suitable. Determining your grilling needs will help you make an informed decision that ensures you get the most out of your Traeger grill.
Traeger Hot Rod Replacement
The hot rod in your Traeger grill is responsible for igniting the wood pellets and starting the fire. Over time, the hot rod may become worn out or damaged, and it’s important to replace it to ensure the proper functionality of your grill.
Why And When To Replace The Hot Rod
You need to replace the hot rod when it fails to ignite the wood pellets or if you notice any signs of damage such as frayed wires or rust. A faulty hot rod can result in the grill not starting or inconsistent heating, affecting the overall grilling experience.
Steps To Replace The Hot Rod
Replacing the hot rod in your Traeger grill is a straightforward process. Follow these steps:
- Turn off and unplug the grill for safety.
- Remove the grates and drip tray to access the hot rod.
- Disconnect the wires attached to the hot rod.
- Unscrew and remove the old hot rod.
- Install the new hot rod and secure it with the screws.
- Reconnect the wires to the new hot rod.
- Replace the grates and drip tray.
- Plug in and turn on the grill to test the new hot rod.
Common Replacement Parts
In addition to the hot rod, other common replacement parts may be required for your Traeger grill:
| Replacement Part | Description |
|---|---|
| Firepot assembly | The firepot assembly houses the wood pellets and provides a source of heat for grilling. Over time, it may become worn out and need replacement. |
| Drip tray liner | The drip tray liner collects grease and prevents it from accumulating in the grill. Regular replacement of the liner ensures proper hygiene and easy maintenance. |
| Replacement fuse | The fuse protects the grill’s electronic components from power surges. If the fuse blows, it needs to be replaced. |
| Replacement meat probe | The meat probe allows you to monitor the internal temperature of your food. If it becomes damaged or inaccurate, it should be replaced for precise temperature readings. |
| Traeger controllers (Arc, WiFi, Digital Pro) | The Traeger controllers provide convenient control over the grill’s temperature and cooking time. Depending on your needs, you may choose the Arc, WiFi, or Digital Pro controller. |
By replacing these common parts as needed, you can ensure your Traeger grill performs optimally and continues to deliver delicious and perfectly cooked meals.
Now that you’re familiar with the different Traeger grill models and replacement parts, you can easily troubleshoot any issues that may arise and keep your grill running smoothly for years to come.
Troubleshooting Tips For Traeger Grills
How To Troubleshoot Your Traeger Grill
If you’re experiencing issues with your Traeger grill, don’t worry! Troubleshooting common problems can help you identify and resolve issues quickly, ensuring you can continue enjoying delicious grilled meals. Here are some steps to help you troubleshoot your Traeger grill:
Steps To Identify And Resolve Common Issues
1. Ensure the power source: First, check if your grill is properly plugged in and the power source is functioning. A tripped GFCI on the outlet, a blown fuse on the back of the controller, or a bad power outlet could be the culprit.
2. Check the temperature probe: If your grill isn’t heating up properly, the temperature probe may be dirty or damaged. Clean the probe using a soft brush or replace it if necessary.
3. Examine the hot rod: A damaged or faulty hot rod can prevent your grill from lighting. Inspect the hot rod carefully to see if it’s broken or worn out. If needed, replace the hot rod following manufacturer’s instructions.
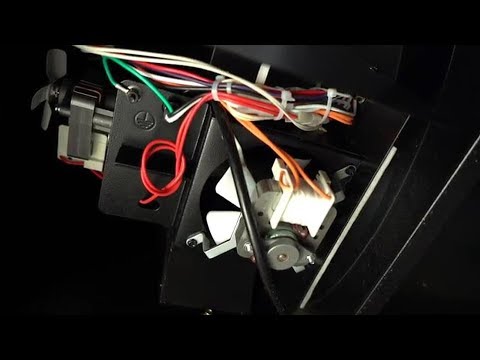
4. Assess the fan: A malfunctioning fan can lead to temperature swings or inconsistent heating. Locate the fan and check for any debris or obstructions. Clean the fan blades if necessary.
5. Inspect the auger: An auger jam can disrupt the flow of pellets, resulting in inconsistent feeding and grilling. Identify the auger motor and ensure it’s functioning correctly. Clear any blockages or obstructions from the auger if needed.
Tips For Maintaining Grill Performance
To keep your Traeger grill performing optimally, follow these tips:
1, Clean your grill regularly: Regular cleaning helps remove grease, ash, and debris, ensuring better heat distribution and preventing clogs.
2, Always use high-quality pellets: Using low-quality pellets can lead to poor performance and potential issues. Ensure you’re using premium hardwood pellets for the best results.
3, Keep the firepot clean: A rusty or dirty firepot can affect heat transfer and cause temperature fluctuations. Clean the firepot regularly with a grill brush or replace it if necessary.
4, Store your grill properly: When not in use, cover your grill with a Traeger grill cover to protect it from the elements. Additionally, store your pellets in a dry and cool place to maintain their quality.
Resetting Your Traeger Grill
If you need to reset your Traeger grill, follow these steps:
1. Power cycling the grill: Turn off and unplug your grill from the power source. Flip the power switch to the “on” position and then back to the “off” position. Finally, plug in and turn on the grill.
2. Restoring factory settings: To restore your grill to its factory settings, consult your grill’s manual for specific instructions. Usually, this involves holding down buttons or performing a specific sequence of actions as indicated by the manufacturer.
By following these troubleshooting tips and proper maintenance guidelines, you can keep your Traeger grill in excellent working condition. Enjoy your outdoor cooking adventures without any hassles!
Frequently Asked Questions
How Do I Troubleshoot My Traeger Grill?
To troubleshoot your Traeger grill, try these steps: 1) Check the power source, outlet, and cord for any issues. 2) Make sure the hot rod and fan are functioning properly. 3) Ensure the temperature probe and firepot are clean. 4) Follow the correct start-up process. 5) If the auger is jammed, clear the blockage. For more detailed instructions, check Traeger Grills’ YouTube channel or seek help from the Traeger community forums.
How Do I Reset My Traeger Grill?
To reset your Traeger grill, follow these steps: 1. Turn off and unplug the grill. 2. Flip the power switch to the on position. 3. Flip the power switch to the off position. 4. Plug in and turn on the grill.
Why Is My Traeger Not Firing Up?
If your Traeger grill is not firing up, it could be due to a tripped GFCI on the outlet, a faulty power outlet, a blown fuse on the controller, a damaged extension cord, or a break in the power cord.
Make sure to check these potential issues to resolve the problem.
How Do You Unclog The Auger On A Traeger Grill?
To unclog the auger on a Traeger grill, follow these steps: 1. Turn off and unplug the grill. 2. Remove any pellets from the hopper. 3. Access the auger by removing the grill grates and heat baffle. 4. Use a long, flexible brush to clear any debris or obstructions from the auger tube. 5. Plug in the grill and turn it on to test if the auger is running smoothly.
How Do I Troubleshoot My Traeger Grill?
Power cycle your grill by turning it off, unplugging it, and flipping the power switch to the on position. Then, plug it back in and turn it on. – Check for a tripped GFCI on the outlet or a blown fuse on the back of the controller.
Make sure the power outlet is functioning properly and that there are no breaks in the power cord. – If using an extension cord, ensure that it is not faulty.
Conclusion
If you’re facing issues with your Traeger grill, don’t worry! You can easily troubleshoot common problems to get back to grilling delicious meals. From grill startup to maintaining temperature, the Traeger Grills YouTube channel provides step-by-step videos for troubleshooting. Whether it’s replacing a damaged hot rod, fixing the fan, or unclogging the auger, you’ll find helpful tips to address any problem.
Don’t let these issues dampen your grilling experience – with the right troubleshooting techniques, you’ll be back to enjoying mouthwatering barbecues in no time. Happy grilling!


I set the temperature at 350 degrees and it only reaches a temperature of 87 degrees and the temperature starts to decrease by itself. What is causing this?
Hi there,
Thank you for your comment and for reaching out to us. It sounds like you’re experiencing an issue with your Traeger Grill not reaching or maintaining the correct temperature. This could be caused by a few different factors. Please follow these steps to troubleshoot:
If these steps don’t resolve the issue, it could be a more complex problem, and we would recommend reaching out to Traeger’s customer support or a certified technician for further assistance.
Let us know if this helps, and feel free to reach out if you have any more questions!
Best regards,
TroubleshootingLAB