To troubleshoot Zephyr Vent Hood issues, check for a broken on-and-off switch and a burned-out fan motor. If you’re not confident in your repair skills, it’s best to hire a professional for help.
Common Vent Hood Problems And Solutions
If you own a Zephyr vent hood, you may encounter various issues with its ventilation system. Understanding common ventilation problems can help you identify the root causes, troubleshoot them, and fix them effectively. In this section, we will explore the most common vent hood problems and provide solutions to resolve them.
Understanding Common Ventilation Problems
When it comes to vent hood troubleshooting, it’s important to be aware of the common ventilation problems that can occur. Here are some of the issues you may encounter:
- 1. The vent hood fan is not working properly.
- 2. The vent hood lights are not turning on.
- 3. Excessive noise is coming from the vent hood.
- 4. Poor air suction or airflow.
- 5. Smoke or odors are not being effectively removed.
Identifying The Root Causes Of Ventilation Issues
To troubleshoot and fix ventilation problems with your Zephyr vent hood, it is essential to identify the root causes. Here are some potential reasons behind these common issues:
- 1. Electrical problems, such as a blown fuse or faulty wiring.
- 2. A malfunctioning fan motor or switch.
- 3. Inadequate cleaning and maintenance of the vent hood.
- 4. Blocked or clogged air filters.
- 5. Improper installation or ventilation duct issues.
Steps To Troubleshoot And Fix Ventilation Problems
If you are experiencing any of the above-mentioned ventilation problems with your Zephyr vent hood, you can follow these steps to troubleshoot and resolve the issues:
- 1. Check the power supply: Ensure that the vent hood is properly connected to a power source and that the circuit breaker or fuse is not tripped or blown.
- 2. Inspect the fan motor and switch: Examine the fan motor and switch for any signs of damage or malfunction. If necessary, replace the faulty parts.
- 3. Clean and maintain the vent hood: Regularly clean the vent hood and remove any accumulated grease or debris. Pay close attention to the air filters, as clogged filters can reduce airflow. Replace or clean the filters as recommended by the manufacturer.
- 4. Check the ventilation ducts: Ensure that the ventilation ducts are free from any obstructions or blockages. Inspect the ductwork for any leaks or disconnections and repair them if necessary.
- 5. Seek professional assistance: If you are unable to resolve the ventilation problems on your own, consider contacting a professional technician or the Zephyr customer care team for assistance.
By following these troubleshooting steps, you should be able to resolve most of the common ventilation problems with your Zephyr vent hood. Remember to consult the product manual or contact the manufacturer for specific instructions and guidelines.
Vent Hood Lights Not Working: A Troubleshooting Guide
When it comes to a vent hood, having properly functioning lights is essential for a well-lit and functional kitchen. However, if you find that your Zephyr vent hood lights are not working, it can be frustrating. In this troubleshooting guide, we will explore the various reasons why your vent hood lights may not be working and provide steps to help you check and replace faulty vent hood bulbs, as well as troubleshoot the wiring and switches for light malfunctions.
Reasons Why Your Vent Hood Lights May Not Be Working
- Faulty bulbs: One of the most common reasons for vent hood light issues is faulty bulbs. Over time, bulbs can burn out or become loose, resulting in a lack of illumination. It is important to check the bulbs and ensure they are properly screwed in and functioning.
- Power supply issues: Another reason for light malfunctions could be related to power supply problems. Check if there is power reaching the vent hood and if the electrical outlet is functioning correctly. If not, it may require a professional electrician to diagnose and fix the issue.
- Defective switches: Faulty switches can also cause problems with your vent hood lights. Over time, switches can wear out or become damaged, preventing them from properly turning on or off the lights. Inspect the switches for any signs of damage or wear, and consider replacing them if necessary.
- Wiring problems: In some cases, the issue may lie with the wiring of your vent hood. Poorly connected or damaged wiring can disrupt the flow of electricity to the lights, resulting in malfunctioning or non-operational lights. It is important to carefully examine the wiring connections and replace any faulty wiring if needed.
How To Check And Replace Faulty Vent Hood Bulbs
If you suspect that the issue lies with the bulbs in your vent hood, follow these steps to check and replace them:
- Turn off the power. Before attempting to check or replace the bulbs, ensure that the power to your vent hood is turned off to avoid any potential electrical accidents.
- Remove the existing bulbs. Gently twist the bulbs counterclockwise until they come loose. Carefully remove them from the socket.
- Inspect the bulbs: Check the bulbs for any signs of damage or burnout, such as dark spots or a broken filament. If they appear faulty, it is recommended to replace them with new bulbs of the same wattage and type.
- Install the new bulbs: Align the tabs on the new bulbs with the slots in the socket and gently push them in. Once aligned, twist the bulbs clockwise until they are securely in place.
- Test the lights: After replacing the bulbs, turn on the power to your vent hood and test the lights to ensure they are now functioning correctly.
Troubleshooting The Wiring And Switches For Light Malfunction
If you have ruled out bulb issues and suspect that the problem lies with the wiring or switches, follow these troubleshooting steps:
- Turn off the power: As with any electrical work, it is crucial to turn off the power to your vent hood before attempting to troubleshoot or repair any wiring or switches.
- Inspect the wiring: Carefully examine the wiring connections in your vent hood to check for any loose or damaged wires. If you notice any issues, consider seeking assistance from a professional electrician to ensure proper repairs.
- Check the switches: Test the functionality of the switches by gently pressing or toggling them. If they feel loose, unresponsive, or show visible signs of damage, it may be necessary to replace them with new switches.
- Replace faulty wiring or switches: If you have identified any faulty wiring or switches, it is recommended to replace them with new, compatible components to restore proper functionality.
- Restore power and test: Once all necessary repairs or replacements have been made, restore the power to your vent hood and test the lights to ensure they are now working as intended.
By following these troubleshooting steps and addressing the specific issues related to faulty vent hood bulbs, wiring problems, and defective switches, you can resolve the problem of your Zephyr vent hood lights not working and enjoy a well-illuminated kitchen once again.
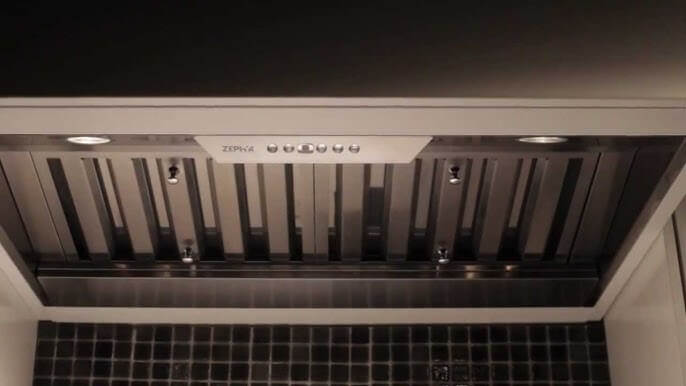
Unresponsive Vent Hood Controls: How To Fix
There can be several reasons why your Zephyr vent hood controls are unresponsive. Understanding these possible causes can help you troubleshoot the issue efficiently.
- Power connection issues: Check if the vent hood is properly connected to a power source. Ensure that the power outlet is working correctly.
- Electrical problems: Faulty wiring or a tripped circuit breaker can cause the controls to become unresponsive. Inspect the electrical connections and reset the circuit breaker if needed.
- Malfunctioning control panel: The control panel itself may be defective or damaged. This can happen due to wear and tear or electrical issues.
Once you have identified the possible reasons for the unresponsive vent hood controls, follow these steps to troubleshoot and fix the control panel issues:
- Check the power source. Ensure that the vent hood is properly plugged into a working power outlet. If the power connection is loose or faulty, try plugging it into a different outlet.
- Inspect the wiring: Carefully examine the electrical wiring to look for any signs of damage, such as frayed wires or loose connections. If you find any issues, it is recommended to call a professional electrician to repair or replace the wiring.
- Reset the circuit breaker. If the vent hood is connected to a circuit breaker, check if it has tripped. Reset it by flipping the corresponding switch back on. If the breaker continues to trip, it may indicate a wiring problem that requires professional assistance.
- Clean the control panel: Sometimes, unresponsive controls can be caused by dirt, grease, or debris on the control panel. Gently clean the panel using a soft cloth and a mild cleaning solution. Avoid using abrasive materials or harsh chemicals, as they may cause damage.
- Reset the vent hood: If none of the above steps resolve the issue, try resetting the vent hood. Locate the reset button, usually located on the control panel or inside the vent hood. Press and hold the reset button for a few seconds to reset the system.
If the troubleshooting steps mentioned above do not resolve the issue, it might be necessary to replace faulty control components. Ensure you follow these steps:
- Identify the faulty component: Use the Zephyr vent hood’s manual or reach out to the manufacturer’s customer support to determine which control component needs to be replaced.
- Purchase a replacement component: Order the specific replacement part from an authorized Zephyr dealer or directly from the manufacturer.
- Disconnect the power supply. Before starting any repair work, always disconnect the power supply to prevent accidents or electrical damage.
- Replace the faulty component. Follow the instructions provided by the manufacturer to safely replace the faulty control component. Ensure that the replacement is compatible with your specific Zephyr vent hood model.
- Test the vent hood: After replacing the control component, restore power to the vent hood and test the controls to ensure they are now responsive and functioning correctly.
By following these troubleshooting and repair steps, you can effectively fix unresponsive vent hood controls. However, if you are not confident in your repair abilities or the issue persists, it is recommended to seek professional assistance to avoid any further damage or safety hazards.
Maintaining And Replacing Vent Hood Filters
One of the most crucial aspects of maintaining a Zephyr vent hood is regularly cleaning and replacing the filters. Neglecting this simple task can lead to reduced efficiency, unpleasant odors, and even potential damage to your kitchen appliances. In this section, we’ll explore the importance of cleaning and replacing vent hood filters, provide a step-by-step guide to maintaining and cleaning filters, and explain how to replace different types of vent hood filters.
Importance Of Cleaning And Replacing Vent Hood Filters
Cleaning and replacing vent hood filters is an essential part of proper maintenance for several reasons. Firstly, the filters help to trap grease, smoke, and other airborne particles while preventing them from spreading throughout your kitchen. Over time, these particles accumulate and can impede the vent hood’s performance. Secondly, a dirty filter can produce unpleasant odors that linger in your kitchen, affecting the overall air quality. Lastly, neglecting to clean and replace the filters can lead to increased energy consumption and potential damage to the vent hood motor.
Step-by-step Guide To Cleaning And Maintaining Filters
Cleaning and maintaining vent hood filters is a relatively simple process that can be done in a few easy steps:
- Before cleaning the filters, turn off the vent hood and unplug it from the power source for safety.
- Remove the filters from the vent hood. Depending on the model, you may need to unscrew them or release a latch mechanism.
- Fill a sink or basin with warm water and add a mild dishwashing liquid.
- Submerge the filters in the soapy water and allow them to soak for about 15 minutes to loosen up any built-up grease.
- Gently scrub the filters using a soft brush or sponge to remove any remaining residue.
- Rinse the filters thoroughly with clean water to remove any soap residue.
- Allow the filters to air dry completely before reinstalling them.
- Once dry, reinstall the filters in the vent hood and ensure they are securely in place.
How To Replace Different Types Of Vent Hood Filters
Zephyr vent hoods may use various types of filters, including baffle filters, charcoal filters, or a combination of both. Here’s a guide on how to replace each type:
Baffle Filters:
1. Locate the baffle filters within the vent hood. Depending on the model, they may be located at the bottom or side of the hood.
2. Remove any screws or latches securing the filters in place.
3. Slide out the old baffle filters and dispose of them properly.
4. Insert the new baffle filters into the designated slots, ensuring they fit securely.
5. Secure the filters in place using the screws or latches.
Charcoal Filters:
1. Determine the location of the charcoal filters inside the vent hood. They are typically found behind a removable cover.
2. Remove the cover by unscrewing any screws or releasing any latch mechanisms.
3. Take out the old charcoal filters and dispose of them correctly.
4. Insert the new charcoal filters into the designated compartments, making sure they fit snugly.
5. Reattach the cover using the screws or latches to secure it in place.
By following these steps, you’ll be able to maintain and replace your Zephyr vent hood filters effectively, ensuring optimal performance and a clean and fresh kitchen environment.
Resetting Your Zephyr Vent Hood For Optimal Performance
How To Reset Your Vent Hood After Cleaning Filters
After cleaning your Zephyr vent hood filters, it is important to reset it properly to ensure optimal performance. Follow these steps to reset your vent hood:
- Ensure the vent hood is powered off and unplugged.
- Remove the filters from the vent hood.
- Clean the filters according to the manufacturer’s instructions.
- Once the filters are clean and dry, reinsert them back into the vent hood.
- Plug in the vent hood and turn it on.
- Press and hold the reset button on the control panel for 10 seconds.
- Release the reset button and wait for the vent hood to initialize.
- Your Zephyr vent hood is now reset and ready for optimal performance.
Troubleshooting Error Codes And Resetting Functions
If you encounter any error codes or experience issues with your Zephyr vent hood, resetting the functions can often resolve the problem. Follow these steps to troubleshoot error codes and reset functions:
- Refer to the user manual or manufacturer’s website for a list of error codes and their corresponding meanings.
- Determine the error code displayed on your vent hood’s control panel.
- Once you identify the error code, try resetting the function associated with it.
- To reset a function, locate the reset button or switch on the vent hood’s control panel. Press and hold it for 10 seconds.
- Release the reset button and wait for the vent hood to reset.
- Check if the error code is cleared and if the vent hood is functioning properly.
- If the issue persists, refer to the troubleshooting section in the user manual or contact Zephyr customer support for further assistance.
Ensuring Maximum Efficiency And Performance Post-reset
Once you have successfully reset your Zephyr vent hood, it is important to ensure maximum efficiency and performance. Here are a few tips to follow:
- Regularly clean and maintain the filters to prevent buildup and improve airflow.
- Inspect the ventilation ducts for any blockages or obstructions and clear them if necessary.
- Check the vent hood’s fan motor and replace it if it is not functioning properly.
- Keep the control panel and buttons clean and free from dirt or grease buildup.
- Monitor the vent hood for any unusual noises or odors, and address them promptly.
- Consider scheduling professional maintenance and servicing at regular intervals to ensure optimal performance.
By following these steps and guidelines, you can reset your Zephyr vent hood for optimal performance and enjoy efficient and effective ventilation in your kitchen.
Frequently Asked Questions
How Do You Reset A Zephyr Hood After Cleaning Filters?
To reset a Zephyr hood after cleaning filters, follow these steps: 1. Turn off the hood’s power. 2. Remove the filters. 3. Locate the reset button on the hood’s control panel. 4. Press and hold the reset button for 5 seconds. 5. Release the button and reinstall the filters.
Why Has My Hood Fan Stopped Working?
The most common reasons for a hood fan to stop working are a broken on/off switch or a burned-out fan motor. If you’re not confident in your repair skills, it’s best to hire a professional for assistance.
What Is The Clean Air Function On A Zephyr Range Hood?
The clean air function on a Zephyr range hood helps to improve the air quality in your kitchen by removing smoke, odors, and pollutants from the cooking area.
How Do You Reset The F Code On A Zephyr Hood?
To reset the F code on a Zephyr hood, you can try turning off the power to the hood for a few minutes and then turning it back on. If the issue persists, it’s best to contact a repairman for assistance.
How Do I Troubleshoot A Zephyr Vent Hood With No Power?
If your Zephyr vent hood has no power, check the circuit breaker and ensure it’s properly connected.
Conclusion
In troubleshooting Zephyr Vent Hood issues, it’s crucial to address common problems like broken switches and burned-out motors. While attempting repairs yourself is an option, hiring a professional may be the safer choice. Checking for proper installation and verifying that there are no blockages in the ductwork can also help resolve ventilation issues.
Remember to consult the Zephyr Connect App and customer care info for further assistance. With the right troubleshooting steps, your Zephyr Vent Hood will be functioning optimally again in no time.
")


