When your equipment fails to record or display content, effective dish hopper troubleshooting usually starts with checking your internet connection and power cables. Most connectivity issues stem from a loose coaxial cable or a temporary drop in your home network signal. If the device remains unresponsive, a simple power cycle often resolves the underlying software glitch. Always ensure your cables are hand-tightened and your router is broadcasting a stable signal before assuming the hardware itself has failed.
Troubleshoot your Dish Hopper system errors
The primary reason for a device failure is often a communication breakdown between the base receiver and the individual tuner. When the signal from your satellite dish encounters an obstacle, such as heavy rain or tree branches, the system displays a “searching for signal” error. This is a common issue during severe weather, as environmental factors can frequently disrupt satellite reception.
If the error persists after the weather clears, check the signal strength meter in your settings menu. A reading below 70 indicates a physical misalignment of the dish. If the signal is strong but the error remains, the coaxial cable connector may have corroded. Replace the cable if you see white oxidation on the copper tip.
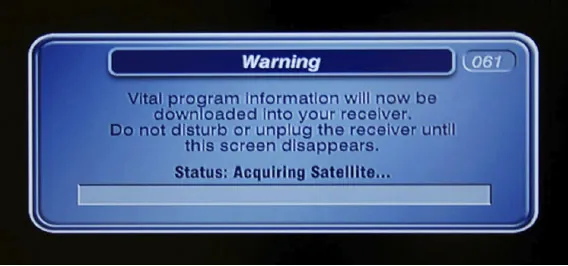
Another frequent cause involves outdated software. If your receiver hasn’t updated its firmware recently, it may struggle to process new menu commands or guide data. You’ll usually see a progress bar on the screen during an update; don’t unplug the device while this is happening, as it can corrupt the internal storage. If the unit hangs on the update screen for more than thirty minutes, perform a hard reset by holding the power button for ten seconds.
Finally, hardware overheating can trigger a sudden restart. If the unit is tucked inside a closed cabinet with no airflow, the internal temperature rises quickly. This forces the system to shut down to protect its components. If you touch the top of the box and it feels hot, you must move it to a location with better ventilation.
Always verify that the cooling vents aren’t blocked by dust or fabric covers. If the device restarts every time you access high-definition content, the processor is likely struggling with thermal load. In this case, use a can of compressed air to clear debris from the internal fan intake.
Refresh the signal connection
To fix a persistent signal loss, you should perform a manual refresh of your receiver settings. This process forces the device to re-establish its handshake with the satellite array and clears out any temporary errors in the tuner configuration. If you have multiple rooms connected, start by checking the main hub, as it controls the distribution of the signal to all other points in the house.
Begin by navigating to the system settings menu using your remote control. Look for the “Diagnostics” or “Connection” tab and select the option to test the satellite signal strength. If the bars are low, check the coaxial cable leading into the back of the device.
If X, do A; if the cable is loose, tighten it firmly by hand. If Y, do B; if the cable is tight but the signal remains low, you must contact your service provider to have a technician align your dish.
This fix is for users who see a “Searching for Signal” error on their screen. It isn’t for users who have a “No Input” message on their television, as that usually indicates a cable or source issue between the receiver and the TV itself. If you aren’t comfortable handling external cabling, or if your dish is mounted on a high roof, don’t attempt to adjust it yourself. Call a professional to avoid the risk of falling or damaging the mount.
Restart the hardware safely
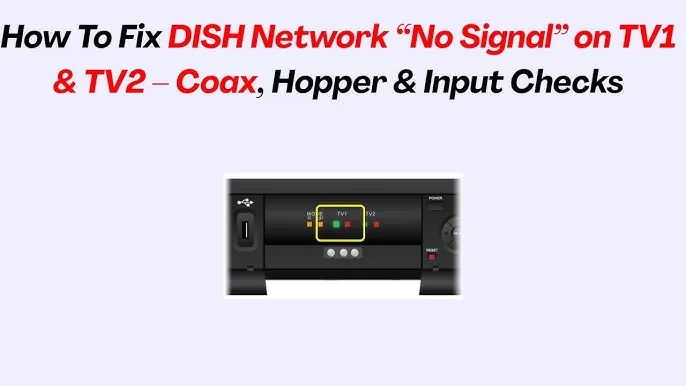
When the interface becomes sluggish or a specific channel fails to load, a full power cycle is the most effective way to clear the memory. This is different from just turning the device off with the remote, as a power cycle forces the operating system to reload from the hard drive.
To perform this, locate the power cable at the back of the receiver. Unplug it directly from the wall outlet and wait for at least 60 seconds. This time allows the internal capacitors to discharge fully, which ensures that all temporary data is cleared. After the wait, plug the cable back into the wall and wait for the system to restart. You’ll see a series of lights on the front panel while it reboots.
This step is for users experiencing frozen menus, missing guide data, or unresponsive remote commands. It isn’t for users who have a completely dark screen with no lights on the front of the unit. If your unit is dark, check the outlet first by plugging in a lamp to confirm there’s active power.
If the unit doesn’t power on after waiting for 10 minutes, the power supply or the internal board might be faulty. In that case, you should contact the manufacturer’s support line for a warranty replacement. Don’t attempt to open the casing, as this voids your warranty and exposes you to the risk of electrical shock.
If you see a blinking red light after the reboot, this indicates a hardware failure rather than a software glitch. In this specific scenario, don’t attempt further power cycles. Contact support immediately to prevent further damage to the internal drive.
Inspect cables and ventilation
If the system works intermittently, the issue is often physical. Inspect the coaxial cable for sharp bends or kinks, as these can damage the internal copper wire and degrade the signal quality. A kinked cable is a common mistake that costs users hours of frustration because the damage is often hidden behind furniture. Run your fingers along the entire length of the cable; if you feel a rigid, flattened, or crimped spot, replace the cable immediately.
Ensure the device has at least 4 inches of clear space on all sides. If you have the unit inside an entertainment center, remove the back panel of the cabinet to allow heat to escape.
If the receiver is stacked on top of another electronic device, such as a gaming console or a Blu-ray player, move it to a separate shelf. These devices generate significant heat, and stacking them creates a “heat trap” that causes the receiver to throttle its performance or crash.
If the unit feels hot to the touch or the internal fan is running constantly, it’s likely suffocating. Use a can of compressed air to clear dust from the intake vents. If you see dust accumulation, perform this cleaning at least once every six months to prevent permanent thermal damage.
If you have tried these steps and the issues persist, check your account status online. Sometimes, a service interruption is caused by an unpaid balance or a deactivated subscription, which will prevent the device from pulling the necessary authorization codes. If your account is in good standing and the cables are verified, the issue is likely a hardware failure.
Use this decision rule: if the device displays a specific error code on the screen, prioritize a factory reset. If the screen remains black or the device fails to power on entirely, you’re looking at a terminal hardware failure requiring professional replacement.
Avoid common mistakes

Don’t plug your receiver into a power strip or surge protector if the device acts erratically. These strips often degrade the steady voltage the unit requires to maintain a stable signal. If your receiver reboots randomly, plug it directly into a dedicated wall outlet to rule out power fluctuations.
Never spray liquid cleaners directly onto the receiver vents. Moisture seeps through these openings and causes immediate short circuits on the internal motherboard. Instead, spray a microfiber cloth lightly with isopropyl alcohol and wipe the exterior casing. This prevents liquid from pooling near sensitive electrical pathways.
Avoid a factory reset unless you have exhausted all other troubleshooting steps. This process wipes every recorded program and personalized preference from the drive. If you see a persistent error code, check your account status online first. A reset can’t fix a billing-related service suspension, but it will permanently erase your data.
Don’t use pliers to tighten coaxial cables. You can easily crack the connector or snap the internal copper pin. A broken pin renders the cable useless and may damage the receiver’s input port. Hand-tighten the connector until it feels snug. If you still experience signal loss, check for a loose connection at the wall plate before applying more force.
Proper system maintenance
| If you’re doing this | Do this instead | Why |
|---|---|---|
| Leaving the unit on 24/7 | Put it in standby mode | Saves energy and allows updates |
| Using a long extension cord | Plug directly into the wall | Prevents voltage drops |
| Dusting with a damp cloth | Use a dry microfiber cloth | Prevents liquid damage |
| Ignoring the “Overheating” warning | Move to an open area | Prevents permanent hardware failure |
When you find that your device is no longer responding to the remote, first verify that the remote control batteries aren’t dead. A simple change of batteries is often the “fix” for a system that appears to be frozen, as the box is actually working perfectly but simply can’t receive your commands.
If the lights on the front of the receiver still blink when you press buttons but nothing happens on the screen, the issue is definitely with the box itself. In this case, perform a hard power cycle by unplugging the unit from the wall for exactly sixty seconds. This clears the temporary cache and resets the internal network handshake. If the device fails to boot after this minute, you’re likely facing a corrupted firmware partition rather than a simple glitch.
Many users mistakenly blame their internet service provider for these hardware freezes. If your router lights are green but the device remains unresponsive, the fault lies within your local hardware. Don’t open the casing, as this voids your warranty and risks electrical shock. Contact your manufacturer’s technical department with your serial number to begin a professional diagnostic.