
To fix a dymo letratag troubleshooting tape jam, you should open the cassette compartment, remove the tape cartridge, and gently pull out any loose or crinkled tape from the print head area. This problem usually happens because the label tape has become misaligned inside the cartridge or the adhesive backing has stuck to the internal rollers. If the tape is stuck deep inside the device, don’t force it, as this can break the delicate plastic parts that hold the mechanism in place.
Troubleshooting Dymo Letratag tape jams
The most common reason for a jam is using a tape cartridge that has been stored in a hot or humid area. Heat can cause the adhesive on the back of the label to become soft or “gooey,” which makes it stick to the rubber rollers instead of moving smoothly through the exit slot. When this happens, the motor continues to spin, but the tape stays still, leading to a tangled mess inside the housing.
Another frequent cause is poor tape tension during installation. If the tape isn’t pulled tight or is already loose when you snap the cartridge into the machine, it can easily fold over itself as soon as the motor starts.
You should always check that the tape is taut across the cartridge opening before you close the lid. If the cartridge is dropped, the internal spools can shift, which often prevents the tape from unrolling correctly even if the outside of the plastic shell looks perfectly fine.
You can verify the proper operation of your device by checking the Dymo user manual support page for your specific model. This official resource shows the correct way to load and unload cartridges to avoid common mechanical errors. If you notice the motor sounds like it’s struggling or the screen shows an error message even after you have cleared the path, the issue might be a worn-out drive gear rather than just a simple jam.
Open the compartment and clear debris
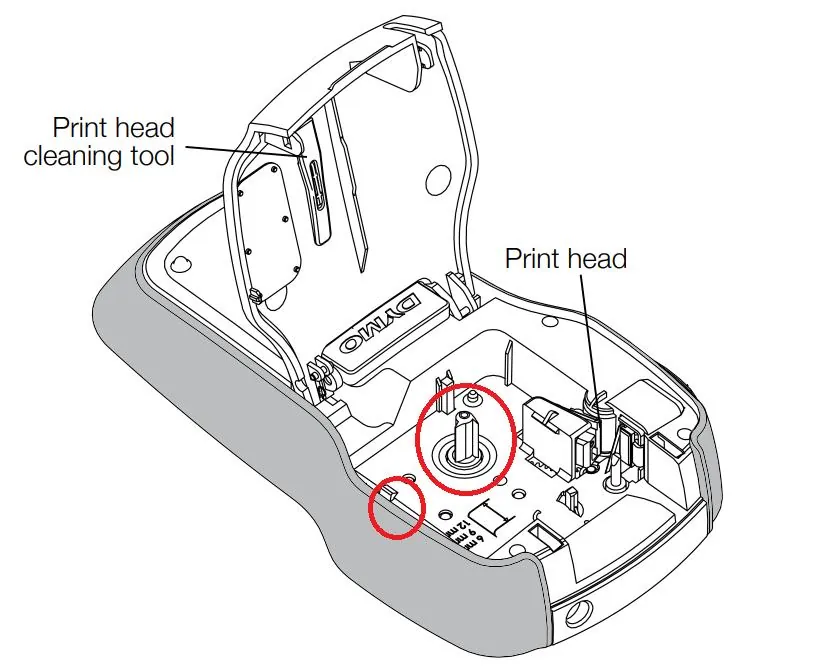
This fix is for users who can see the tape tangled near the print head or the exit slot. First, turn off the device and remove the batteries to ensure the motor doesn’t engage while you’re working. Press the release button to open the cartridge door and take the tape cassette out of the machine. Look closely at the print head, which is the small, dark strip located inside the slot where the cartridge sits.
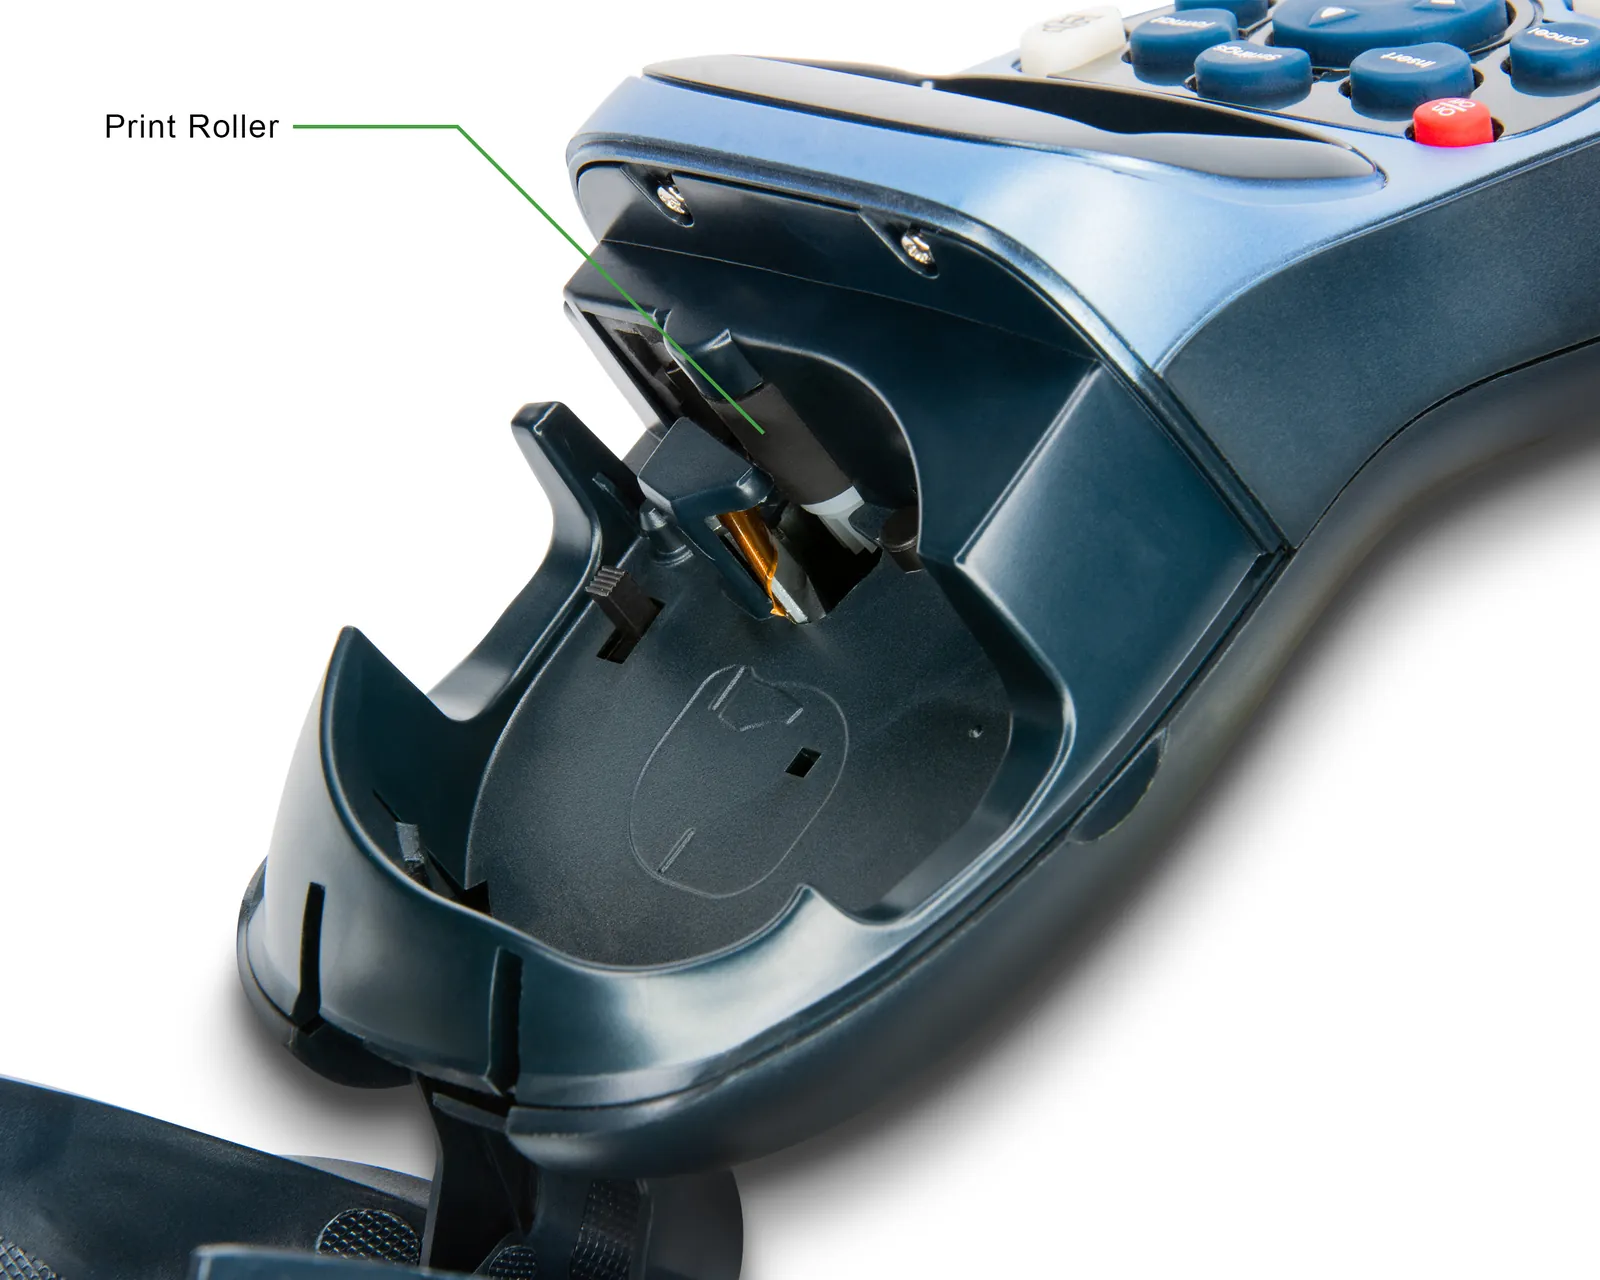
If you see a piece of label stuck to the rubber roller or the print head, use a pair of plastic tweezers to lift it away. Don’t use metal tools like scissors or screwdrivers, as these can scratch the print head surface or damage the rubber roller.
Once the path is clear, look at the cartridge itself to see if the tape inside is crinkled or stuck to the inner plastic wall. If the tape is damaged, it’s usually better to discard that cartridge, as a wrinkled edge will likely jam the machine again immediately.
Reset the tape tension
This method is for when the machine isn’t jamming, but the label comes out crooked or with ink streaks. Often, the internal spool that pulls the tape back into the cartridge has lost its tension, causing the label to bunch up. Take the cartridge out and look for the small spool on the side of the plastic housing. Use a pencil or your finger to gently turn the spool in the direction that tightens the tape.
You should feel a slight resistance as the tape pulls taut across the front of the cartridge. If the tape remains loose no matter how much you turn the spool, the internal spring mechanism is likely broken, and the cartridge should be replaced.
If you’re using a non-official label brand, check that the cartridge fits snugly against the back of the machine. Some generic tapes have slightly different dimensions, and a loose fit often causes the gear teeth to skip, which leads to immediate jamming during the printing cycle.
Use a cleaning card for residue
For persistent issues where the machine makes a grinding noise, a sticky print head is often the culprit. Over time, small amounts of adhesive build up on the rollers and the print head, creating a layer that grabs the tape. While commercial cleaning cards are available, you can also use a cotton swab lightly dampened with 90% or higher isopropyl alcohol to clean the area.
Only use a very small amount of alcohol and ensure it’s fully dry before you put the cartridge back in. If you use too much liquid, it can drip into the electronic components and cause a short circuit. A common mistake is using standard rubbing alcohol, which often contains oils or water that leave a conductive residue.
This step is for the hard cases where simple clearing doesn’t work. If the machine still jams after you have cleaned the rollers and ensured the tape isn’t sticky, the internal motor or gears may have suffered permanent wear. Use this decision rule: if the motor hums but the feed rollers don’t turn, the gear train is likely stripped. At this point, it’s usually more cost-effective to replace the device than to seek professional repair services.
What not to do during a jam
Never use metal tweezers or knives to extract stuck tape. Metal permanently scratches the sensitive print head, which causes permanent white lines across every future label.
Don’t pull the tape with force. Internal plastic gears are fragile and snap easily when you pull against the motor’s resistance. If the tape doesn’t budge with a light tug, stop immediately.
Avoid solvents like nail polish remover or harsh household cleaners. These chemicals melt the plastic housing and degrade the internal rubber rollers, causing them to lose the grip necessary to feed tape.
Don’t disassemble the outer casing. This voids your warranty and makes it nearly impossible to reassemble the complex, spring-loaded parts.
If you see a jam, the correct decision rule is simple: if the tape is visible, use a blunt plastic tool to gently guide it out. If the tape is buried, power down the device and wait ten minutes before attempting any further maintenance.
Preventing future tape jams
If you’re currently experiencing frequent jams, compare your habits with the table below to see where the process is failing.
| If you’re doing this | Do this instead | Why |
|---|---|---|
| Storing tapes in a hot car | Store tapes in a cool, dry drawer | Heat makes the adhesive sticky |
| Dropping the label maker | Keep the device in a protective case | Drops misalign the internal gears |
| Forcing the lid shut | Check for tape overlap first | Forcing puts pressure on the rollers |
| Using old, dusty cartridges | Wipe the cartridge surface clean | Dust prevents the gears from turning |
Most users ignore the “slack” rule. Before inserting a new cartridge, manually rotate the internal spool to tighten the tape. If the tape is loose, it will inevitably catch on the print head.
Check the exit slot for adhesive residue. If you see sticky buildup, clean the area with a cotton swab dipped in isopropyl alcohol. A clean path is the difference between a smooth feed and a permanent jam.
If your device jams repeatedly despite these steps, inspect the gear teeth for plastic shards. If you find debris, use a pair of tweezers to clear it. Never use metal tools that could scratch the delicate drive mechanism.
Frequently asked questions
Can I fix a jammed dymo letratag by pulling the tape hard?
No, you should never pull the tape with force because the internal gears are made of plastic and will break under pressure. If the tape is stuck, you must open the cartridge compartment and gently remove the obstruction with plastic tweezers. Pulling hard only forces the tape deeper into the rollers or snaps the drive mechanism, which isn’t a user-serviceable part.
Why does my label maker keep saying tape jam?
It happens because the tape path is blocked by debris or the tape isn’t feeding correctly from the cartridge. Check the rubber roller for sticky residue and ensure the tape isn’t wrinkled or overlapping inside the cartridge. If the message persists after you have cleared the area, the internal sensor that detects the tape may be dirty or failing.
How long should a dymo letratag cartridge last?
A single cartridge typically lasts for about 13 feet of printing, assuming you’re using standard settings for label length. The exact number of labels you get depends on the length of each label you choose to print. If you print shorter labels, you’ll get more per cartridge, but the mechanical wear on the feed system remains the same regardless of label length.
Is it safe to use generic tape in my dymo?
Yes, it’s generally safe, but generic tapes may have slightly different dimensions that lead to more frequent jams. If you notice your device jams more often with a specific brand, switch back to the original manufacturer’s tape to see if the issue goes away. Generic brands sometimes have weaker shells that can warp, which causes the tape to feed unevenly.
What happens if I get glue inside the machine?
The glue will coat the rubber rollers and the print head, which causes the tape to stick and stop moving through the exit slot. You can clean this off with a small amount of isopropyl alcohol on a cotton swab, but be careful not to let any liquid drip inside the machine. If the glue has reached deep into the gears, it will likely cause the motor to stall permanently.
How often should I clean the print head?
You should clean the print head whenever you change the tape cartridge or if you notice the print quality is fading or streaking. Regular cleaning prevents adhesive buildup that leads to jamming and poor print results. Use a dry cotton swab first to remove dust, and only use alcohol if you can clearly see sticky residue on the rubber components.
Is the label maker worth repairing if it still jams?
No, it’s usually not worth the cost because the price of professional repair labor often exceeds the cost of a new device. If you have cleaned the path and verified the cartridges aren’t the problem, the motor or the internal gear train is likely worn out. These components aren’t designed for long-term repair, so replacing the unit is the most practical solution for a home user.
Conclusion
If you have tried all the steps above and your device continues to jam, the internal drive mechanism has likely reached the end of its life. At this stage, the cost of professional repair is almost always higher than buying a replacement, and most manufacturers don’t offer parts for these small electronic tools.
Related guides