You can fix most issues with an fhsm 505 sewing machine troubleshooting process by checking the needle insertion and the bobbin tension first. Most problems with this compact unit stem from using the wrong needle type or having the thread path blocked by lint. If your machine skips stitches or jams, start by re-threading both the upper spool and the bobbin case completely.
Troubleshooting FHSM 505 sewing machine jams
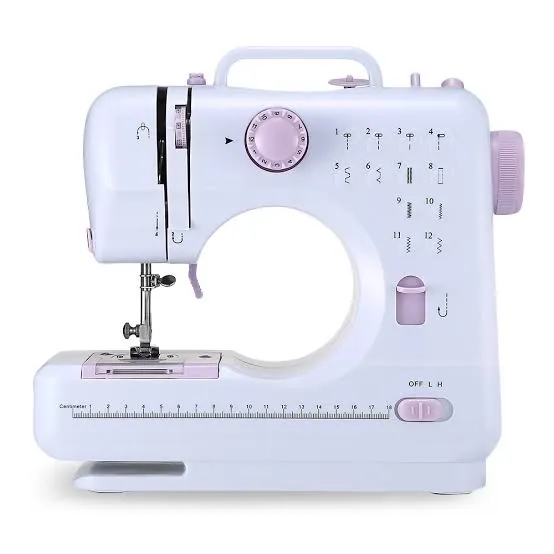
The most common cause of performance issues is incorrect tension settings or a dull needle. Because this machine is a lightweight, portable model, it relies on precise thread path alignment to keep the stitch formation consistent. If the thread isn’t seated firmly between the tension discs, the machine will create loops or bunch up underneath the fabric.
Another major factor is the buildup of fabric dust and thread bits inside the shuttle race. This area collects debris quickly, which prevents the hook from catching the needle thread properly. When the hook can’t grab the thread, the machine fails to create a lock stitch, resulting in skipped stitches or a tangled mess of thread. You should check the shuttle area after every few hours of heavy use to ensure the path is clear.
Finally, the quality of your thread and the size of your needle must match your fabric. Using a heavy-duty needle on thin silk or a thin needle on thick denim will cause the machine to struggle. The official sewing machine safety guide from the Consumer Product Safety Commission reminds users that keeping the workspace clear and the machine clean is essential for preventing mechanical strain.
If the machine makes a grinding noise or the motor feels hot to the touch, turn it off immediately and let it cool, as this often indicates that the internal gears are under too much stress from a jam.
Re-thread the upper and lower paths
This fix is for anyone experiencing uneven stitches or thread snapping. First, turn the power off and lift the presser foot to the highest position. Remove the thread entirely from the machine, including the bobbin case. Clean any visible dust from the thread path using a soft brush.
Check that your needle is inserted with the flat side facing the back of the machine and the long groove facing the front. If the needle is backward or loose, the hook will miss the eye of the needle every time.
A common mistake is failing to push the needle all the way into the clamp; if it isn’t seated fully against the stop, the loop formation will fail. Once the needle is secure, pull the thread through the tension discs slowly while the presser foot is up. Ensure the thread sits deep in the discs, not just resting on the surface.
Next, place the bobbin into the case so the thread rotates in the direction shown on the machine’s diagram. Pull the thread through the small tension spring on the bobbin case itself. If you pull the thread, the bobbin should provide light, steady resistance.
Use this decision rule: if the bobbin spins like a top, tighten the tiny screw on the side of the case by a quarter turn. If the thread snaps during a test, loosen that same screw by a quarter turn. If the thread is impossible to pull, the tension is too tight. Always test the stitch on a scrap piece of fabric before returning to your main project.
Adjust the tension dial settings
If your fabric is puckering or the thread is looping on the underside, you need to adjust the tension dial. This fix is for those who have already verified that the machine is threaded correctly. The tension dial usually has numbers from 0 to 9, with 4 or 5 being the standard starting point for most cotton fabrics.
If the top thread is being pulled to the bottom, your top tension is too loose. Turn the dial to a higher number to increase the pressure on the thread. If the bottom thread is showing on the top of the fabric, your top tension is too tight.
Turn the dial to a lower number to release some pressure. Make small adjustments, moving only one number at a time, and test the stitch on two layers of the same fabric you’re using for your project.
This fix isn’t for internal motor issues or broken timing. If the needle hits the needle plate or the machine sounds like metal grinding against metal, don’t force the dial. These are signs of mechanical failure that require a qualified repair technician. Don’t attempt to open the motor housing or adjust the internal timing screws yourself, as this can void your warranty and cause permanent damage to the drive gears.
Clean the shuttle and feed dogs
This fix is for when the machine refuses to move the fabric or the thread keeps getting stuck in the base. Start by removing the needle plate, which is usually held in place by two small screws. Use a small, soft brush to remove lint from the feed dogs—the small metal teeth that push the fabric forward. Compressed air is often too strong and can push dust deeper into the internal mechanism, so use a brush instead.
After cleaning the feed dogs, remove the shuttle hook assembly. Look for any bits of thread wrapped around the central post. Even a tiny piece of thread can stop the hook from rotating smoothly. Wipe the area with a dry cloth; don’t use oil unless the manual specifically lists a point for it, as oil can attract more dust and gum up the machine.
A common mistake is assuming the feed dogs are broken when they’re simply set to the wrong height. Check the drop-feed lever, usually located on the back or side of the machine. If this lever is toggled for free-motion quilting, the dogs will remain retracted regardless of how clean the machine is.
This process is worth the effort if your machine has been sitting for a long time or if you have been sewing thick, fuzzy fabrics. It isn’t helpful if the motor itself isn’t turning on.
If the machine is clean but still won’t move the fabric, check that your presser foot is lowered. The feed dogs only engage the fabric when the presser foot provides the necessary downward pressure. If the fabric still bunches, verify that the stitch length isn’t set to zero.
Popular advice that causes damage
Using heavy-duty thread in a standard needle: This prevents the thread from passing through the eye smoothly, causing it to snap constantly. Match your needle gauge to the thread weight; if the thread drags, you need a larger eye, not more tension.
Forcing the handwheel when the machine is stuck: This can strip the plastic gears inside, turning a simple jam into a broken machine. If the wheel resists, stop immediately. Check the bobbin case for tangled thread or a bent needle before applying any pressure.
Pulling the fabric while sewing: This pushes the needle against the plate, which creates microscopic burrs. These metal jagged edges will shred your thread later. Let the feed dogs do the work. If you must pull, you’re likely using the wrong presser foot pressure.
Using WD-40 or household oil: These fluids aren’t sewing machine lubricants. They dry into a sticky paste that ruins internal timing. Always use dedicated sewing machine oil.
Maintenance for consistent results
To keep your machine running well, you must match your settings to the material you’re using. If you move from thin cotton to heavy denim, you must change your needle size and adjust the tension.
| If you’re doing this | Do this instead | Why |
|---|---|---|
| Sewing heavy denim | Use a size 100/16 needle | A thinner needle will bend or break |
| Starting a seam | Hold both threads back | This prevents the thread from nesting |
| Changing fabric types | Test on a scrap first | It saves your project from mistakes |
| Machine sounds slow | Check for jammed thread | Force will break the plastic gears |
Most users neglect the bobbin case until a jam occurs. You should clear the lint from this area every three bobbins to maintain consistent stitch quality. If you see skipped stitches, your needle is likely dull. A needle loses its sharpness after roughly eight hours of continuous sewing.
Replace it immediately to prevent fabric snags. If the machine still skips, check your thread path. A loose tension disc is often the culprit. If the thread pulls through with no resistance, rethread the entire machine from the spool pin down.
Frequently asked questions
Can I use any needle in this machine?
No, you must use a standard household sewing machine needle with a flat shank. These needles are specifically calibrated to reach the correct depth to catch the bobbin thread. Ensure the needle is pushed fully into the clamp, as even a slight misalignment will cause the machine to skip stitches.
Why does my thread bunch up under the fabric?
Thread bunches up because the top tension is too loose or the machine is threaded incorrectly. When tension is loose, the top thread fails to pull the bobbin thread into the fabric. Always raise the presser foot when threading the machine to ensure the tension discs are open and ready to grip the thread.
How long should a needle last?
A needle typically lasts for 8 to 10 hours of active sewing time before it becomes too dull. If you hear a popping sound when the needle enters the fabric, change it immediately. Using a dull needle causes skipped stitches and can damage fabric fibers by pulling rather than piercing them cleanly.
Is it safe to leave the machine plugged in?
No, you should always unplug the machine when you aren’t actively using it or performing maintenance. Leaving electrical equipment unattended creates a fire hazard and risks accidental activation if the foot pedal is bumped. Always inspect the cord for heat or discoloration, and stop using the machine if you notice any damage.
What happens if I sew without fabric?
Sewing without fabric causes the needle thread to loop around the shuttle hook and create a massive jam. Running the machine empty also allows the feed dogs to rub against the presser foot, causing unnecessary wear. Always keep a piece of scrap fabric under the needle before starting the motor.
Conclusion
Keep your machine clean by brushing away stray lint after every project to prevent future snags. If you’re still having trouble after these quick checks, don’t hesitate to reach out to a local repair shop. They’ll get you back to sewing smoothly so you can enjoy your creative hobby again.