You can fix common issues with your device by performing a basic gardepro a3 trail camera troubleshooting process, which starts with checking your power source and SD card. Most performance problems stem from low battery voltage or a card that’s either full or improperly formatted. If your camera isn’t recording images or saving files, the first step is always to swap your batteries for a fresh set of high-quality alkaline or lithium AAs and test the unit again.
Fixing GardePro Trail Camera Issues
Trail cameras rely on a very specific sequence of events to trigger a recording. When this sequence breaks, the camera often appears dead or unresponsive. The most common cause is a power supply that can’t provide the sudden burst of current needed to activate the infrared sensors or the flash during night shots.
Even if your batteries read as “full” in a low-power state, they might drop below the required voltage the moment the camera tries to save a large image file to the memory card.
Another frequent cause is the file system on your SD card. These cameras use a specific format, usually FAT32, to read and write data. If you move your card between a computer, a phone, and the camera, the file structure can become corrupted. This prevents the camera from “seeing” the card, even if the card is physically intact. You can check the specific storage requirements and compatibility guidelines for your unit on the GardePro official support page.
Finally, environmental factors play a major role. If the lens or the PIR sensor window is covered in debris, spider webs, or heavy dew, the camera will fail to detect motion. It will remain in standby mode indefinitely, leaving you with empty folders. Always inspect the front of the unit for physical obstructions before assuming an internal hardware failure.
Perform a Hard Power Reset
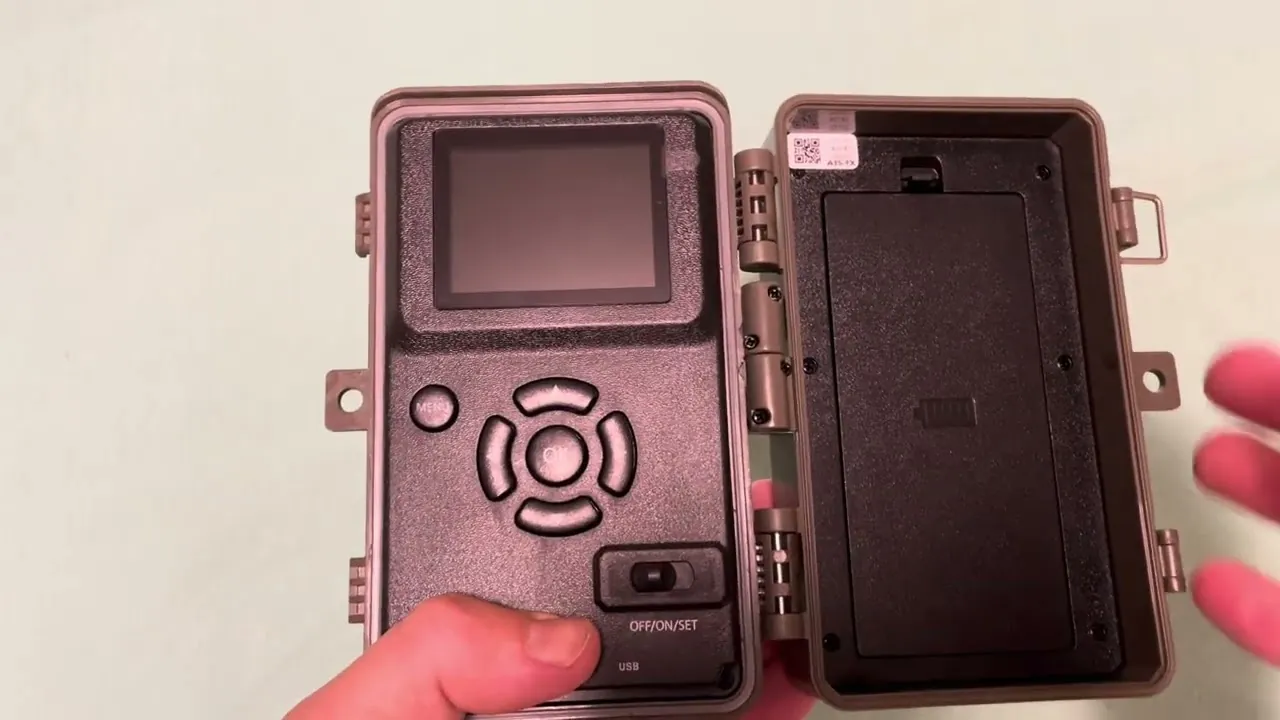
If your screen is frozen or the camera isn’t responding to button inputs, a hard reset is the most effective way to clear the internal memory. First, turn the power switch to the “OFF” position. Remove the batteries completely for a few minutes to ensure the device is fully powered down before reinserting them.
While the batteries are out, remove the SD card and clean the gold contacts with a soft, dry cloth. Never use water or solvents, as these can leave a residue that interferes with data transfer. After the wait, insert a fresh set of batteries and a different, known-working SD card if you have one available. Slide the switch to “TEST” or “SETUP” mode.
If the screen wakes up and displays the menu, the issue was likely a temporary memory conflict. If the screen remains black, the internal display or the main board may have failed. This fix is for users who have access to fresh batteries and a spare card; if the unit still fails to power on after this, it’s likely a hardware defect that requires professional service from the manufacturer.
Format the Memory Card Correctly
If your camera powers on but fails to save photos or stops recording after a few days, the SD card is likely the culprit. You must format the card inside the camera itself to ensure the file system matches the device’s requirements. To do this, insert the card into the slot while the camera is off. Switch the unit to “SETUP” mode and navigate to the menu. Look for the “Format” option and select “Yes.”
Be aware that this action deletes every file on the card, so back up any important footage to your computer first. If the camera gives an “Error” or “Card Full” message even after formatting, the card has likely reached the end of its write-cycle life.
Most standard SD cards are designed for a limited number of write cycles. This fix isn’t for users who don’t have a computer to read their old files, as formatting will permanently erase the data. If the camera refuses to format the card, try a different brand of SD card, as some high-speed cards are incompatible with older firmware versions.
Optimize Sensor Sensitivity Settings
When the camera captures too many “blank” videos or misses animals entirely, you need to adjust the motion sensor sensitivity. In the menu settings, look for the “Sensitivity” or “PIR Sensitivity” option. If you’re in a dense forest with swaying branches, set the sensitivity to “Low.” This prevents the camera from triggering when the wind moves tree limbs, which saves battery life and prevents your card from filling up with useless footage.
Conversely, if you’re monitoring a wide-open field, set the sensitivity to “High.” This allows the sensor to detect movement at a greater distance. Keep in mind that a trade-off exists: higher sensitivity increases the chance of “false triggers” caused by heat signatures like tall grass blowing in the sun. If you find the camera is still not catching targets, check the mounting angle.
The PIR sensor is most sensitive to movement that crosses the field of view, rather than movement coming directly toward the lens. If you aren’t seeing results, adjust the camera to face sideways relative to the trail. This simple physical change often works better than any software setting. If you suspect the PIR sensor is broken, contact the manufacturer’s customer service team, as these sensors aren’t user-serviceable parts.
Common Misconceptions to Avoid
- Don’t use rechargeable batteries with low capacity: Some trail cameras are calibrated for the higher starting voltage of alkaline batteries and may display a low battery warning sooner when using 1.2V rechargeable batteries.
- Don’t force the SD card into the slot: If it doesn’t slide in smoothly, you may have the card upside down, and forcing it can bend the delicate pins inside the reader.
- Don’t use “High-Speed” or “Ultra” cards: Some older models struggle to communicate with high-speed SDXC cards, leading to corrupted files or failed recordings.
- Don’t leave the camera in “SETUP” mode: If you leave the switch in the “SETUP” position, the camera won’t record motion and will drain the batteries rapidly.
- Don’t clean the lens with paper towels: The wood pulp in paper can create microscopic scratches on the plastic, which will blur your images and cause the infrared light to scatter.
Preventing Future Camera Failures
You can avoid most performance issues by maintaining a regular check-up schedule for your gear. Instead of waiting for a failure, treat your camera as a piece of precision equipment that requires specific environmental adjustments.
| If you’re doing this | Do this instead | Why |
|---|---|---|
| Leaving batteries in storage | Remove them completely | Prevents corrosion from leaking acid |
| Using old SD cards | Buy a new Class 10 card | Reduces risk of file corruption |
| Cleaning with wet cloths | Use a dry microfiber cloth | Prevents water ingress into the seal |
| Mounting in direct sunlight | Mount in the shade | Avoids false triggers from heat |
| Ignoring firmware updates | Check the maker’s website | Updates fix known bugs and bugs |
Frequently asked questions
How long should the batteries last?
Batteries typically last 3 to 6 months using high-quality lithium AAs with fewer than 50 images daily. High-frequency video or infrared usage reduces this to 2 to 4 weeks. Always check the battery level in the “SETUP” menu before deployment.
Can I use a 128GB SD card?
Most models are limited to 32GB or 64GB, and exceeding this capacity will cause the camera to fail. Check your manual or product page to confirm the exact limit for your specific model. Using larger cards often prevents the camera from formatting or reading storage.
Why is my night video blurry?
Night video is blurry because the infrared flash has a limited range and the sensor struggles in low light. Subjects appearing as white blurs are likely moving too quickly or too close to the lens. Ensure the lens is clear of moisture, which often accumulates during cold nights.
Is it safe to leave the camera out in the rain?
The camera is weather-resistant only if the rubber gasket is clean and the latch is fully locked. Debris on the seal allows water to enter and destroy the electronics. Inspect the seal for damage or dirt every time you change the batteries to prevent internal moisture.
What happens if the internal date resets?
The date and time reset if the batteries are removed or the internal coin cell battery dies. This causes the camera to stamp photos with incorrect information. You must manually reset the date and time in the “SETUP” menu if the internal clock fails to hold settings.
How do I know if the PIR sensor is broken?
The PIR sensor is likely broken if the camera fails to trigger in “TEST” mode with fresh batteries and high sensitivity. If the test light doesn’t blink, the hardware isn’t detecting your heat signature. This isn’t user-repairable, so contact the manufacturer for a warranty claim or professional repair.
Conclusion
Proper care and regular maintenance will help your trail camera perform reliably throughout the season. Focus on keeping your power source consistent and your SD cards clean to avoid the most common field frustrations. If you follow the steps above and the device still doesn’t function as expected, reach out to the manufacturer’s support team for further assistance with your specific model.
Related guides