Is your GE refrigerator acting up and leaving you wondering what to do next? You’re not alone, and the good news is that many common issues can be diagnosed and fixed without waiting for a costly repair call.
This GE Refrigerator Troubleshooting Manual is designed to guide you step-by-step through identifying problems, understanding error codes, and performing simple fixes that save you time and money. Whether your fridge isn’t cooling properly, the ice maker is on the fritz, or you’re seeing warning lights, this manual puts practical solutions right at your fingertips.
Keep reading, and you’ll learn how to get your GE refrigerator back to running smoothly—fast and hassle-free.
Common Cooling Problems
Cooling problems are common issues that affect GE refrigerators. These problems can cause food spoilage and increase energy costs. Understanding the main causes helps in quick repairs and avoids major damage. Below are the frequent cooling problems and how to identify them.
Dirty Condenser Coils
Condenser coils release heat from inside the fridge. Dust and dirt block air flow, causing poor cooling. Clean coils every few months with a vacuum or brush. Dirty coils make the compressor work harder and use more power. Regular cleaning improves efficiency and extends fridge life.
Evaporator Fan Issues
The evaporator fan moves cold air inside the fridge and freezer. If the fan stops working, cold air cannot circulate. This leads to uneven cooling or warm spots. Listen for fan noise when the door is closed. Check if the fan blade is stuck or broken. Replace the fan motor if it fails to run.
Compressor Relay Failures
The compressor relay starts the compressor motor. A faulty relay prevents the compressor from running. The fridge will not cool properly or may stop cooling entirely. Test the relay for a rattling sound or no electrical continuity. Replace the relay to restore compressor function and cooling.
Temperature Settings Check
Checking the temperature settings is a key step in fixing GE refrigerator problems. Incorrect settings can cause poor cooling or freezing issues. This step helps confirm the fridge runs at the right temperature for food safety and efficiency.
Many users overlook this simple check, yet it often solves common problems quickly. Knowing how to read and adjust the control panel is essential. Below, learn the ideal temperatures and how to adjust your GE refrigerator.
Ideal Refrigerator Temperatures
The perfect fridge temperature keeps food fresh and safe. GE recommends setting the refrigerator between 37°F and 40°F. The freezer should be set at 0°F to keep items frozen solid.
Temperatures too high cause food spoilage. Temperatures too low may freeze fresh produce. Monitor the internal thermometer to ensure accuracy. Adjust settings if temperatures stray outside this range.
Adjusting Control Panels
GE refrigerators have easy-to-use control panels for temperature settings. Locate the control panel usually found inside the fridge or on the door.
Use the buttons or dials to increase or decrease the temperature. Some models show digital displays with current temperature readings. Make small changes and wait 24 hours to see effects.
If your fridge has a touchscreen, follow the menu prompts to access temperature controls. For models with manual dials, turn slowly to avoid sudden large changes.
After adjusting, close the door firmly to maintain the cold air inside. Check the temperature again after a day to confirm it is stable and correct.
Water Dispenser And Ice Maker Issues
The water dispenser and ice maker in a GE refrigerator add great convenience. Problems with these features can disrupt daily routines. Common issues include slow water flow, no ice production, or poor ice quality. Understanding simple troubleshooting steps helps restore function quickly. Below are key areas to check for common issues.
Water Flow Problems
Low or no water flow often relates to blockages or frozen lines. Check if the water supply valve is fully open. Inspect the dispenser tube for ice or debris. Frozen lines can thaw after unplugging the fridge for a few hours. The water inlet valve may fail and need replacement. Test the valve for proper operation if water flow remains weak.
Ice Maker Malfunctions
The ice maker may stop producing ice due to a faulty motor or thermostat. Check the ice maker’s power switch is on. Clear any ice jams inside the ice tray or chute. Faulty sensors or control boards can cause malfunctions. Remove old ice buildup to prevent blockages. Resetting the ice maker by pressing the reset button can also help.
Checking Water Filters
A clogged water filter reduces water flow and ice quality. Replace the filter every six months or as recommended. Use only GE-approved filters for best results. To replace, twist the old filter counterclockwise and pull it out. Insert the new filter and turn it clockwise until it locks. Run water through the dispenser for a few minutes after replacement to clear air.
Door And Seal Troubleshooting
The door and seal of a GE refrigerator play a key role in keeping cold air inside. Problems with the door or seals often cause temperature issues. This section helps you identify and fix common door and seal problems. Proper door function saves energy and keeps food fresh longer.
Door Closure Problems
Check if the door closes fully without extra force. Sometimes the door may stick or not close evenly. Dirt or debris on the hinges can cause poor closure. Clean the door hinges and make sure nothing blocks the door’s path. A misaligned door may need adjustment to close tightly. Listen for a solid seal sound when closing the door.
Seal Inspection And Replacement
Inspect the rubber seal around the door for cracks or tears. Worn or damaged seals let cold air escape. Run your hand along the seal to feel for gaps. Use a thin piece of paper to test the seal’s grip; if it slips out easily, the seal may need replacement. Replace the seal with an official GE part for best fit and function.
Impact Of Large Items On Door Function
Large items inside the fridge can block the door from closing properly. Avoid overpacking the shelves near the door. Items sticking out may push the door open slightly. Rearrange or remove tall or wide containers to allow smooth door closure. Proper spacing inside helps maintain the fridge’s cooling efficiency.
Diagnostic And Reset Modes
The diagnostic and reset modes in your GE refrigerator help identify and fix common problems quickly. These modes give you control over testing the appliance’s functions and clearing errors. Understanding how to use them can save time and prevent unnecessary repairs.
Diagnostic mode runs tests on key components, such as sensors and fans. Reset mode clears error codes and restarts the control board. Both modes require specific steps to access and operate safely.
Accessing Service Mode
To enter service mode, press and hold specific buttons on the control panel. Usually, this involves pressing the “Temperature Up” and “Temperature Down” buttons simultaneously. Hold them for about five seconds until the display changes.
The display will show a code or symbol indicating service mode is active. Follow your model’s manual for exact button combinations. Be careful not to change settings accidentally during this process.
Running Diagnostic Tests
Once in service mode, use the control panel buttons to cycle through diagnostic tests. The fridge will check components like the compressor, fans, and temperature sensors. Each test runs for a few seconds and shows results on the display.
Look for error codes or unusual readings during these tests. Write down any codes to help with further troubleshooting or when calling for support. Diagnostic tests help pinpoint parts that may need repair or replacement.
Resetting The Control Board
Resetting the control board clears errors and restarts the refrigerator’s control system. To reset, unplug the fridge for about five minutes. Plug it back in and press the reset buttons if your model has them.
Some models require holding the “Power” or “Reset” button on the control panel for several seconds. Check your manual for the exact reset procedure. Resetting often resolves minor glitches and restores normal operation.

Error Codes And What They Mean
GE refrigerators are equipped with error codes to help diagnose problems quickly. These codes appear on the display panel. Understanding these codes saves time and avoids unnecessary repairs. Each code points to a specific issue within the appliance. Knowing what each error means helps you take the right action. This guide breaks down the most common error codes and their meanings. It also explains how to interpret and respond to these messages.
Common Ge Refrigerator Error Codes
Some error codes appear frequently in GE refrigerators. Er1 or Er2 often indicate temperature sensor faults. F1 or F2 usually relate to defrost sensor problems. FF means a freezer fan error. PF signals a power failure or interruption. Each code targets a particular component or function. Recognizing these codes helps identify the issue faster.
Interpreting Error Messages
Error messages on GE refrigerators are short and coded. These messages do not explain the problem fully. They point to the part needing attention. For example, an Er1 code means the fridge’s temperature sensor may be faulty or disconnected. A F1 error shows the defrost sensor has issues. Check the sensor’s wiring and connection. Understanding these messages helps narrow down the repair process.
Responding To Specific Codes
Each error code requires a different response. For sensor errors, inspect and test the sensor with a multimeter. Replace if readings are outside the normal range. For fan errors, check for obstructions or damaged blades. Replace the fan motor if it does not run. Power failure codes mean checking the outlet and power supply. Reset the refrigerator by unplugging it for a few minutes. Always consult the user manual for code-specific advice. If the error persists, contact a professional technician.
Testing And Replacing Components
Testing and replacing components is crucial in fixing GE refrigerators. Faulty parts often cause common issues like not cooling or strange noises. Understanding how to test parts helps you find problems fast. Replacing bad parts restores your fridge’s performance and saves repair costs. This section covers key steps for testing and swapping out important components.
Testing The Compressor Relay
The compressor relay helps start the compressor motor. A bad relay can stop cooling completely. To test it, unplug the fridge first. Remove the relay from the compressor. Shake it gently; a rattling sound means it is faulty. Use a multimeter to check continuity. No continuity means the relay needs replacement. Replace the relay with a matching part to avoid damage.
Replacing Faulty Fans
Fans circulate air inside the fridge and freezer. If a fan stops working, cooling drops. Listen for unusual noises or no sound at all. Unplug the fridge and locate the fan. Remove screws holding the fan in place. Disconnect the fan from its connector carefully. Install a new fan and secure it properly. Plug the fridge back in and check if cooling improves.
Inspecting The Control Board
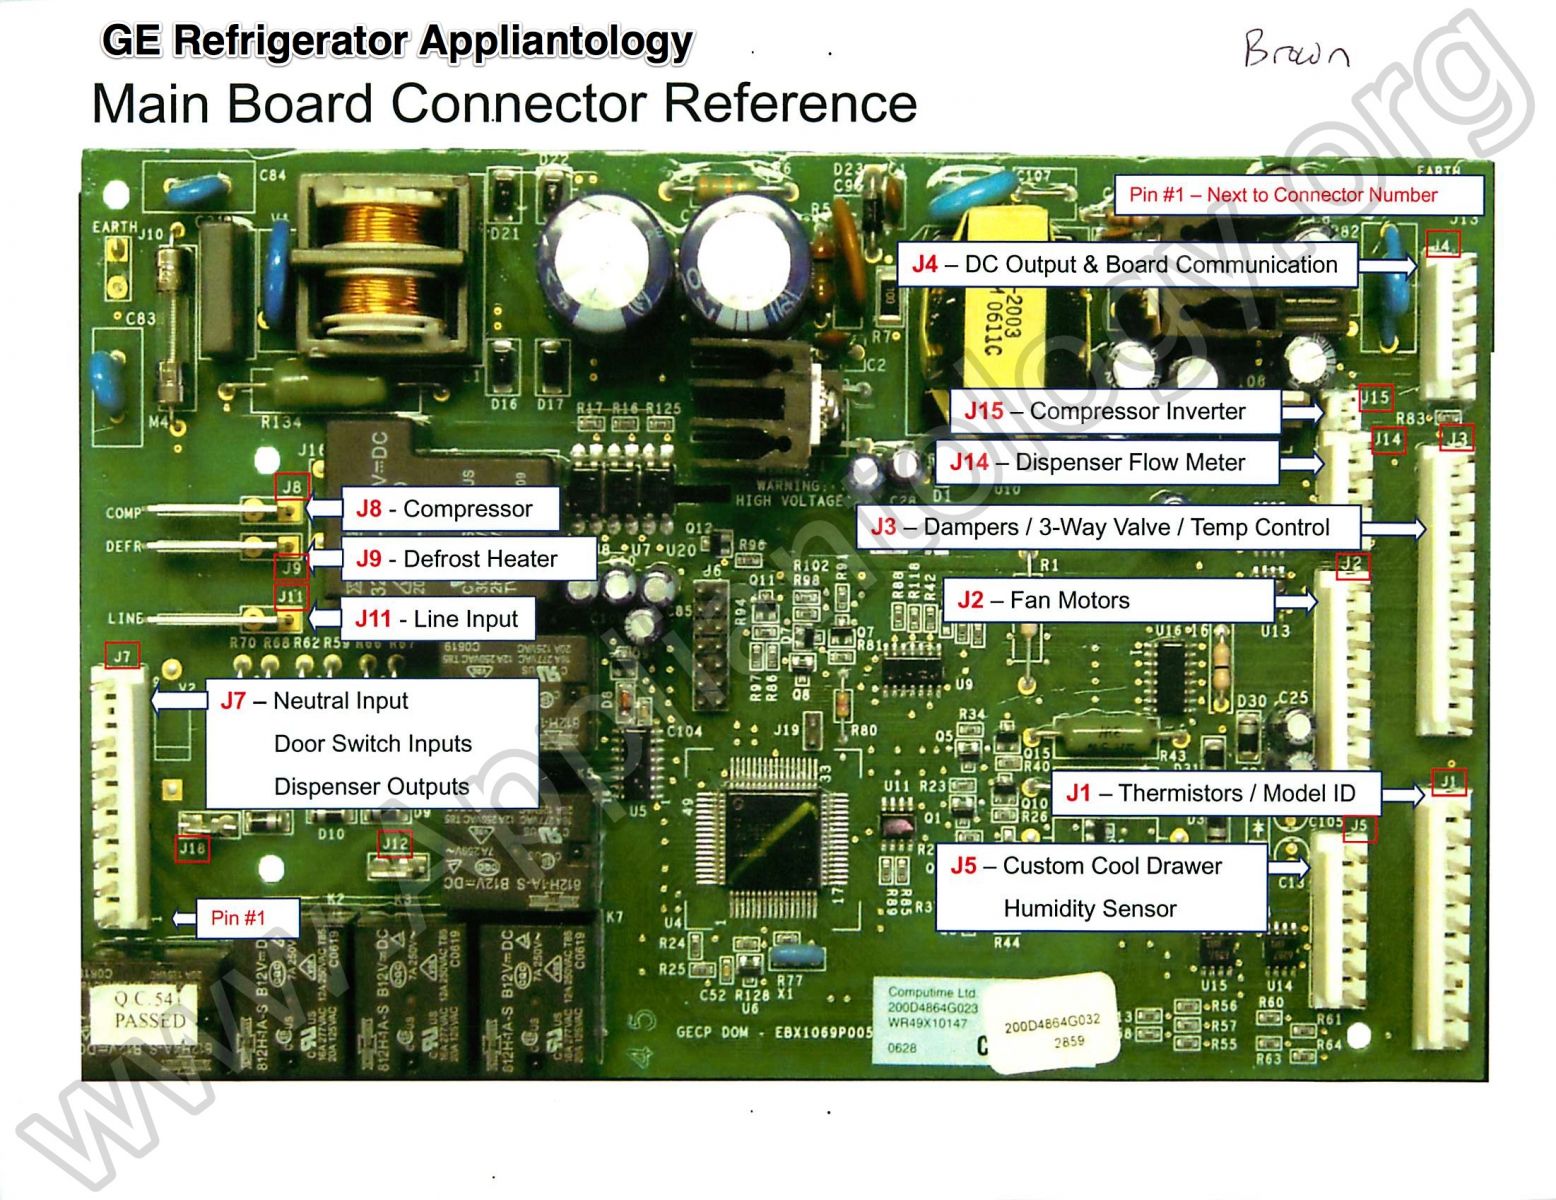
The control board manages all fridge functions. A damaged board can cause erratic behavior or no operation. Look for burn marks, loose wires, or corrosion. Unplug the fridge before inspection. Use a multimeter to test board connectors for power flow. Replace the board if tests fail or visible damage exists. Use the exact board model to ensure compatibility.

Maintenance Tips To Prevent Issues
Proper maintenance keeps your GE refrigerator running smoothly. Small care steps reduce breakdown risks and extend appliance life. Follow these simple tips to avoid common issues and save repair costs.
Regular Cleaning Routines
Clean your refrigerator inside and out every few weeks. Wipe shelves, drawers, and walls with mild soap and water. Remove spills quickly to prevent stains and odors.
Vacuum dust and debris from condenser coils twice a year. Dirty coils force the fridge to work harder, raising energy use and wear. Keep the coils clear for efficient cooling.
Checking And Replacing Filters
Check the water and air filters regularly. Clogged filters reduce water flow and affect ice and water quality. Replace filters every six months or as recommended in your manual.
Use only GE-approved filters for best results. Proper filtration helps prevent system clogs and keeps your fridge functioning well.
Ensuring Proper Ventilation
Place your refrigerator with enough space around it for air circulation. Leave at least two inches of clearance on all sides. Poor ventilation causes overheating and reduces cooling efficiency.
Keep vents and grilles free from dust and obstructions. This simple step prevents motor strain and improves fridge performance.
When To Call Professional Help
Knowing when to call professional help can save time and avoid damage. Some refrigerator problems need expert skills and tools beyond basic troubleshooting. Recognizing these signs helps protect your GE refrigerator and ensures safe repairs.
Warranty Considerations
Check your warranty before any repair. Many warranties become void if you try fixing complex issues yourself. Calling a professional ensures your warranty stays valid. Professionals often provide authorized repairs that meet warranty standards. This can save money on costly parts or labor later.
Identifying Complex Repairs
Some problems require technical knowledge and special equipment. Issues like compressor failure, sealed system leaks, or electrical faults are best handled by experts. If your fridge shows error codes or won’t cool despite simple fixes, it’s time to call a technician. Avoid guessing or forcing repairs that might worsen the problem.
Finding Certified Technicians
Choose technicians certified by GE or recognized appliance repair organizations. Certified experts have training specific to GE refrigerators. They use genuine parts and follow safety guidelines. Check reviews and ask for proof of certification before hiring. This guarantees quality service and peace of mind.
Frequently Asked Questions
What Is The Most Common Problem With A Ge Refrigerator?
The most common problem with a GE refrigerator is not cooling properly. This often results from dirty condenser coils, a faulty evaporator fan, or a bad compressor start relay. Regularly cleaning coils and checking fan operation can help maintain proper cooling performance.
How Do I Reset My Ge Refrigerator Control Board?
To reset your GE refrigerator control board, unplug the fridge for 5 minutes. Plug it back in to restart the system. This clears minor glitches and resets the control board.
How Do I Run Diagnostics On My Ge Refrigerator?
Press and hold the “Energy Saver” and “Lighting” buttons for 8 seconds. The display will show diagnostic codes. Follow the codes to identify issues. Consult your GE refrigerator manual for specific code meanings and next steps.
Is There A Reset Button For A Ge Refrigerator?
GE refrigerators do not have a dedicated reset button. To reset, unplug the unit for 5 minutes, then plug it back in. This often clears minor issues. For persistent problems, consult the user manual or contact GE Appliances Support.
What Are The Most Common Ge Refrigerator Problems?
Common issues include poor cooling, noisy operation, and water dispenser problems. Dusty condenser coils and faulty compressor relays often cause these. Regular cleaning and part checks help prevent many problems.
Conclusion
Troubleshooting your GE refrigerator becomes easier with simple steps. Check common issues like cooling problems and strange noises first. Clean coils and test fans to improve performance. Use diagnostic modes to find specific errors quickly. Keep your model number handy for accurate help.
Regular care helps avoid many problems. For tough issues, seek professional support or parts from GE. Stay patient and follow the guide to keep your fridge running smoothly. Small fixes often save time and money. Your fridge can work well again with basic troubleshooting.