If your Toto toilet is not flushing fully, the most common causes could be a clogged sewer line or toilet bowl, a clogged vent line, incorrect settings, or worn-out toilet parts. To fix a hissing, leaking Toto toilet, you can replace the flush valve or adjust the fill valve.
Make sure the flapper is resting on the bottom of the tank, and clean up any debris between the flapper and the tank. If these steps don’t work, you may need to replace the flapper. If the Toto toilet keeps running, check for any debris or defects in the flush valve and flappers and replace them if necessary.
Why Is My Toto Toilet Not Flushing Fully?
The flushing mechanism in a Toto toilet is designed for efficient and powerful flushing. However, if you notice that your Toto toilet is not flushing fully, there could be several reasons behind it. Understanding these reasons can help you troubleshoot the issue and restore the optimal flush performance of your toilet.
Clogged Sewer lines or Toilet Bowl Clog
One possible reason why your Toto toilet is not flushing fully is a clogged sewer line or toilet bowl. Over time, debris, toilet paper, and other materials can accumulate in the sewer line or the toilet bowl itself, leading to restricted water flow and incomplete flushing. To address this issue:
- Inspect the toilet bowl for visible clogs. If you can see any debris or material blocking the water path, use a plunger or a toilet auger to remove the clog.
- If the clog is in the sewer line, you may need to call a professional plumber to perform a thorough cleaning or clearing of the line.
Clogged Vent Line
Another potential cause of incomplete flushing in a Toto toilet is a clogged vent line. The vent line is responsible for maintaining proper air pressure within the plumbing system, allowing water to flow smoothly, and ensuring efficient flushing. When the vent line is clogged or obstructed, it can affect the flush performance. To address this issue:
- Inspect the vent line for any visible clogs, such as debris or bird nests.
- If you can access the vent line, use a plumbing snake or a pressure washer to clear the obstruction.
- If the vent line is not easily accessible, it is best to seek the assistance of a professional plumber to safely clear the clog.
Incorrect Settings Or Worn Out Toilet Parts
Incorrect settings or worn-out toilet parts can also contribute to a Toto toilet not flushing fully. These issues can include:
- Water level adjustment: If the water level in the toilet tank is not set correctly, it can affect the amount of water available for flushing. Check the water level and adjust it if needed.
- Flapper wear and tear: The flapper is responsible for releasing water from the tank into the toilet bowl during flushing. If the flapper is worn out or damaged, it may not fully open or close, leading to an incomplete flush. Consider replacing the flapper if necessary.
- Flush valve problems: The flush valve controls the release of water from the tank into the toilet bowl. If the flush valve is faulty or not functioning properly, it can result in inadequate flushing. Inspect the flush valve for any signs of damage or malfunction and replace it if necessary.
By addressing these common causes of incomplete flushing in a Toto toilet, you can ensure optimum performance and a reliable flush every time.
How To Quickly Fix A Hissing Leaking Toto Toilet With A New Flush Valve
If your Toto toilet is hissing and leaking, it’s important to address the issue promptly to prevent any further damage. One common cause of this problem is a faulty flush valve, which regulates the flow of water from the tank into the toilet bowl. In this section, we will guide you through the step-by-step process of replacing the flush valve to resolve the issue quickly and efficiently.
Step 1: Shut Off The Water Supply
The first step in fixing a hissing leaking Toto toilet is to shut off the water supply. Locate the water shut-off valve, usually located near the base of the toilet. Turn the valve clockwise until it is fully closed to stop the flow of water into the toilet tank.
Step 2: Drain The Toilet Tank
Next, you need to drain the toilet tank. To do this, flush the toilet and hold down the handle to allow the water to drain completely. Use a towel or sponge to soak up any remaining water in the tank.
Step 3: Remove The Old Flush Valve
Now it’s time to remove the old flush valve. Start by disconnecting the refill tube from the flush valve overflow tube. Then, remove the nut securing the flush valve to the bottom of the tank using a wrench. Once the nut is removed, lift the old flush valve out of the tank.
Step 4: Install The New Flush Valve
With the old flush valve removed, it’s time to install the new one. Begin by placing the rubber gasket included with the new flush valve onto the bottom opening of the tank. Insert the flush valve into the tank, ensuring that it sits securely in place. Next, tighten the nut onto the flush valve from underneath the tank, using a wrench to ensure a snug fit. Reconnect the refill tube to the overflow tube.
Step 5: Turn On The Water Supply
Once the new flush valve is installed, it’s time to turn on the water supply. Slowly reopen the water shut-off valve by turning it counterclockwise. This will allow water to fill the tank. Check for any leaks around the new flush valve and make any necessary adjustments to ensure a tight seal.
Congratulations! You have successfully fixed your hissing leaking Toto toilet by replacing the flush valve. If the issue persists or you encounter any other problems, it may be best to consult a professional plumber for further assistance.
Easy Fix For Toto Drake Toilet Bowl Not Filling Completely
If you’re experiencing the issue of your Toto Drake toilet bowl not filling, don’t worry, there are a few simple steps you can take to troubleshoot and fix the problem. In this guide, we will go through the easy fix for this common issue, so you can get your toilet back to working properly.
Step 1: Check The Water Supply Line
Start by checking the water supply line to ensure it is properly connected and not blocked. Follow these steps:
- Turn off the water supply valve located near the base of your toilet.
- Inspect the water supply line for any kinks, twists, or obstructions.
- If you notice any issues, straighten the line or remove any obstructions.
- Turn the water supply valve back on and check if the toilet bowl is filling properly.
Step 2: Adjust The Float
The float in your toilet tank controls the water level. If it is not adjusted correctly, it can cause the bowl to not fill. Follow these steps to adjust the float:
- Remove the toilet tank cover and locate the float assembly.
- Rotate the float counterclockwise to decrease the water level or clockwise to increase it.
- Test the toilet by flushing and observe if the bowl is filling to the desired level.
- Make necessary adjustments until the bowl fills.
Step 3: Clean Or Replace The Fill Valve
The fill valve in your toilet can sometimes become dirty or worn out, causing issues with water flow. Follow these steps to clean or replace the fill valve:
- Shut off the water supply to your toilet.
- Remove the toilet tank cover and locate the fill valve.
- If the fill valve is dirty, use a clean cloth or sponge to remove any debris or buildup.
- If cleaning doesn’t solve the issue, consider replacing the fill valve with a new one.
- After cleaning or replacing the fill valve, turn the water supply back on and test the toilet for proper filling.
By following these simple steps and troubleshooting methods, you can easily fix your Toto Drake toilet bowl not filling issue. Remember to always check the water supply line, adjust the float, and clean or replace the fill valve when necessary. These steps will help ensure your toilet functions properly and avoid any inconvenience.
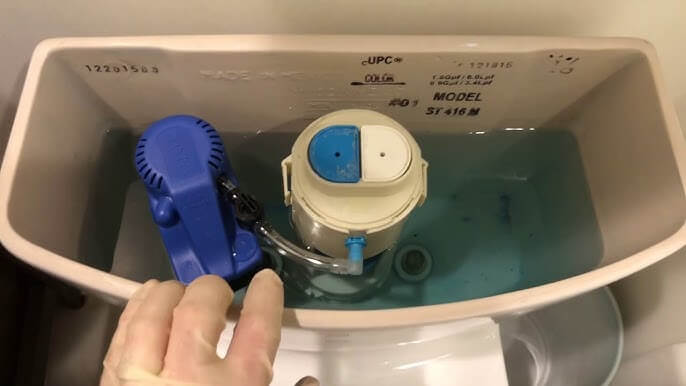
How To Fix A Toto Toilet Fill Valve
Step 1: Shut Off The Water Supply
To fix a Toto toilet fill valve, the first step is to shut off the water supply. Look for the shut-off valve located beneath the toilet tank on the wall or floor. Turn the valve clockwise until it is fully closed. This will prevent water from flowing into the tank while you work on the fill valve.
Step 2: Drain The Toilet Tank
After shutting off the water supply, you need to drain the toilet tank. To do this, simply flush the toilet. Hold down the handle until all the water has drained out. You can also use a sponge or towel to soak up any remaining water in the tank.
Step 3: Remove The Old Fill Valve
With the tank empty, you can now remove the old fill valve. Start by disconnecting the water supply line from the bottom of the fill valve. Use an adjustable wrench to loosen the nut that connects the supply line to the valve. Once the nut is loose, you can easily remove the supply line.
Next, unscrew the lock nut that holds the fill valve in place. Use your wrench to turn the nut counterclockwise until it is loose enough to remove. Once the lock nut is off, you can pull the old fill valve out of the tank.
Step 4: Install The New Fill Valve
With the old fill valve removed, it’s time to install the new one. Start by inserting the new fill valve into the hole in the bottom of the tank. Make sure the rubber gasket on the bottom of the valve is properly seated.
Once the valve is in place, screw on the lock nut and tighten it with your wrench. Make sure the valve is secure, but be careful not to overtighten and damage the tank.
Next, reconnect the water supply line to the bottom of the fill valve. Slide the supply line onto the valve and tighten the nut with your wrench.
Step 5: Turn On The Water Supply
After the new fill valve is installed, it’s time to turn on the water supply. Locate the shut-off valve that you closed in the first step and turn it counterclockwise to open it. This will allow water to flow into the tank.
As the tank fills, check for any leaks around the new fill valve and the supply line connection. If you notice any leaks, tighten the appropriate nuts until the leaks stop.
Once the tank is full, the fill valve should shut off automatically. Give the toilet a test flush to ensure everything is working properly.
To conclude, by following these steps – shutting off the water supply, draining the toilet tank, removing the old fill valve, installing the new fill valve, and turning on the water supply – you can successfully fix a Toto toilet fill valve. Remember to check for leaks and test the flush to ensure everything is in working order.
Toto Toilet Parts: Troubleshooting Common Problems And Replacement
If you’re experiencing issues with your Toto toilet, it’s important to understand the different parts involved and how to troubleshoot common problems. Here, we will guide you through replacing Toto toilet parts such as the flush valve, universal adjustable toilet fill valve, chrome plated toilet handle, SoftClose elongated toilet seat, and Toto toilet flapper.
Flush Valve Replacement
If your Toto toilet is not flushing properly or experiencing a weak flush, a faulty flush valve might be the culprit. To replace the flush valve:
- Turn off the water supply to the toilet.
- Flush the toilet to remove the water from the tank.
- Disconnect the water supply line from the bottom of the toilet tank.
- Unscrew the flush valve from the tank.
- Install the new flush valve and tighten it securely.
- Reattach the water supply line and turn on the water.
Universal Adjustable Toilet Fill Valve
A malfunctioning fill valve can cause issues such as a continuously running toilet or inconsistent water levels. To replace the universal adjustable toilet fill valve:
- Turn off the water supply to the toilet.
- Flush the toilet to empty the tank.
- Disconnect the water supply line from the bottom of the tank.
- Remove the old fill valve by unscrewing it.
- Insert the new universal adjustable toilet fill valve and attach it securely.
- Reattach the water supply line and turn on the water.
Chrome Plated Toilet Handle
A broken or loose toilet handle can make flushing difficult. To replace the chrome plated toilet handle:
- Remove the tank lid and place it in a safe location.
- Remove the nut on the inside of the tank that secures the handle.
- Take out the old handle and replace it with the new chrome-plated toilet handle.
- Tighten the nut securely to hold the handle in place.
- Replace the tank lid.
Soft-close Elongated Toilet Seat
If your SoftClose elongated toilet seat is loose or not functioning properly, you may need to adjust or replace it. To replace the SoftClose elongated toilet seat:
- Locate the screws that secure the seat to the toilet bowl.
- Use a screwdriver to remove the screws and detach the old seat.
- Place the new SoftClose elongated toilet seat onto the bowl, aligning it with the screw holes.
- Insert the screws and tighten them with a screwdriver.
Toto Toilet Flapper Replacement
If your toilet is running continuously or not properly sealing, the flapper may need to be replaced. To replace the Toto toilet flapper:
- Turn off the water supply to the toilet.
- Flush the toilet to empty the tank.
- Remove the old flapper by disconnecting it from the flush valve.
- Attach the new Toto toilet flapper to the flush valve.
- Turn on the water supply and allow the tank to fill.
- Perform a test flush to ensure proper sealing.
By troubleshooting and replacing these common Toto toilet parts, you can restore your toilet’s functionality and prevent further issues. Remember to always follow the manufacturer’s instructions and exercise caution when handling plumbing components.
Frequently Asked Questions For Toto Toilet Troubleshooting
Why Is My Toto Toilet Not Flushing Fully?
The most common causes for a Toto toilet not flushing fully are a clogged sewer line or toilet bowl, a clogged vent line, incorrect settings, or worn-out toilet parts. Check for any clogs or blockages and make sure the toilet parts are functioning properly.
How To Fix A Toto Toilet Fill Valve?
To fix a Toto toilet fill valve, follow these steps:
- Check if the valve is leaking, and if it is, replace it.
- Adjust the partial-flush water volume by twisting the blue float counterclockwise or clockwise to lock it in place.
- Make sure the flapper is resting on the bottom of the tank and clean any debris between the flapper and the tank.
- Ensure the chain holding the flapper is not caught on anything.
If these steps don’t work, consider contacting a professional plumber.
How Do You Adjust A Toto Toilet?
To adjust a Toto toilet, twist the blue float counterclockwise to adjust the partial-flush water volume. Move the float up or down and lock it back into place by twisting it clockwise. Make sure the float is locked to prevent any flush valve malfunction or damage to property.
How Do I Stop My Toto Toilet From Running?
To stop your Toto toilet from running, check that the flapper is resting on the bottom of the tank and clean any debris between the flapper and the tank. Ensure that the chain holding the flapper is not caught on anything.
If this doesn’t work, you may need to replace the flapper.
How Can I Fix A Toto Toilet That Is Not Flushing Fully?
To ensure a powerful flush, check for clogged sewer lines or toilet bowl clogs, clogged vent lines, and worn-out or incorrect toilet parts.
Conclusion
To sum up, troubleshooting your Toto toilet doesn’t have to be a daunting task. By following these tips and tricks, you can quickly and effectively address common issues such as weak flushes, leaks, and running toilets. Don’t hesitate to consult online resources or reach out to professionals if you need further assistance.
With the right knowledge and tools, you can keep your Toto toilet in optimal condition for years to come. Happy troubleshooting!
")


My TOTO one piece toilet has what appears to be a black vent pipe in the back (almost impossible to access as installed). My bathroom is getting infested with black drain flies which appear to be comming of the vent. How do I fix.
Thanks
It sounds like you’re dealing with an unpleasant issue. Black drain flies, or sewer flies, are typically attracted to stagnant water and organic matter found in drains or vents. Here are a few steps to address the problem:
Clean the Vent Pipe: Since accessing the vent pipe is difficult, consider using a plumbing snake or a long flexible brush to clean it. This can help remove any build-up of organic material that may be attracting the flies.
Pour Boiling Water: Pour boiling water down the vent pipe if accessible. This can help kill any larvae or flies present.
Use Enzymatic Cleaners: Enzymatic cleaners break down organic material. Pour these into the toilet and other drains to ensure that any biofilm or organic matter in the pipes is broken down.
Inspect and Repair Seals: Check if there are any cracks or breaks in the seals around your toilet or the vent pipe. If you find any, sealing these could help prevent flies from entering.
Increase Ventilation: Ensure your bathroom is well-ventilated to reduce moisture levels, as damp environments attract drain flies.
Professional Help: If the infestation persists, it might be best to call a professional plumber. They can perform a thorough inspection and cleaning of your plumbing system, including hard-to-reach areas.
By taking these steps, you should be able to reduce or eliminate the black drain flies. Good luck!
We have a four year old Toto Promenade II elongated toilet that no longer flushes well, meaning slow and weakly. We had a professional come out and check everything–no blocked
or damaged drain line, no ventilation issue, and no issue with the toilet parts. He said the toilet is defective and needs to be replaced. For such an expensive toilet, and one that should last years, I would appreciate Toto’s comments on this problem.
Hi,
Thank you for reaching out with your concern regarding the performance of your Toto Promenade II toilet. We understand how frustrating it can be when a high-quality toilet isn’t working as expected, especially when it’s relatively new. Based on the information you’ve provided, it’s good to know that a professional inspection has already ruled out common issues like a blocked drain line or ventilation problems.
Since the issue seems to be with the flushing performance, there are a few things you can try before considering a full replacement:
If these steps don’t resolve the issue, it might be worth contacting Toto’s customer support for a more specific solution or warranty claim. Given that the toilet is a high-quality model, they may be able to provide further assistance.
We hope this helps!
Best regards,
TroubleshootingLAB
Hi,
I have a Toto toilet with a flush problem. If flushes properly, but when the bowl is refilling, the incoming water shuts off and on briefly, 6 – 8 times, before it stops. When it stops, the fill level is complete and correct, with no signs of leakage.
Can you assist in identifying the problem, and what needs to be done to repair it? Thank you!
Hi,
The issue you’re describing—where the incoming water shuts off and on several times while the toilet bowl is refilling—is typically caused by a problem with the fill valve. This “stop-and-start” behavior often happens when the fill valve is partially obstructed by debris or when the float mechanism isn’t moving smoothly, causing the valve to open and close repeatedly before completing the fill cycle.
To resolve this, try the following steps:
These steps should eliminate the on-and-off filling issue and ensure your toilet refills properly every time.