Is your Litter Robot acting up and leaving you puzzled? You’re not alone.
Whether it’s a flashing red light, a motor that won’t start, or the unit refusing to cycle, these issues can be frustrating when you’re counting on your automatic litter box to keep things clean. But don’t worry—help is here. This guide will walk you through easy, step-by-step troubleshooting tips to get your Litter Robot back to working perfectly.
By the end, you’ll know exactly how to identify common problems and fix them quickly, so your cat’s favorite gadget runs smoothly again. Keep reading to take control and save time on cleanup!
Power Issues
Power issues are a common reason why a Litter Robot stops working properly. Without a steady power supply, the unit may fail to start or perform its cleaning cycle. Understanding how to check and fix power problems can save time and keep your device running smoothly.
Checking The Power Supply
First, ensure the power cord is fully plugged into both the unit and the wall outlet. Try a different outlet to rule out socket problems. Inspect the cord for any visible damage or fraying. A loose or damaged power connection often causes power failures.
Resetting The Unit
Sometimes, a simple reset restores power functions. Unplug the Litter Robot and wait for 10 seconds. Plug it back in and press the reset button if available. This action can clear temporary errors that block the device from turning on.
Addressing Power Supply Defects
If power problems persist, the adapter or internal power board may be defective. Test the adapter with a voltage meter to confirm output. Contact customer support for a replacement adapter if needed. Avoid using incompatible power supplies to prevent damage.
Sensor Problems
The Litter Robot depends on sensors to detect your cat’s presence and control its cleaning cycle. Sensor problems can cause the unit to stop working or cycle incorrectly. Understanding these sensor issues helps you troubleshoot and keep your Litter Robot running smoothly.
Cat Sensor Faults
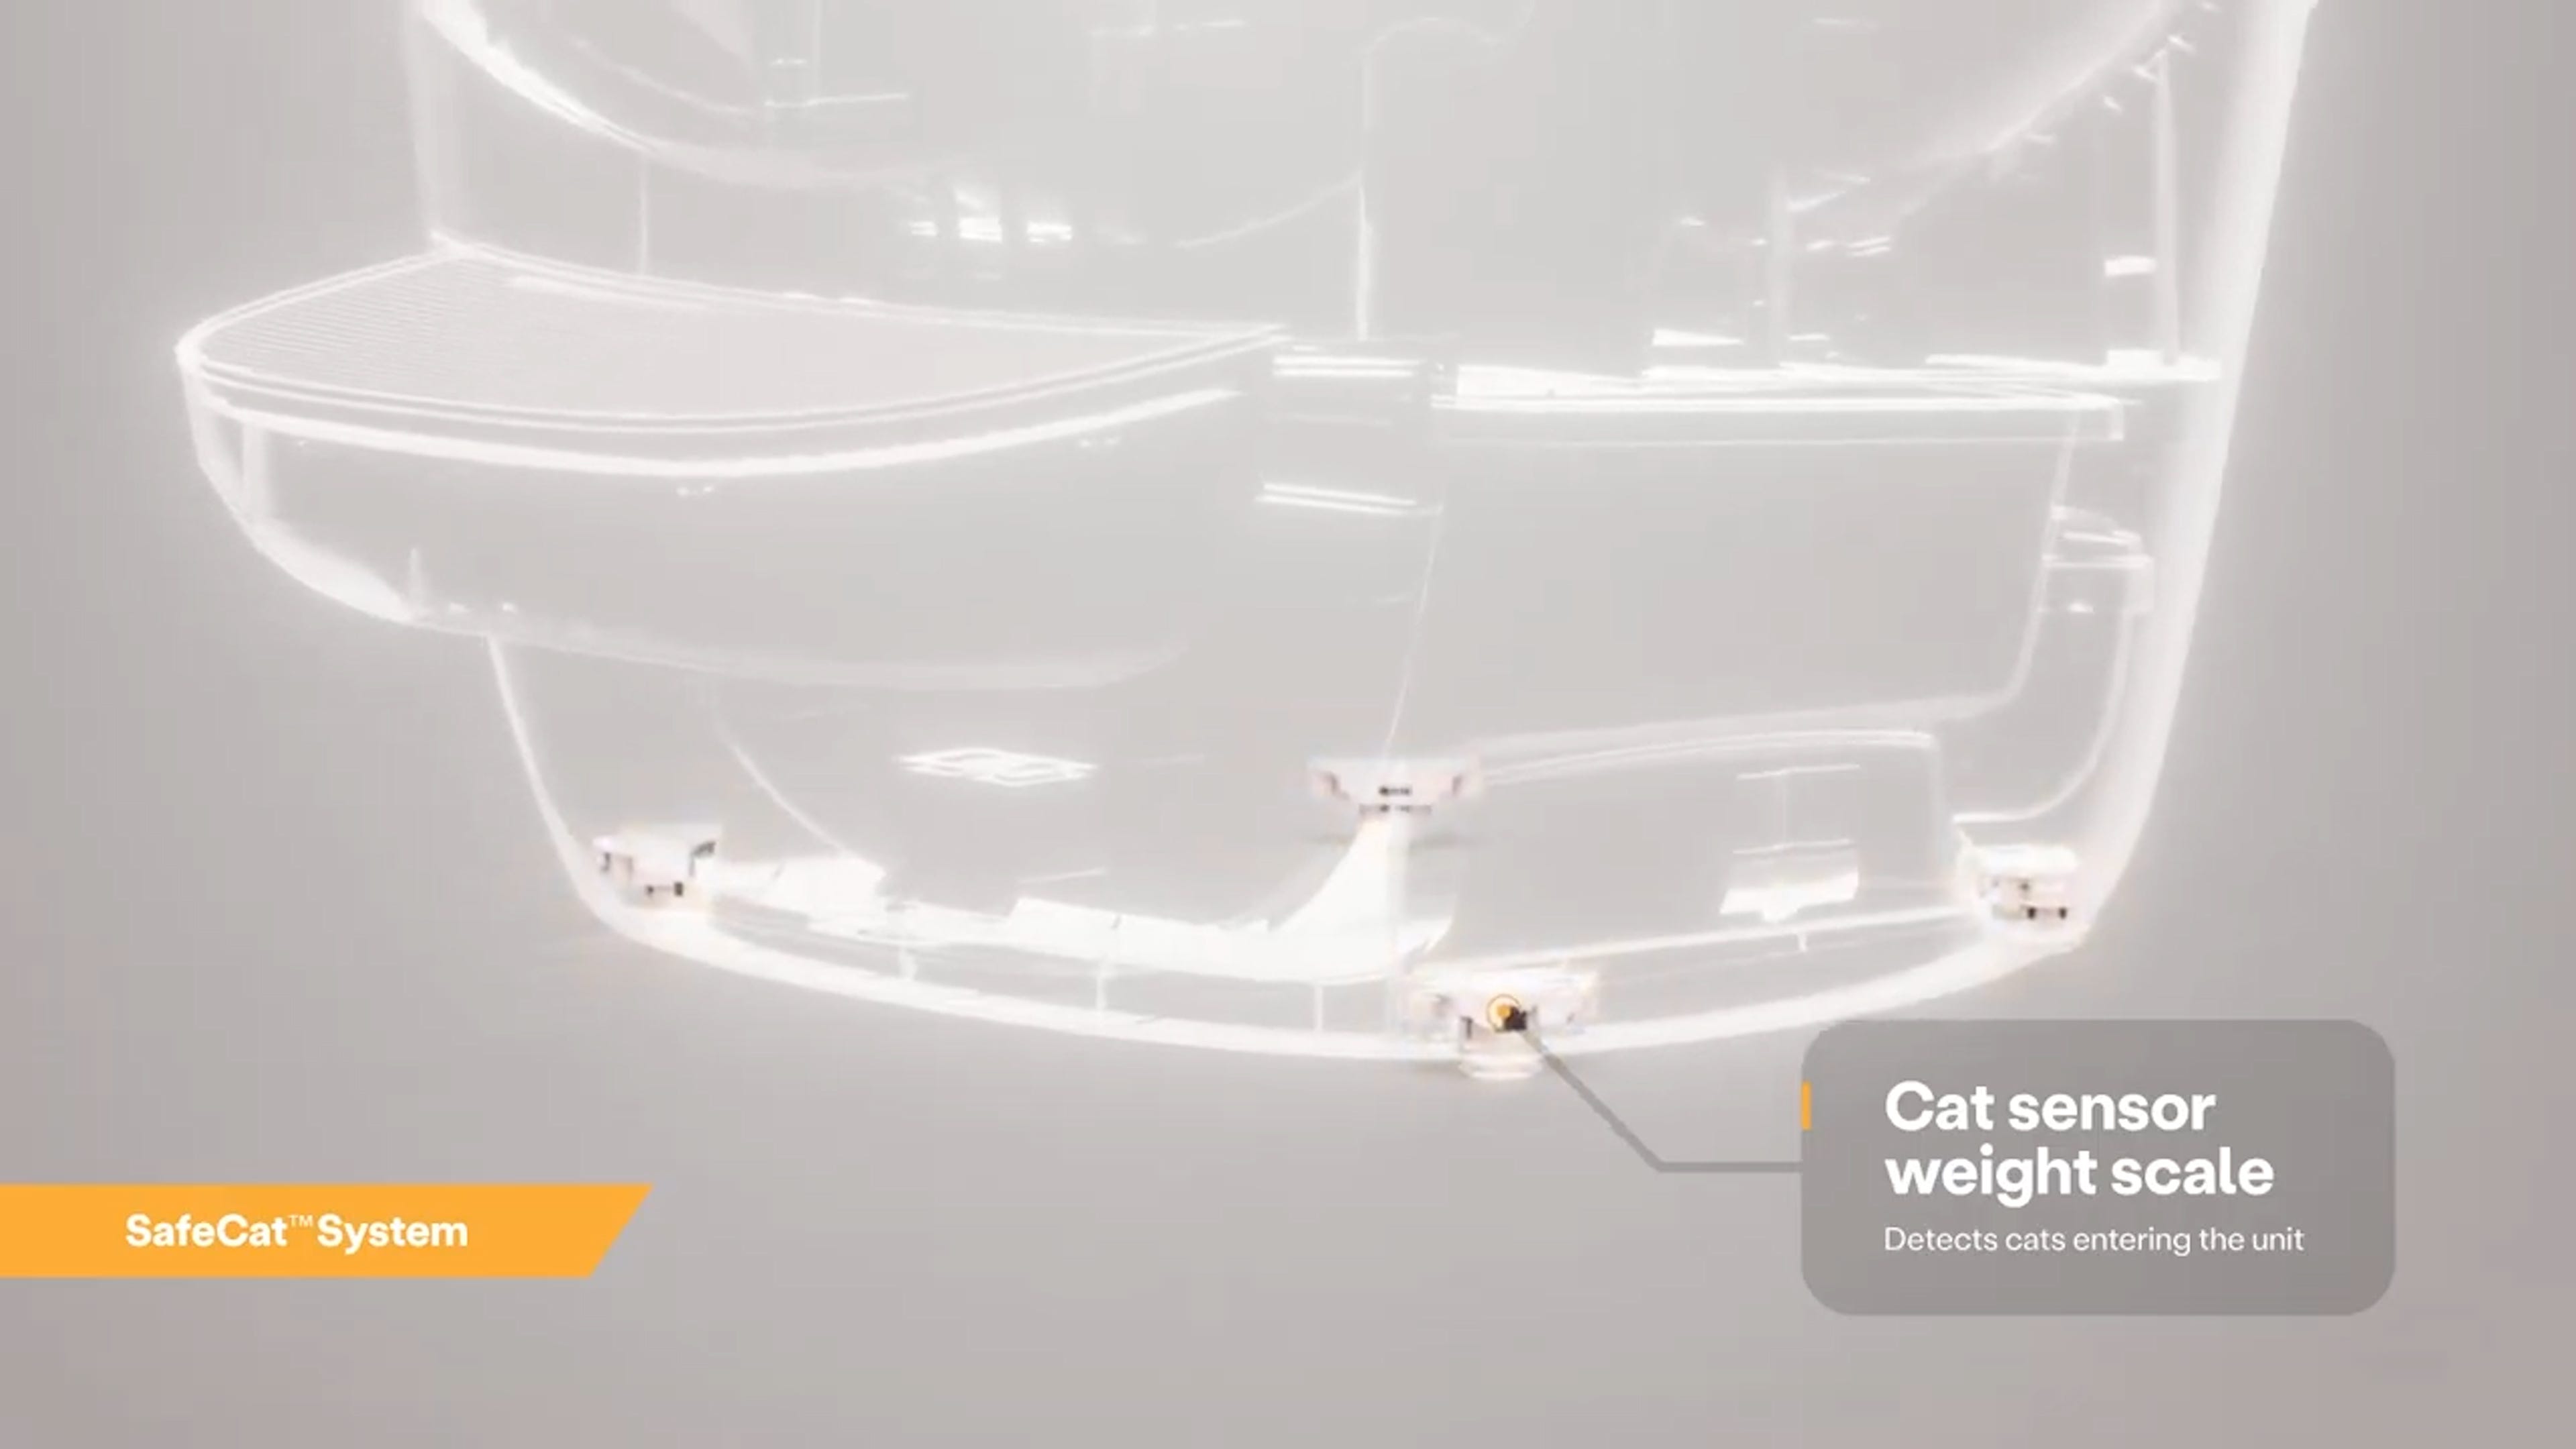
Cat sensor faults happen when the Litter Robot thinks a cat is inside, even when it is empty. This may stop the cleaning cycle from starting. A common cause is debris or dust on the sensor. Wipe the sensor gently with a soft cloth to clear any dirt.
Also, check if the litter level is too high. Litter above the fill line can block the sensor. Make sure the unit is on a flat, hard surface, not on thick carpet or mats. This helps the sensors work properly.
Dealing With False Cat Detection
False cat detection occurs when the unit senses movement or weight without a cat present. This may cause the Litter Robot to delay or not start cleaning. Remove any objects inside that might trigger the sensor.
Try moving the Litter Robot away from walls or furniture. Sometimes reflections or vibrations cause false detection. Press the reset button to clear the sensor’s memory if needed.
Adjusting Litter Levels
Proper litter levels are important for sensor accuracy. Too much litter can block sensors and cause errors. Fill the globe only up to the marked fill line.
If the litter is too low, the sensors may not detect your cat well. Add litter carefully to keep the right balance. Regularly check and adjust the litter level for best performance.
Error Lights
Error lights on the Litter Robot help identify problems quickly. These lights blink in specific patterns to show different issues. Understanding these signals saves time and avoids frustration. Each error light points to a unique problem that needs attention. Follow simple steps to fix these errors and keep your Litter Robot working smoothly.
Interpreting Common Error Codes
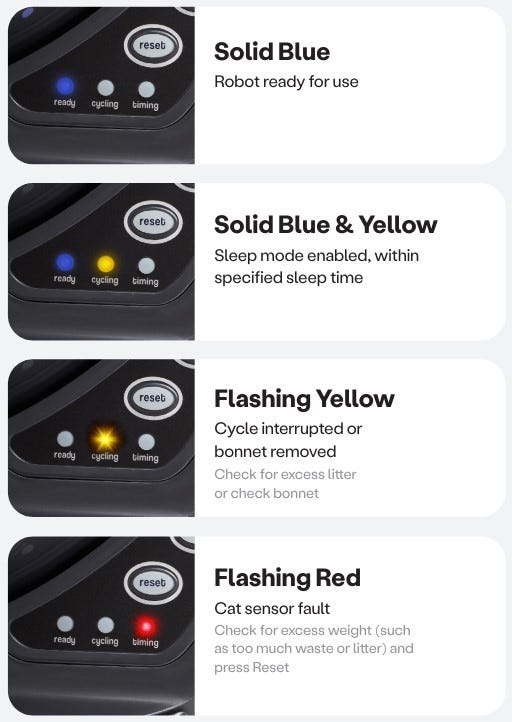
The Litter Robot uses blinking lights for alerts. Each pattern means a different error. For example, a green and purple alternating light means a power supply issue. Blue and yellow blinking shows a manual override is active. Blue and white indicates a motor problem. Knowing these codes helps diagnose problems fast. Keep the user manual handy for reference.
Fixing Hall Effect Board Disconnects
A green and purple blinking light signals a Hall Effect board disconnect. This board controls the globe’s rotation sensor. Check the wiring connections to the board first. Make sure all plugs are secure and clean. If loose, gently reconnect and test the unit. Sometimes restarting the Litter Robot fixes this error. If problem persists, contact support for a replacement board.
Resolving Motor Disconnection
Blue and white flashing lights point to a motor disconnect. The motor powers the globe’s movement. Inspect the motor wiring for any loose or damaged cables. Reconnect any loose plugs carefully. Clean any debris blocking the motor or gears. Reset the Litter Robot to see if error clears. Persistent motor errors may require professional repair or parts replacement.
Cycling And Emptying Issues
Cycling and emptying issues can disrupt your Litter Robot’s performance. These problems often confuse users and cause frustration. Understanding why your unit empties instead of cycling helps fix the problem quickly. Simple steps like using manual override or resetting the cycle timer restore normal operation.
Why It Empties Instead Of Cycling
The Litter Robot empties instead of cycling if it detects a problem. A common cause is the sensor falsely sensing a cat inside. Excess litter above the fill line or an uneven surface may trigger this error. The unit stops cycling to prevent damage or spills. Check the litter level and placement before restarting.
Manual Override Mode
Manual override mode lets you control the cycle manually. Press and hold the reset button to start this mode. It helps when the robot won’t cycle automatically. Use manual override to empty or cycle the globe as needed. This mode bypasses automatic sensors temporarily for troubleshooting.
Resetting The Cycle Timer
The cycle timer controls when the Litter Robot starts cleaning. Resetting it can solve cycling delays or failures. Press the reset button once to cancel the current timer. This forces the unit to begin a new cycle immediately. Resetting helps clear sensor errors and restart normal function.
Mechanical Troubles
Mechanical troubles with the Litter Robot often stop the unit from working properly. These issues usually involve parts that move or fit together. Fixing mechanical problems helps keep your Litter Robot running smoothly. Understanding common problems and solutions saves time and frustration.
Globe Movement Problems
The globe may fail to rotate or move unevenly. Dirt or litter clumps can block the movement path. Check for any debris inside the globe or near the motor. Clean the globe and remove any stuck litter. Make sure the globe is seated correctly on the base. Sometimes, a stuck sensor can stop the motor from working. Reset the unit to see if the globe moves again.
Ensuring Proper Unit Placement
Place the Litter Robot on a flat, hard surface. Uneven or soft surfaces cause the unit to wobble. Avoid thick carpets or mats under the unit. Walls or furniture too close can block the globe’s movement. Keep at least a few inches of clearance around the unit. Proper placement helps the motor work without strain or interruption.
Handling Obstructions
Obstructions inside the waste drawer or under the globe can stop cycling. Check for objects like toys, excess litter, or clumps in the drawer. Remove anything blocking the globe or motor. Inspect the entry ramp for stuck debris. Clear out any litter that might jam the sensors. Regular cleaning prevents obstructions and keeps the Litter Robot cycling smoothly.
App And Connectivity
The Litter Robot app connects your unit to your smartphone for easy control and monitoring. It allows you to check the robot’s status and receive alerts. Good connectivity ensures smooth operation and timely updates.
Problems with the app or connection can stop the robot from working properly. Troubleshooting app and connectivity issues helps keep your Litter Robot running well.
Error Notifications In The App
The app sends alerts if the Litter Robot encounters a problem. These notifications explain errors like sensor faults or motor issues. Reading the messages carefully guides you on what needs fixing.
Ignoring error alerts can cause the unit to stop cleaning. Act quickly by following the steps suggested in the app. It can save time and prevent further trouble.
Syncing The Unit With The App
Syncing connects the Litter Robot with your phone. Open the app and follow the prompts to link the devices. Make sure Bluetooth and Wi-Fi are on during this process.
Unsuccessful syncing can result from weak signals or outdated app versions. Restart your phone and the unit before trying again. Keep the app updated to avoid bugs.
Checking Waste Drawer Levels
The app shows the waste drawer’s fill level. It alerts you when the drawer is almost full and needs emptying. This feature helps maintain cleanliness and prevents overflow.
Check the app regularly to avoid missing waste drawer alerts. Empty the drawer promptly to keep the robot functioning well. Proper waste management extends the unit’s lifespan.
Maintenance Tips
Maintaining your Litter Robot is key to keeping it running smoothly. Regular care prevents common issues and keeps the unit efficient. Simple maintenance tasks can save time and money on repairs.
Follow these maintenance tips to ensure your Litter Robot stays in top shape. Clean parts, replace worn components, and use smart habits to extend its lifespan.
Cleaning Sensors And Components
Keep sensors free from dust and litter dust. Use a soft cloth or a cotton swab to wipe sensors gently. Avoid using harsh chemicals that can damage sensitive parts.
Clean the globe and waste drawer regularly. Remove all litter and debris to prevent blockages. Ensure the unit is unplugged before cleaning to avoid electrical issues.
Replacing Worn Parts
Check the carbon filter often and replace it when it loses effectiveness. A clogged filter reduces odor control and airflow.
Inspect the globe seals and motor for wear. Replace any parts that show cracks or damage. Use only official replacement parts for best results.
Extending Unit Lifespan
Place the Litter Robot on a flat, stable surface to avoid sensor errors. Keep the unit away from moisture and direct sunlight.
Use the recommended litter type to prevent clumping and sensor blockage. Avoid overfilling the litter to maintain proper weight detection.
Regularly check for firmware updates. Updating software can improve performance and fix bugs.

Frequently Asked Questions
How Do I Do A Hard Reset On My Litter-robot?
To hard reset your Litter-Robot, unplug it from power for 10 seconds. Then, plug it back in and press the reset button. This clears errors and restarts the unit.
What Is The Average Lifespan Of A Litter-robot?
The average lifespan of a Litter-Robot is around 5 to 7 years with proper care and regular maintenance.
What Are Common Litter-robot Error Codes?
Common Litter-Robot error codes include flashing red for cat sensor faults, green/purple for power issues, blue/yellow for manual override, and blue/white for motor disconnection. Check power, sensor alignment, and litter levels to resolve these errors quickly.
Why Is My Litter-robot Emptying Instead Of Cycling?
Your Litter-Robot may empty instead of cycling due to a sensor fault or incorrect litter level. Check litter height, ensure unit rests on a hard, level surface, and avoid contact with walls. Perform a hard reset if needed.
How Do I Reset My Litter Robot Manually?
Press and hold the reset button for 10 seconds. The unit will power down and restart. This clears most minor errors quickly.
Conclusion
Troubles with your Litter Robot don’t have to be frustrating. Simple checks often fix common problems fast. Always keep the unit clean and properly positioned. Resetting the device can clear many error codes quickly. Don’t ignore sensor alerts or unusual light patterns.
Following easy steps saves time and keeps your cat happy. Regular care helps your Litter Robot work smoothly every day. Troubleshooting becomes easier with practice and patience. Keep this guide handy for quick fixes anytime. Your Litter Robot will soon run like new again.