
When your home entrance suddenly goes silent, doorbell wiring troubleshooting becomes a necessary task to restore your security and convenience. Most traditional residential systems rely on a low-voltage circuit that connects a transformer, a physical button, and a chime. If your system is failing, you’re likely looking at a repair cost ranging from $75 to $250 if you hire a professional electrician, or a parts cost of $15 to $60 if you decide to handle the repair yourself. Understanding how these components interact is the first step toward a successful fix.
Key Takeaways
- Check the circuit breaker panel first to ensure the doorbell transformer has power.
- Corrosion on button contacts is a common cause of intermittent doorbell failure.
- Low-voltage wiring often breaks inside the wall near the door frame due to house settling.
- Modern video doorbells require specific voltage ranges that older transformers may not provide.
Safety: Inside a mains-powered machine, the parts behind the outer cover can hold a dangerous electrical charge even after it has been unplugged — that’s why they sit behind a cover. Opening the housing, or testing or replacing anything behind it, is a job for a qualified technician, never a home repair.
Understanding Your Doorbell System
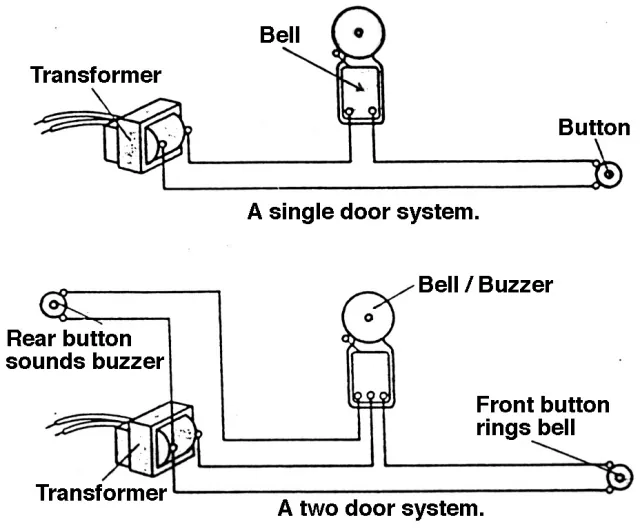
Most residential doorbells utilize a transformer that steps down standard household 120-volt AC power to a safer, lower voltage, typically ranging from 10 to 24 volts. This low-voltage current travels through the wiring to the button. When the button is pressed, it completes the circuit, sending the signal to the chime mechanism. If any part of this loop is compromised, the system won’t function.
Typical Doorbell Components
| Component | Function | Common Failure Mode |
|---|---|---|
| Transformer | Lowers voltage | Internal coil burnout |
| Doorbell Button | Completes the circuit | Oxidation or stuck plunger |
| Chime Unit | Produces the sound | Mechanical spring failure |
| Wiring | Transmits the current | Breakage or insulation degradation |
How to Test for Power
Inspecting the Doorbell Button
The button is the most exposed part of your system and frequently suffers from weather damage. Over time, moisture can cause corrosion on contacts, preventing the flow of electricity. To inspect it, unscrew the button from the wall and gently pull it away from the siding.
You should see two wires attached to the back. If they’re loose, tighten the screws. If the wires look intact, remove them and touch the two ends together. If the chime rings, the button itself is faulty and needs to be replaced.
Troubleshooting the Chime Unit
Troubleshooting Doorbell Wiring Issues
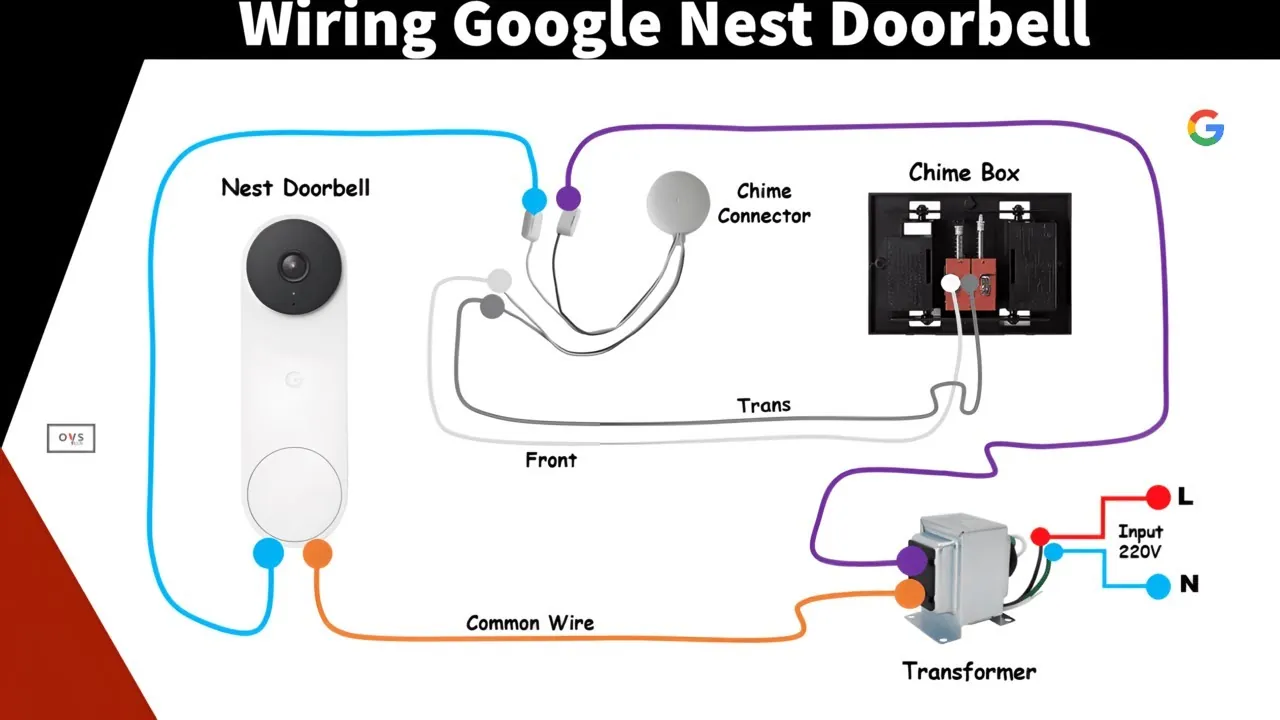
Low-voltage wires are thin and susceptible to damage. If you have verified power at the transformer but find no voltage at the button or chime, there’s likely a break in the wire. Check for visible wire damage near the door frame or entry points. If you have a video doorbell, ensure your transformer meets the power requirements outlined by the manufacturer.
Upgrading to Video Doorbells
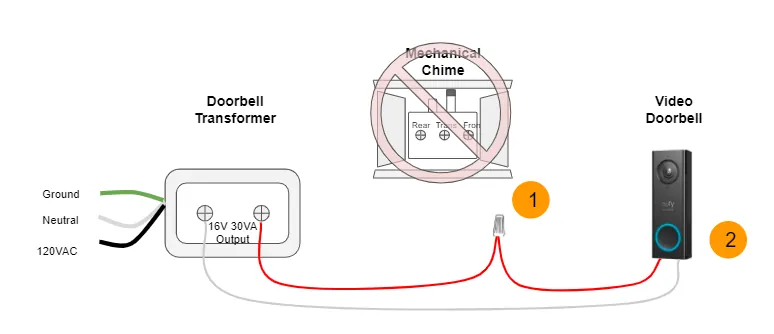
Many homeowners attempt to upgrade to smart devices only to find them unresponsive. This is often because the existing transformer provides insufficient power. A standard mechanical doorbell can operate on 10 volts, but most video doorbells require at least 16 to 24 volts. If you’re struggling with a new smart device, you may need to upgrade the transformer to a higher-capacity model. Ensure you turn off the power at the main breaker before handling any electrical connections.
Common Doorbell Problems Comparison
| Problem Symptom | Likely Cause | Suggested Action |
|---|---|---|
| No sound at all | Transformer or breaker | Test voltage at transformer |
| Intermittent ringing | Loose button wiring | Clean or replace button |
| Constant humming sound | Stuck button plunger | Check button mechanism |
| Video doorbell won’t power | Low voltage transformer | Install 24V transformer |
Safety During Repairs
Warning: Always shut off the main power supply at your circuit breaker before working on the transformer wiring. Even low-voltage systems can cause a short circuit that damages equipment if you accidentally touch the wrong wires together. Use insulated screwdrivers and take photographs of the wiring configuration before you disconnect anything so you can easily restore the original setup if necessary.
Tools You Will Need
To perform effective doorbell wiring troubleshooting, you should have a basic toolkit ready. You don’t need professional-grade equipment, but a few specific items will make the job much easier. Keep these tools organized so you can move efficiently between the transformer, button, and chime.
- Small flathead and Phillips screwdrivers
- Needle-nose pliers for wire manipulation
- Wire strippers for cleaning frayed ends
- Electrical tape for securing connections
- Compressed air for cleaning chime dust
Dealing with Wall Obstructions
Sometimes the wires leading to your doorbell are stapled inside the wall, making them difficult to pull or replace. If you suspect a break inside the wall, you don’t necessarily need to tear into your drywall.
You can often use a fish tape tool to pull a new wire through the existing path if the conduit or wall cavity is clear. If the wire is stapled tightly, you may have to run a new, surface-mounted wire along the trim, which can be hidden with paintable cable covers.
Checking the Transformer Output
Frequently Asked Questions
Why does my doorbell only ring halfway?
A partial ring usually indicates that the plunger in your chime is obstructed by dust or debris. Open the cover and ensure the plunger moves freely without hitting the casing. Alternatively, the transformer might not be providing enough current to complete the full strike cycle. Cleaning the mechanism and checking for loose wire connections at the chime terminals usually resolves this issue.
Is it safe to touch doorbell wires?
Yes, doorbell wires are low-voltage and generally safe to touch, as they don’t carry enough current to cause a dangerous shock. However, you should still avoid touching the transformer terminals if it’s plugged into a high-voltage outlet. Always verify power is off at the breaker before working on the transformer itself, as those connections involve 120-volt household electricity.
How do I know if my transformer is bad?
Can I fix a broken doorbell wire?
Yes, you can fix a broken wire by stripping back the insulation and using wire nuts or solder to reconnect the ends. If the wire is too short, use a length of compatible low-voltage wire and a butt-splice connector to bridge the gap. Ensure the connection is protected with electrical tape or heat-shrink tubing to prevent future corrosion, especially if the repair is located outdoors.
Why is my doorbell making a buzzing noise?
A constant buzzing or humming sound usually means the button is stuck in the “on” position, completing the circuit continuously. Check the button to ensure the plunger isn’t jammed. If the button is clear, the problem could be a short circuit in the wiring between the button and the chime. Inspect the wire path for any areas where the insulation might be pinched or damaged.
Conclusion
If your chime still doesn’t ring after checking the connections, there might be a hidden break in the wall wiring. Don’t worry if you can’t find it; it’s perfectly fine to call a pro for a quick inspection. You’ll have your front door sounding like new in no time at all.