You can perform easy heat heat tape troubleshooting by checking the power supply, testing the circuit breaker, and inspecting the cable for physical damage. The most common cause of a failure is a tripped ground-fault circuit interrupter (GFCI) or a blown fuse at the main electrical panel. If the indicator light on your plug doesn’t glow, the system is likely not receiving power. Always verify that your power outlet is active before assuming the cable itself is broken.
Reasons for heat tape failure
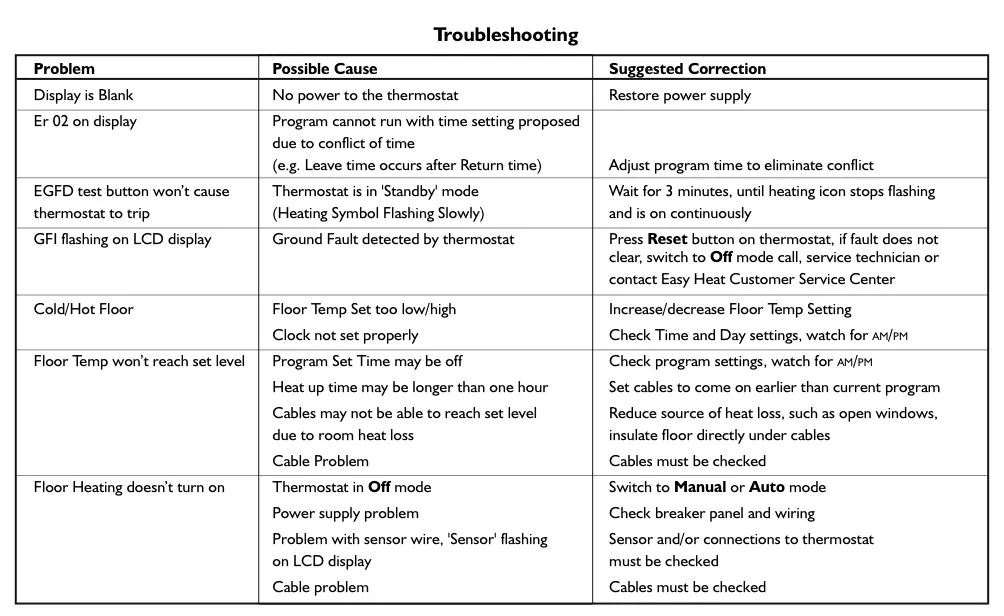
Most heating cable issues stem from simple electrical interruptions rather than internal hardware failure. Because these cables are often installed in crawl spaces or along exterior pipe runs, they’re susceptible to moisture intrusion and mechanical stress. If the system stops working, the first thing to check is the GFCI outlet. These outlets are designed to trip if they detect even a minor ground fault, which often happens when water enters the housing or condensation builds up near the plug.
Another frequent cause is physical damage to the cable jacket. If the cable was bent too sharply during installation or if it has been crushed by heavy objects, the internal heating element can snap. You should look for signs of overheating, such as melted plastic or charred spots along the line. If you see any exposed wire, you must stop using the product immediately. Never try to patch or tape over damage, as this creates a serious fire hazard.
Finally, consider the ambient temperature. Many modern cables feature a built-in thermostat that only activates the heating element when the pipe temperature drops near freezing. If the weather is mild, the cable will feel cold to the touch even if it’s working perfectly.
You can verify the operation of the EasyHeat heating cable by following the testing instructions provided by the manufacturer. If your cable is older and lacks an indicator light, you may need to wait for a significant cold snap to confirm it’s actually warming the pipe.
Safety: Inside a mains-powered machine, the parts behind the outer cover can hold a dangerous electrical charge even after it has been unplugged — that’s why they sit behind a cover. Opening the housing, or testing or replacing anything behind it, is a job for a qualified technician, never a home repair.
Test the power connection
If your heating cable isn’t producing warmth, start by confirming that the power source is operational. Plug a small appliance, such as a lamp or a radio, into the same outlet to ensure it provides electricity.
If the lamp doesn’t turn on, the problem is your home’s electrical system, not the heating tape. Check your breaker box for any tripped switches and reset them if necessary. If the breaker trips again immediately, you have an electrical short and must stop using the outlet.
Once you confirm the outlet works, inspect the plug on the heating cable. Many of these units include a test and reset button on the plug itself. Press the “Reset” button firmly to ensure the internal circuitry is engaged. If the plug has a small neon indicator light, it should glow when the unit is receiving power. If the light remains dark after you press reset, the internal fuse in the plug has likely blown.
This fix is intended for users who have basic access to their home electrical panel. If you’re uncomfortable working with electrical outlets or if the breaker continues to trip, you should contact a licensed electrician. Never attempt to open the sealed plug or the cable housing, as these are non-serviceable parts. If the unit remains unresponsive after a reset, the internal components have failed and you must replace the entire cable assembly to maintain safety.
Inspect the cable length
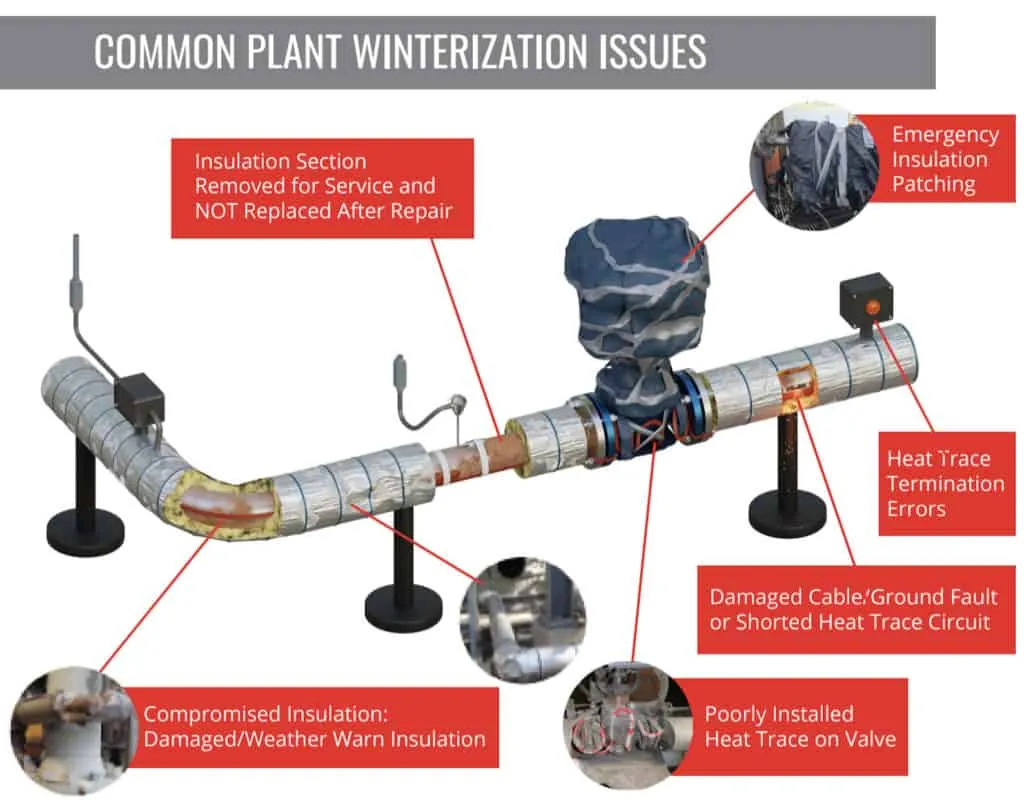
Visual inspection of the entire length of the cable is the next step to identify potential problems. Start at the point where the cable connects to the pipe and follow it to the very end. Look for any areas where the cable has been pulled tight or stretched, as this can break the internal heating wires. If you notice any kinks, sharp bends, or areas where the outer insulation has become brittle or cracked, the cable is compromised.
While checking the length, ensure the cable is in direct contact with the pipe. If the cable is hanging loosely or has pulled away from the pipe surface, it won’t transfer heat effectively. You should use the manufacturer-approved glass fiber tape to secure the cable back against the pipe. Never use plastic electrical tape or zip ties, as these materials can’t handle the temperature changes and will melt or break over time.
This inspection is for anyone with safe access to the pipe area. If the pipe is located in a high, cramped, or otherwise dangerous space, don’t attempt to reach it yourself. If you find significant damage to the cable insulation, the unit is no longer safe for use in a wet or cold environment. In such cases, the only safe action is to disconnect the cable from power and replace it with a new, undamaged unit of the correct length.
Confirm thermostat operation
Some heating cables use an external thermostat or a built-in sensor to manage energy consumption. If your system has a separate control box, ensure the sensor is firmly attached to the pipe surface. The sensor must be able to “feel” the pipe temperature to know when to turn on. If the sensor has fallen off or is covered by too much heavy insulation, it may not trigger the system even when the pipe is freezing.
You should also check the thickness of the pipe insulation covering the cable. While insulation is necessary to keep heat near the pipe, adding too much material over the thermostat sensor can prevent it from detecting the cold. Follow the manufacturer’s guidelines for the maximum thickness of foam or fiberglass allowed over the sensor area. If you find the sensor is buried under layers of thick material, move it to a location with less coverage.
This step is for users whose cables have a distinct sensor module. If you don’t have a separate sensor, your cable likely has an automatic thermostat built into the heating element itself. If the ambient temperature is above 40 degrees Fahrenheit, the cable will stay off regardless of your settings.
If you still suspect a failure, wait for the temperature to drop below 35 degrees before making further assessments. If the pipe freezes despite the cable being plugged in and the light glowing, the heating element has reached the end of its life.
Common mistakes to avoid
Never wrap the heating cable over itself. Overlapping creates a localized heat trap that melts the internal insulation and triggers a short circuit.
Avoid using standard duct tape or plastic tape to secure the cable. The adhesive degrades rapidly under heat, causing the tape to dry out and fall off. This leaves the cable dangling, which creates a fire hazard. Use only manufacturer-approved glass fiber tape or specialized heat-resistant electrical tape for secure contact.
Don’t plug the heating cable into a standard extension cord. Most household cords lack the heavy-gauge wiring required for the high amperage these cables draw. This mismatch causes the cord to overheat, potentially melting the outlet or starting a fire. Always plug directly into a GFCI-protected wall outlet.
Never install the cable on a plastic pipe unless the model is explicitly rated for non-metallic surfaces. Standard cables reach temperatures that soften PVC, leading to leaks.
Finally, unplug the cable during summer. Leaving it active wastes electricity and prematurely degrades the heating element. If the cable lacks a thermostat, install a plug-in timer to automate this process.
Prevent future pipe freezing
The most effective way to maintain your system is to ensure the cable remains flush against the pipe surface throughout the winter season. If you find the cable has moved, you must re-secure it immediately to ensure even heat distribution.
| If you’re doing this | Do this instead | Why |
|---|---|---|
| Using plastic zip ties | Use glass fiber tape | Plastic melts and loses grip |
| Leaving cable exposed | Cover with pipe insulation | Insulation keeps heat on the pipe |
| Wrapping cable over itself | Use a longer cable | Overlapping creates dangerous hot spots |
| Ignoring the indicator light | Test your GFCI outlet | Light confirms power is reaching the unit |
| Removing the thermostat | Keep sensor against pipe | Sensor needs pipe heat to cycle |
Related guides
- Prostat Thermostat Troubleshooting: Solve Heating Problems Like a Pro
- Framingham Ma Heating System Troubleshooting: Quick Fixes Guide
- Radiant Heating Troubleshooting: Quick Fixes for Warm Comfort
Frequently Asked Questions
Is it safe to leave the heat tape on all year?
No, you shouldn’t leave heat tape on during warmer months. Unplug the cable once freezing temperatures pass to prevent unnecessary wear on the thermostat and reduce electricity costs. Always inspect the cable for damage before reusing it next winter.
How long does heat tape usually last?
Most heat tape cables last several years, though lifespan depends on how often the unit cycles. Perform a visual inspection at the start of every season. If the outer jacket shows signs of cracking or hardening, replace the unit to prevent potential electrical fires.
Why is my pipe still freezing with the heat tape on?
Your pipe is likely freezing because the cable lacks direct contact or sufficient insulation. Heat tape must be wrapped snugly against the pipe to transfer warmth effectively. Ensure the cable is covered with approved foam or fiberglass insulation to maintain proper temperatures.
Can I shorten the heat tape if it’s too long?
No, you can’t shorten a standard heat tape cable because it’s a sealed electrical circuit. Cutting the cable breaks the internal wiring and creates a dangerous hazard. If you have extra length, wrap the excess in a spiral pattern along the pipe without overlapping.
What happens if the heat tape gets wet?
If a heating cable gets wet, the GFCI outlet or safety device should trip immediately to prevent shock. Never use a cable that has been submerged or shows signs of water damage. If the unit fails to trip, unplug it manually and discontinue use permanently.
Conclusion
If you still can’t get the system running after these checks, it’s time to call a licensed electrician for help. Don’t try to repair a damaged cable yourself, as that’s a serious fire risk. It’s better to be safe and let a pro handle the wiring so you’ll stay warm all winter.