To resolve scanning errors, you should perform fujitsu fi-7160 troubleshooting by first cleaning the glass and rollers with a lint-free cloth. Most common issues stem from dust buildup or debris on the internal sensors. If your scanner isn’t feeding paper correctly or shows lines on images, these simple maintenance steps often restore full functionality immediately.
Troubleshooting your Fujitsu scanner connection issues
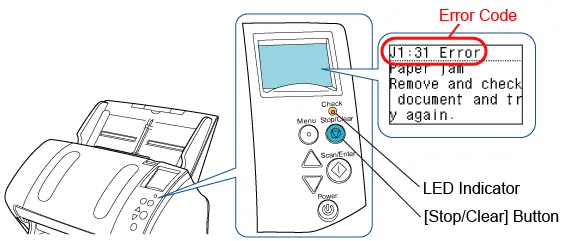
Scanning failures usually happen because the internal optics or feeding path have become obscured over time. The most frequent cause is a layer of paper dust or ink residue accumulating on the scan glass. This debris confuses the light sensors, which then register a false error or create vertical streaks on your digital files.
To test if your glass is the culprit, place a clean white sheet on the scanner. If a dark vertical line appears in the same spot on every scan, you have a physical blockage on the sensor. Use a lint-free microfiber cloth and a drop of glass cleaner to wipe the surface. Avoid paper towels, as their wood fibers can leave microscopic scratches that permanently degrade image quality.
Another common reason involves the condition of the rubber rollers. These rollers rely on specific friction levels to pull sheets into the device. If they become slick with dust, the paper will slip, leading to a jam or a “multi-feed” error.
You can check the current status of your device’s consumables by opening the official support portal to view the estimated page counts for your rollers. If you have exceeded 100,000 scans, the rubber has likely hardened and requires a replacement kit.
Finally, connection issues often arise from outdated software drivers. If the hardware is clean but the computer can’t see the scanner, the communication bridge between the operating system and the device is likely broken. This happens frequently after major computer system updates. If the scanner isn’t showing up in your software, your first step is to reinstall the official driver package.
Clean the internal glass and rollers
This fix is for anyone experiencing streaks on images or consistent paper jams during a batch scan. To start, power off the device and unplug the power cable. Open the automatic document feeder (ADF) by pulling the release lever. Use a soft, lint-free cloth dampened with a small amount of mild cleaning fluid—specifically one recommended by the manufacturer for office equipment—to wipe the glass strips inside the unit.
If you see vertical lines on your digital files, look for tiny, hardened specks of debris on the glass. Use a fingernail wrapped in the cloth to gently scrape these spots away. A common mistake is using paper towels, which leave behind microscopic fibers that cause more streaks. Always use a microfiber cloth to prevent static buildup.
Next, focus on the rubber rollers. Gently rotate each roller with your finger while wiping it down to remove any accumulated paper dust. Don’t use harsh solvents like alcohol or acetone, as these can dry out and crack the rubber, making the feeding problem worse. Once finished, leave the ADF open for a few minutes to ensure everything is completely dry before closing it and reconnecting the power.
If the scanner still fails to feed after this cleaning, check if the “Pick Roller” or “Separation Roller” has reached its duty cycle limit. These parts are designed to be replaced after a specific number of scans, which varies by your model’s usage.
If the rubber surface feels slick or polished rather than tacky, the roller has lost its grip and must be replaced. If you aren’t comfortable handling these internal parts, contact an authorized service center to avoid damaging the sensitive alignment of the scanning bed.
Update the device drivers
Use this fix if your computer fails to detect the scanner despite it being plugged in and powered on. Start by going to your computer’s device manager to see if the scanner is listed with a yellow warning icon. If it is, the system recognizes the hardware but can’t talk to it. You must visit the manufacturer’s website to download the latest driver version for your specific operating system.
Before installing the new driver, uninstall the old one completely through your system’s settings menu. Restart your computer after the removal to ensure all old files are cleared. Once the computer restarts, run the new installer and follow the on-screen prompts. Plug the USB cable in only when the installer specifically asks you to do so.
Many users make the mistake of leaving the scanner plugged in during the driver update. This often causes the operating system to force-load a generic, incompatible driver before the manufacturer’s software can initialize. If you see the device listed as “Unknown Device,” you must manually right-click and select “Uninstall Device” before running the installer.
If the scanner still doesn’t appear, try a different USB port on your computer, ideally one located directly on the motherboard rather than a hub. A faulty USB cable can also cause intermittent connectivity issues. If you have swapped the cable and updated the software but the computer still shows no response, the internal interface board may have failed. This is a hardware limit that requires a professional technician to diagnose and repair.
Adjust the software settings
This fix is for users who face errors related to image size, color settings, or file output formats. If the scanner works but the images look wrong, the issue is likely in the scan software configuration. Open your scanning application and look for the profile settings. Ensure that the resolution is set to a standard value, such as 200 or 300 DPI, as extremely high settings can cause memory overflows on older computers.
Check the “Paper Size” detection settings in your software. If it’s set to “Automatic,” the scanner might struggle with documents that have non-standard edges. Try setting it to “Letter” or “A4” manually to see if the error persists. Additionally, disable “Blank Page Removal” if you find that the scanner is skipping pages during a batch process.
If you find that the scanner is running very slowly, check the image compression settings. High-level compression requires more processing power from your computer. Reducing the compression level or switching to a simpler file format like JPEG instead of a complex PDF can speed up the process. If you’re using a network-attached scanner, ensure your connection speed is sufficient, as low bandwidth will cause the scanner to pause while it waits for the computer to receive data.
Common mistakes to avoid
Cleaning with water: Never use water or household window cleaners on the glass. Moisture seeps into the electronics, causing permanent corrosion. Use only a dry, lint-free microfiber cloth. If a smudge persists, dampen the cloth slightly with 70% isopropyl alcohol, but never spray the scanner directly.
Overloading the feeder: Respect the tray’s capacity limit, usually 50 sheets. Forcing extra paper causes roller strain and misfeeds. If the stack feels tight, remove five sheets; if the machine still jams, your rollers are likely worn and require professional replacement.
Using compressed air: Blowing air into the scanner forces dust deeper into the internal sensors. This creates “streaking” artifacts that are nearly impossible to remove without disassembly. Always use a soft brush or a vacuum with a delicate attachment instead.
Forcing the ADF door: If the door resists, stop immediately. A jammed scrap is likely blocking the latch. Pulling harder snaps the plastic hinge, which is expensive to repair. Gently wiggle the door while checking the paper path.
Prevent future scanning issues
To keep your device running smoothly, establish a regular maintenance routine based on the volume of your daily work. If you scan more than 500 pages per week, set a reminder to wipe the glass and rollers every Friday. This prevents the microscopic dust buildup that leads to the most common streak errors.
Most users make the mistake of waiting for a visible jam before cleaning the internal rollers. This oversight often leads to permanent rubber degradation, which is costly to replace. If you notice pages feeding at an angle, stop immediately. A quick wipe with a lint-free cloth now saves you a complex mechanical repair later.
| If you’re doing this | Do this instead | Why |
|---|---|---|
| Scanning dusty receipts | Wipe them clean first | Dust ruins the scan quality |
| Leaving it on 24/7 | Power it off at night | Saves the internal light source |
| Using long USB cables | Use the included cable | Prevents data transfer drops |
| Ignoring warning lights | Check the error log | Helps identify the specific part |
If your scans appear blurry, check the glass for adhesive residue. If the image is clear but skewed, the issue is almost always a worn-out feed roller.
Frequently asked questions
Can I use alcohol to clean the scanner glass?
No, avoid using standard rubbing alcohol because it can leave a residue or damage the protective coating on the scanner glass. Always use a dedicated scanner cleaning fluid or a soft, dry cloth as directed by the manufacturer. Using the wrong chemicals can cloud the optics and permanently degrade your scanned images.
How do I know if the rollers are worn out?
You can tell the rollers are worn out if you notice consistent multi-feed errors or if the paper slips despite the rollers being clean. Most scanner software tracks the usage count of these parts. If the rollers look shiny or smooth rather than matte and textured, they need to be replaced.
How long does it take for a scan to finish?
Scan speed depends on your resolution and color settings, typically ranging from 3 to 5 seconds per page. If your scans are taking significantly longer, the bottleneck is likely your computer’s processing speed or the USB connection. High resolutions, such as 600 DPI, will naturally increase the time required for each page.
Is it safe to open the scanner cover?
Yes, it’s safe to open the ADF cover for routine cleaning as long as the device is powered off. Don’t attempt to open the main outer casing, as this exposes high-voltage components and voids your warranty. If the paper path is clear but the device still fails, contact a professional technician.
What happens if the scanner makes a loud noise?
If the scanner makes a grinding or clicking noise, stop using it immediately and unplug the power cable. This sound usually indicates a broken gear or a failed motor, which can cause further damage if you continue to operate the machine. Contact the manufacturer’s support line to arrange for a professional inspection.
Conclusion
If these basic fixes don’t get things running smoothly again, don’t worry. You should check the official support website to download the latest driver updates or contact their technical team for extra help. They’ll be happy to guide you through more advanced settings so you can get back to work quickly.