If your range isn’t heating, you should check the power supply and the burner connection before attempting any ge electric stove top troubleshooting. Most issues happen because of a loose connection between the burner and the internal socket or a tripped circuit breaker. If the burner is cool to the touch but the light is on, the heating element itself is likely broken. Always check your home’s main electrical panel first to ensure the breaker hasn’t flipped, as this is the simplest and most common cause of a total loss of power.
Troubleshooting electric stove burners that fail
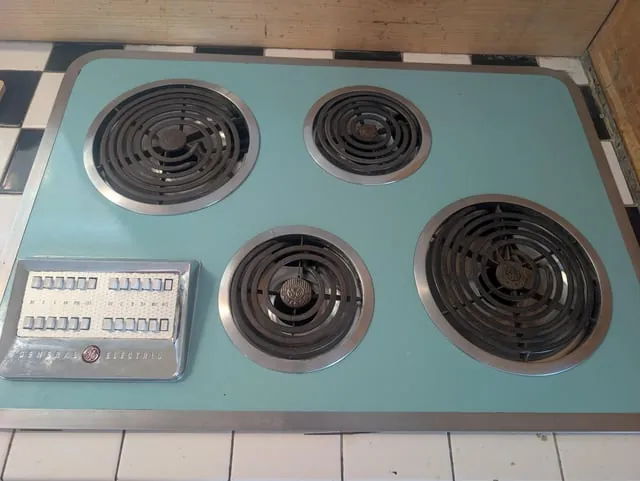
A stove burner often fails due to a damaged heating element or a poor electrical contact. If the metal prongs on the bottom of the burner are loose or burnt, electricity can’t flow into the coil to create heat. You can often see these signs by looking closely at the connection point where the burner plugs into the wall of the stove.
Another common cause is a faulty infinite switch. This is the part behind your control knob that tells the stove how much power to send to the burner. If you turn the knob and hear no click, or if the heat doesn’t change when you adjust the setting, the switch may be worn out. This is a common internal failure for units that have seen years of frequent use.
Electrical issues can also stem from the house wiring. If you have a glass cooktop, a broken sensor or a loose wire beneath the surface can stop the unit from functioning. If the wiring behind the wall or the outlet itself is damaged, contact a professional technician to ensure the stove operates safely.
Safety: Inside a mains-powered machine, the parts behind the outer cover can hold a dangerous electrical charge even after it has been unplugged — that’s why they sit behind a cover. Opening the housing, or testing or replacing anything behind it, is a job for a qualified technician, never a home repair.
Inspecting the burner connections
To check if a plug-in burner is the problem, turn the stove off and wait for it to cool completely. Once the surface is cold, pull the burner straight out of its socket. Look at the prongs on the burner and the holes in the socket. If you see black marks, corrosion, or signs of melting, the connection is poor.
A common mistake is assuming the burner is dead when it’s simply dirty. Use a fine-grit emery board to gently scrub oxidation off the prongs. If the metal shines again, try it once more. If the connection remains loose or the prongs feel wiggly, the socket tension has failed and you must replace the receptacle block.
If the prongs look okay, try plugging the burner into a different socket on the stove that you know works. If the burner heats up in the new spot, the original socket is the issue.
If it still doesn’t heat, the burner element itself is faulty and needs to be replaced. This is a standard process for most electric stoves, but it varies by model; you can read your owner’s manual to find the exact part number for your specific appliance.
This fix is only for removable plug-in burners. If you have a glass cooktop, you can’t remove the burners to inspect them. Attempting to lift or pry off a glass surface will likely shatter the glass or damage the internal sensors. If you have a glass unit and it isn’t working, you should stop and call a professional technician for help.
Testing the control switches
If the burner connection is fine but the heat stays low or doesn’t turn on at all, the infinite switch behind the knob might be the culprit. To check this, turn the power to the stove off at the main breaker. Pull the control knob off the front of the stove to see if there’s any loose debris or damage to the shaft.
If the knob and shaft look normal, you have reached the limit of what you can do safely. The switch is located behind the control panel, which requires removing screws and accessing live electrical components. Because the internal components are connected to live electrical wiring, you must not open the housing. If you suspect the switch is bad, contact a qualified repair person to handle the replacement.
This task is for those comfortable with basic diagnostics, but it isn’t for anyone who doesn’t have experience with electrical appliances. If you don’t feel safe working near the control panel, it’s better to call a professional. A mistake here can lead to a short circuit or damage to the entire control board, which is much more expensive to fix than a simple switch.
Checking for surface errors
Glass cooktops often show error codes when something is wrong with the internal sensors. If your display shows a code, check your manual to see what it means. Many codes simply mean you need to wipe the surface, as a spill or heavy residue can trick the touch sensor into thinking a finger is pressing down.
To test this, turn the unit off at the circuit breaker for sixty seconds to reset the logic board. If the code returns immediately upon powering back up, the issue is likely a hardware fault rather than a surface obstruction.
If the error persists, it may indicate a failure in the control board or the thermal sensor. These components are sealed inside the unit and require specialized tools to test. Don’t try to bypass sensors or force the stove to turn on, as this could lead to overheating or fire risks. If the stove continues to show an error after cleaning and a hard reset, the best path is to schedule a service visit.
Common mistakes to avoid
Cleaning with water: Don’t spray liquid cleaners directly onto the controls. Moisture entering the internal switches causes immediate short circuits. Instead, spray your cloth first and wipe gently. If you notice a flickering display, stop immediately and let the unit air dry for twenty-four hours before testing it again.
Using abrasive pads: Never use steel wool on a glass cooktop. These fibers create microscopic, permanent scratches that trap burnt food, making future cleaning exponentially harder. Use a non-scratch nylon pad or a dedicated ceramic scraper instead.
Ignoring the breaker: Many people assume the stove is broken when only one circuit breaker has tripped. Always check your electrical panel before calling for help. If the stove has power but won’t heat, you’re likely dealing with a dual-pole breaker where only one side has failed.
Prying the glass: Don’t attempt to lift the glass top to inspect internal components. This action often breaks the factory adhesive seal or cracks the glass permanently. If you suspect an internal failure, remove the front access panel rather than prying from the top.
Maintaining your stove top
To prevent future issues, keep the area around your burners clean and dry. A build-up of grease or food scraps can insulate the electrical contacts, leading to poor heat or arcing. The following table helps you understand the difference between routine care and when to seek a repair.
| If you’re doing this | Do this instead | Why |
|---|---|---|
| Leaving spills to bake | Wipe with a damp cloth | Prevents stuck-on food and sensor errors |
| Using heavy cast iron | Use flat-bottom pans | Prevents cracking the glass surface |
| Forcing a stuck knob | Clean around the shaft | Prevents breaking the internal switch |
| Using high heat constantly | Use medium for most tasks | Extends the life of the heating element |
Related guides
- Ge Electric Cooktop Troubleshooting: Quick Fixes & Tips
- Whirlpool Electric Cooktop Troubleshooting: Easy Fixes Guide
- Stoves Electric Oven Troubleshooting: Quick Fixes & Expert Tips
Frequently Asked Questions
Can I replace the heating element myself?
You can replace a plug-in heating element yourself if your stove uses the standard plug-in style. Simply buy the replacement part matching your model number, unplug the cool burner, and push the new one into the socket. Note that glass-top or sealed units require a professional repair.
How do I know if my infinite switch is broken?
You can suspect a broken switch if the burner fails to heat despite the element being functional. A bad switch often feels loose, fails to click, or doesn’t change heat intensity. Since this switch is located behind the control panel, contact a service technician to inspect the internal components.
Is it safe to use a stove with a cracked glass top?
Stop using a stove with a cracked glass top immediately to prevent liquid from seeping into electrical parts. Moisture entering the crack can cause short circuits or damage the heating sensors beneath the surface. If you see a crack, turn off the breaker and contact a professional repair service.
Why does my stove click but not heat up?
A clicking sound from the infinite switch usually indicates the control is working but power isn’t reaching the burner. This often happens because the burner isn’t fully seated or the prongs are dirty. If cleaning the prongs doesn’t resolve the issue, the burner element may be burnt out.
How long does a burner element usually last?
A burner element typically lasts for 10 to 15 years, depending on your cooking frequency and temperature settings. Frequent use of high heat can cause the coil to wear out faster than gentle simmering. Look for signs of wear like sagging coils or failure to heat to determine if replacement is needed.
What happens if I ignore a loose burner connection?
Ignoring a loose connection can lead to arcing, which melts the socket and damages the internal wiring. Poor contact causes electricity to jump across the gap, burning the metal prongs and causing the burner to fail. Ensure your burners are seated firmly to prevent this damage to your appliance.
Conclusion
If these simple checks don’t solve the problem, it’s time to reach out to a professional technician. Don’t try to take apart the internal wiring yourself, as you could get hurt or cause more damage. A certified expert can safely handle the repair so you’ll be cooking again in no time.