You can resolve most power or performance issues by referring to a gem car troubleshooting manual to check your battery connections, state of charge, and safety interlock switches. The most common cause of these vehicles failing to start is a loose or corroded battery terminal, which prevents the electrical current from reaching the motor. If the vehicle has power but won’t move, the issue is often a simple safety switch that isn’t fully engaged, such as the parking brake sensor or the seat occupancy switch.
Understanding why your vehicle stops working
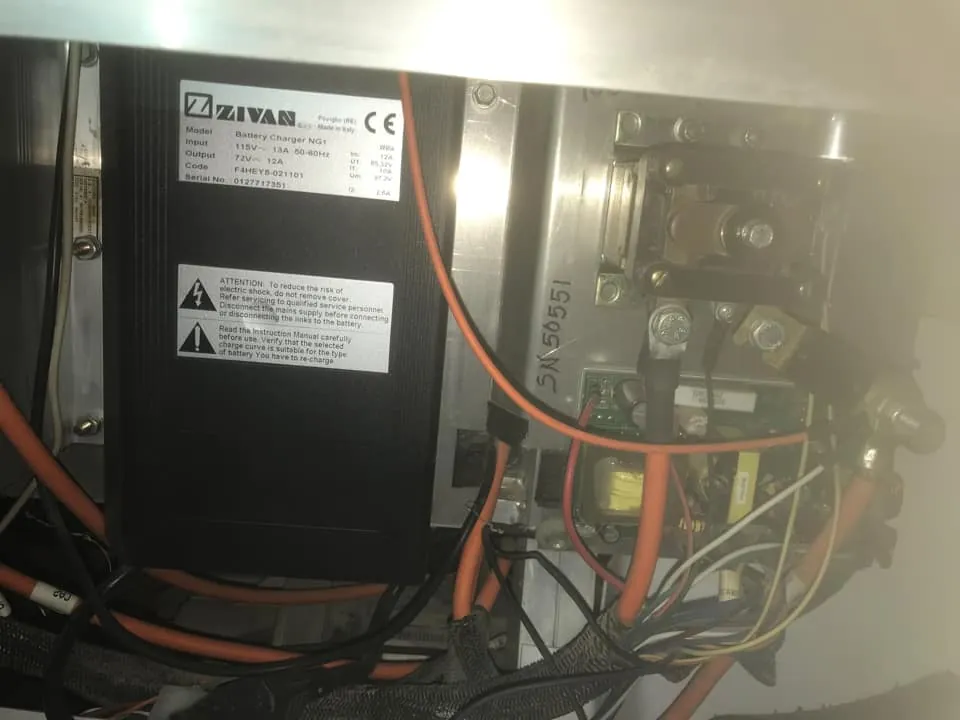
Electrical systems in low-speed vehicles rely on a precise flow of energy between the battery pack, the controller, and the motor. When this flow is interrupted, the vehicle will either fail to turn on or enter a “limp mode” where it moves very slowly. Most issues stem from the high-current cables vibrating loose over time or the battery voltage dropping below the minimum threshold required by the controller.
Environmental factors like moisture and dust also play a significant role. Over time, these elements can build up on the contacts of the forward-reverse switch or the accelerator pedal sensor. If the controller detects a signal that’s out of range, it will disable the drive system to prevent damage to the motor. This is a built-in safety feature designed to protect the electronic components from short-circuiting.
Another frequent cause is the state of the onboard charger. If the vehicle is plugged in but the batteries aren’t reaching a full charge, the charger may have tripped its internal breaker or entered a lockout state.
Always check the status lights on the charger unit itself, as these provide the most accurate diagnostic codes for power delivery problems. You can find specific maintenance guidance through the Polaris GEM official support portal which covers standard operating procedures for these electric platforms.
Safety: Inside a mains-powered machine, the parts behind the outer cover can hold a dangerous electrical charge even after it has been unplugged — that’s why they sit behind a cover. Opening the housing, or testing or replacing anything behind it, is a job for a qualified technician, never a home repair.
Tighten battery cables and check connections
If your vehicle shows no signs of life when you turn the key, start by inspecting every battery terminal for physical movement. Corrosion often looks like a white or blue powder on the metal contacts, which acts as an insulator and blocks the flow of electricity. Use a stiff wire brush to clean these areas until the metal is bright and shiny, then ensure every nut is tightened firmly against the lug.
This fix is intended for owners who are comfortable working around lead-acid or lithium battery packs. If you see signs of physical damage to the battery casing, such as swelling or leaking fluid, don’t attempt to touch the terminals. In those cases, you must contact a qualified electric vehicle technician to prevent the risk of chemical burns or electrical arcs.
To verify this fix, try to turn on the dashboard lights after cleaning and tightening. If the lights are bright and steady, the connection is likely secure.
If the lights flicker when you attempt to drive, you may still have a loose cable at the main contactor, which is the heavy-duty switch that clicks when you press the accelerator. If the clicking sound is absent, the issue is likely a blown fuse or a failed ignition switch rather than a loose cable.
Reset the safety interlock switches

Many modern electric vehicles use a series of safety interlocks that must be closed before the motor will engage. The most common culprit is the parking brake sensor, which prevents the car from moving while the brake is applied. If the handle isn’t pulled back to the absolute limit, the sensor remains open, and the controller will refuse to send power to the drive motor.
Another frequent point of failure is the seat occupancy switch. If the sensor in the seat cushion isn’t detecting your weight, the vehicle assumes it’s unattended and locks the controls. Try shifting your weight or pressing down firmly on the center of the seat to see if the system resets. This is a safety design meant to prevent the car from moving if a driver isn’t seated properly.
If you have checked the brake and seat sensors and the car still doesn’t move, look for the directional switch. Move the lever between forward and reverse several times to ensure it clicks into the correct position. If the lever feels loose or doesn’t click, the internal contacts may be worn out. This is a common issue in older vehicles and usually requires the replacement of the directional control assembly.
Inspect the accelerator pedal sensor
The accelerator pedal uses a potentiometer to tell the controller how much power to send to the motor. If this sensor is dirty or the spring mechanism is damaged, the controller may think the pedal is already pressed when you turn the key on. To protect the drivetrain, the vehicle will enter a lockout state and refuse to move until the pedal is returned to a neutral position.
This fix is for users who notice that the vehicle moves jerkily or experiences sudden drops in speed while driving. If the pedal feels “sticky” or doesn’t return to the top position on its own, it’s likely that debris is trapped in the floorboard area. Clear away any floor mats or loose items that might be pressing against the base of the pedal.
If the pedal is physically clear but the vehicle still doesn’t respond, the internal sensor may have reached the end of its service life. This is a non-repairable component that requires a specific calibration sequence to match it to the vehicle’s controller. If you suspect the sensor is faulty, you should consult an authorized service center to perform the electronic handshake required for the new part to communicate with your specific motor controller.
Common GEM car troubleshooting manual mistakes to avoid
- Don’t spray water directly onto the battery compartment or the controller to clean off dust. Water can pool in sensitive electrical connectors and cause permanent short circuits that are very expensive to repair.
- Avoid bypassing the safety interlock switches with jumpers or tape. These switches are there to prevent the vehicle from lurching forward unexpectedly, and disabling them creates a significant risk of physical injury.
- Don’t attempt to open the motor controller housing yourself. The capacitors inside can hold a lethal electrical charge even when the batteries are disconnected, posing a severe shock hazard.
- Never use a metal wrench to tighten both battery terminals at the same time. This can cause a high-amperage short circuit, which may melt the wrench or cause the battery to vent gas.
- Don’t ignore warning lights on the dashboard. These codes are generated by the onboard computer to point you toward the exact component that’s failing, saving you hours of guessing.
Prevent future electrical issues
To keep your vehicle running smoothly, establish a routine for checking your electrical systems based on your specific usage. Consult your owner’s manual for the authoritative maintenance schedule, as requirements vary significantly depending on how often you operate the vehicle.
| If you’re doing this | Do this instead | Why |
|---|---|---|
| Charging only when dead | Charge after every use | Deep discharges shorten battery life |
| Tightening bolts once a year | Inspect connections quarterly | Vibration loosens cables over time |
| Ignoring dashboard beeps | Record the flash code | Codes identify specific component faults |
| Leaving it in the rain | Use a waterproof cover | Moisture causes corrosion on contacts |
| Forcing the shift lever | Check for debris first | Force breaks the internal plastic clips |
The biggest mistake owners make is waiting for a total failure before inspecting the battery terminals. If you notice white, powdery corrosion on the posts, clean them immediately with a mixture of baking soda and water. Failure to act here increases electrical resistance, which forces the motor to draw excessive current. This eventually burns out the solenoid.
Use this simple decision rule to judge your system’s health. Address these symptoms now to avoid being stranded.
Frequently asked questions
How long do the batteries usually last?
Most battery packs in these vehicles last three to five years. Lifespan is primarily determined by deep-discharge frequency and local climate. If you notice a significant drop in range after a full charge, have the cells load-tested at a local shop.
Is it safe to drive if the controller light is flashing?
No, you shouldn’t drive the vehicle if the controller light is flashing, as this indicates a detected fault in the propulsion system. Driving in this condition can cause the motor to overheat or the controller to lock up permanently. You should stop the vehicle in a safe location, turn the key to the off position, and check your documentation for the specific meaning of that flash sequence to avoid further damage.
Why does my car move slowly even with full batteries?
Your vehicle may be stuck in a “limp mode” because the controller has detected a fault in the accelerator pedal or a safety sensor. This feature is designed to move the vehicle at a crawl so you can reach a service area without damaging the motor. Check your floor mats to ensure they aren’t touching the pedal, and verify that your parking brake is fully released before attempting to move again.
Can I fix a broken charger cord myself?
No, you shouldn’t attempt to repair a damaged charger cord, as this carries a high risk of electrical shock and fire. These cables are designed to handle high current and require specialized tools to create a safe, heat-resistant connection. If the insulation is frayed or the plug is melted, you must replace the entire charger unit or the cable assembly through an authorized parts dealer to ensure your safety.
What happens if I leave the vehicle unplugged for months?
Leaving the vehicle unplugged for an extended time allows the batteries to self-discharge, which can lead to permanent damage if the voltage drops too low. When the voltage falls below a certain level, the onboard charger will fail to detect the battery pack and won’t start the charging process. If you plan to store the vehicle, ensure it’s plugged into a maintainer or that the battery disconnect switch is engaged.
How often should I check the water levels in my batteries?
Flooded lead-acid batteries require regular water level checks using only distilled water. Fill cells to the bottom of the vent well without overfilling, as exposed plates will sulfate and lose capacity. Sealed AGM or lithium batteries are maintenance-free and don’t require this check.
Conclusion
If you still can’t get your vehicle running after checking these basics, it’s time to reach out to a certified technician. They’ll have the specialized diagnostic tools needed to find hidden electrical faults. Don’t hesitate to call for help if you’re unsure, as it’s always safer to let a professional handle complex repairs.