The Sloan Flushmate system is well-known for its powerful flushing action and water-saving design. Used in many commercial restrooms and some homes, Flushmate units are different from traditional gravity-fed toilets. They use pressure to deliver a quick, strong flush, preventing clogs and reducing water usage.
But when problems arise, troubleshooting can feel confusing, especially if you are not familiar with how these systems work.
This guide will help you find and fix common issues with Sloan Flushmate systems. Whether you notice weak flushes, leaks, strange noises, or other problems, you’ll learn step-by-step solutions. We’ll explain how the system works, why certain issues happen, and how to prevent them in the future. You’ll also find tables comparing Flushmate parts, clear instructions, practical tips, and answers to the most frequent questions. If you want your restroom running smoothly, this article gives you everything you need.
Understanding The Sloan Flushmate System
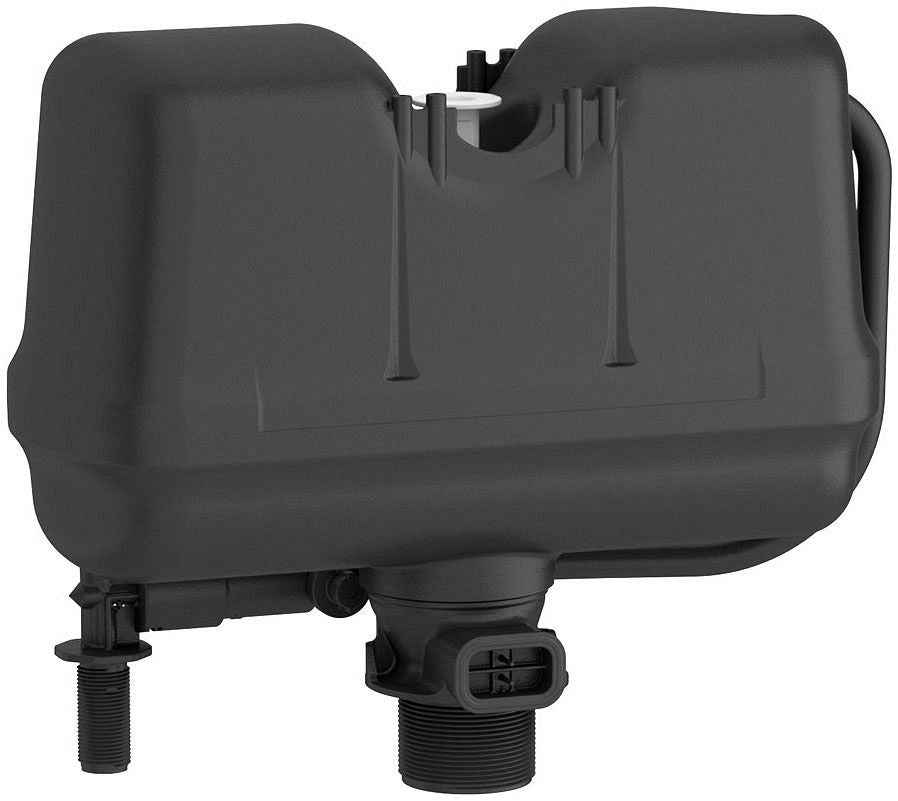
Before troubleshooting, it’s useful to know how the Flushmate works. Unlike most toilets, the Flushmate uses air pressure and water inside a sealed tank. When you flush, the pressure forces water into the toilet bowl quickly, making the flush more powerful.
Flushmate systems are commonly installed in toilets from brands like Kohler, American Standard, and Gerber. The Flushmate unit is inside the tank, and it’s separate from the porcelain. Key parts include:
- Pressure vessel (the sealed tank)
- Flush valve
- Air inducer
- Cartridge (controls water flow)
- Actuator (starts the flush)
- Supply line (brings water in)
Understanding these parts helps you pinpoint issues. For example, a weak flush might mean a problem with the pressure vessel or the cartridge.
Flushmate Models And Compatibility
Flushmate has different models for various toilets. Each model has unique specifications, so using the right one is important. Here’s a comparison of common Flushmate models:
| Model | Gallons per Flush (GPF) | Compatible Brands | Pressure Range (psi) |
|---|---|---|---|
| Flushmate III (M-101526-F) | 1.6 | Kohler, Gerber, American Standard | 35–80 |
| Flushmate II (M-101526) | 1.6 | Older models, Gerber | 20–80 |
| Flushmate 501-B | 1.28 | Kohler, American Standard | 35–80 |
If you have a Flushmate unit, check the label inside the tank for the model number. Using the wrong model can cause flushing problems or leaks.
Common Problems With Sloan Flushmate
Flushmate units are reliable, but issues can happen. Here are the most common problems users face:
- Weak flush
- Leaking inside the tank
- Toilet running continuously
- Loud noises during flush
- Slow tank refill
- Water on the floor
- Flush handle feels loose or stuck
Each problem can be caused by different parts or conditions. Let’s look at each issue and how to fix it.
Troubleshooting Weak Flushes
A strong flush is the main benefit of Flushmate. If your flush feels weak, follow these steps:
Step 1: Check Water Supply Pressure
Flushmate needs at least 35 psi to work well. If your home or building has low water pressure, the unit cannot build enough force.
- Confirm the water supply valve is fully open.
- Check for leaks or restrictions in the supply line.
- If you suspect low water pressure, use a pressure gauge at a faucet to measure it.
If your pressure is under 35 psi, the flush will be weak. You may need a plumber to improve water supply.
Step 2: Inspect The Pressure Vessel
Look inside the tank for cracks or signs of damage on the pressure vessel. If the vessel leaks air or water, it won’t build pressure.
- Turn off the water supply.
- Flush the toilet to release pressure.
- Check the vessel for cracks, leaks, or worn seals.
If you see damage, the pressure vessel must be replaced.
Step 3: Examine The Cartridge
The cartridge controls water flow. If it’s clogged or worn, flushing is affected.
- Remove the cartridge (usually by unscrewing).
- Look for debris or mineral buildup.
- Clean gently with a brush and water.
- If the cartridge seal is damaged, replace it.
Step 4: Check The Flush Valve
The flush valve opens to let water into the bowl. If it sticks or is blocked, the flush will be weak.
- Inspect for debris or obstructions.
- Make sure the actuator moves freely.
- Lubricate the valve if needed.
Non-obvious insight: Sometimes, weak flushes are caused by partial blockages in the rim holes under the toilet bowl. Mineral deposits can build up, restricting water flow. Clean these holes with a wire or brush.
Fixing Leaks In The Flushmate System
Leaks inside or outside the tank are serious. They can cause water damage, high bills, and safety risks.
Step 1: Identify Leak Location
Leaks usually come from:
- Pressure vessel seals
- Cartridge
- Supply line connections
- Flush valve
Dry the area and watch carefully to see where water appears.
Step 2: Tighten Connections
Many leaks are caused by loose fittings. Use a wrench to tighten the supply line and cartridge connections.
- Do not overtighten; this can crack plastic parts.
- Use plumber’s tape if needed for extra sealing.
Step 3: Replace Faulty Seals
Flushmate units have several O-rings and seals. Over time, these can wear out.
- Remove the leaking part.
- Inspect the seal for cracks or flattening.
- Replace with the correct Flushmate-approved seal.
Step 4: Check For Tank Cracks
If the porcelain tank is cracked, water can leak out. This is rare, but possible after an impact.
- Inspect all sides of the tank.
- If you find cracks, replace the tank.
Non-obvious insight: Sometimes, leaks happen only during flushing, not when the toilet is idle. This often means the flush valve seal is damaged. Watch carefully during a flush to spot this.
Solving Continuous Running Problems
If your toilet runs non-stop, it wastes water and can cause flooding.
Step 1: Inspect The Actuator
The actuator triggers the flush. If it sticks, the valve stays open.
- Check the actuator arm for bending or damage.
- Make sure it moves freely.
- Lubricate with silicone grease.
Step 2: Examine The Cartridge
A worn or dirty cartridge can prevent the valve from closing.
- Remove and clean the cartridge.
- Replace if seals are worn.
Step 3: Test The Air Inducer
The air inducer helps maintain pressure. If it’s blocked, the system may not reset after a flush.
- Clean the air inducer.
- Make sure it’s installed correctly.
Step 4: Check Water Supply Valve
If the supply valve is faulty, it may let water in continuously.
- Turn off the valve and listen for water flow.
- Replace the valve if needed.
Practical tip: Sometimes, the actuator button is pressed too hard or gets stuck. Gently press and release the button to see if the problem stops.
Addressing Loud Noises And Strange Sounds
Flushmate toilets often sound louder than gravity toilets, but odd noises can signal problems.
Common Noises
- Bang or hammer: Water hammer in the supply line.
- Whistling: Air escaping from the vessel.
- Gurgling: Air inducer problems.
Step 1: Secure Supply Line
Loose supply lines can cause banging or vibration.
- Check that the supply line is anchored.
- Add a water hammer arrestor if needed.
Step 2: Inspect Air Inducer
A faulty air inducer can cause whistling or gurgling.
- Clean or replace the inducer.
- Make sure seals are tight.
Step 3: Check Vessel For Air Leaks
If air escapes from the vessel, you’ll hear hissing or whistling.
- Inspect vessel seals.
- Replace worn O-rings.
Step 4: Flush Valve Noise
If the flush valve is sticky, it can make grinding or squeaking sounds.
- Lubricate the valve.
- Replace if damaged.
Experience-based insight: Many people ignore loud noises, thinking it’s normal for pressure toilets. But unusual sounds often mean maintenance is needed, and early action can prevent bigger repairs.

Troubleshooting Slow Tank Refills
If the tank refills slowly, the next flush will be weak.
Step 1: Check Water Supply Valve
A partially closed valve slows refill.
- Make sure the valve is fully open.
- Replace if it’s blocked.
Step 2: Inspect Supply Line
Kinks or blockages in the supply line can slow water flow.
- Straighten any bends.
- Clean out any debris.
Step 3: Examine Cartridge
A clogged cartridge can reduce refill speed.
- Remove and clean the cartridge.
- Replace if necessary.
Step 4: Look For Pressure Problems
Low water pressure slows refill.
- Test pressure at other faucets.
- If building-wide, contact your water provider.
Practical advisor tip: Mineral buildup is common in older pipes. Flushing the supply line can help, but sometimes pipe replacement is needed.
Repairing Flush Handle Issues
Sometimes, the flush handle feels loose, sticks, or doesn’t trigger the flush.
Step 1: Tighten Handle Connection
Loose handles are often caused by a loose nut inside the tank.
- Remove the tank lid.
- Tighten the handle nut.
Step 2: Inspect Actuator Arm
The actuator connects to the handle. If it’s bent or broken, the handle won’t work.
- Check for damage.
- Replace if needed.
Step 3: Lubricate Moving Parts
Sticking handles can be fixed by lubricating the actuator and handle connection.
- Use silicone grease.
Step 4: Replace Handle
If the handle is cracked or worn, replace with the correct model.
Straight-to-the-point insight: Many handle issues are caused by improper installation. Always use the correct tools and follow Flushmate’s instructions.
Diagnosing Water On The Floor
Water on the floor is a clear sign of a problem. It can come from several sources:
- Tank cracks
- Supply line leaks
- Pressure vessel leaks
- Overflow during flush
Step 1: Dry The Area And Watch
Dry the floor and flush the toilet. Watch where water appears.
Step 2: Check Supply Line
Feel the supply line for moisture.
- Tighten connections.
- Replace if damaged.
Step 3: Inspect Tank And Vessel
Look for cracks or leaks in the tank and vessel.
- Replace damaged parts.
Step 4: Examine Overflow
If water flows over the tank during flushing, the vessel may be overfilled.
- Adjust water supply.
- Replace faulty cartridge.
Friendly mentor tip: Never ignore water leaks. They can cause mold, damage floors, and create safety hazards.
Maintenance Tips For Sloan Flushmate
Regular maintenance prevents most problems. Here’s what to do:
- Inspect seals and O-rings every 6 months.
- Clean the cartridge yearly to remove debris.
- Check supply line for leaks or kinks.
- Test flush strength monthly.
- Listen for strange noises and act quickly.
Non-obvious insight: Many Flushmate failures are caused by skipping maintenance. Pressure systems work harder than gravity toilets and need regular attention.
When To Call A Professional
Some repairs are simple, but others need a plumber. Call a pro if:
- You see cracks in the pressure vessel or tank.
- Water pressure is too low and cannot be fixed.
- You cannot find the source of a leak.
- Parts are difficult to remove or install.
Licensed plumbers have tools and experience for complex repairs. Trying to fix major issues yourself can lead to bigger problems.
Flushmate Parts Comparison
Choosing the right parts is important for a lasting fix. Here’s a comparison of common replacement parts:
| Part Name | Function | Common Issues | Replacement Frequency |
|---|---|---|---|
| Cartridge | Controls water flow | Clogs, worn seals | 1–3 years |
| Flush Valve | Opens/closes for flush | Sticking, leaks | 2–5 years |
| Actuator | Triggers flush | Bending, sticking | 3–5 years |
| Air Inducer | Maintains pressure | Blockages, leaks | 2–4 years |
Always use Flushmate-approved parts. Generic parts can cause leaks or weak flushes.
Flushmate Safety Recalls
Flushmate pressure-assist systems have had safety recalls in the past. Some older units (especially manufactured before 2008) were recalled due to risks of vessel bursting.
- Check your unit’s serial number.
- Visit the official Flushmate website for recall information.
- If your unit is recalled, stop using it and contact Flushmate for a free replacement.
For more details, visit the official Flushmate Recall Page.
Step-by-step Guide: Replacing The Flushmate Cartridge
Replacing the cartridge is a common fix for weak flushes or leaks. Here’s how:
- Turn off the water supply at the shut-off valve.
- Flush the toilet to release pressure.
- Remove the tank lid and locate the cartridge.
- Unscrew the cartridge (usually with a special tool or by hand).
- Inspect the cartridge for debris or damage.
- Clean the area and install the new cartridge.
- Tighten gently to avoid damaging threads.
- Turn on the water and test the flush.
Practical tip: Always have a towel ready to catch any water. Test several flushes to confirm proper operation.
Flushmate Vs. Gravity Toilets
How do Flushmate systems compare to traditional toilets? Here’s a quick comparison:
| Feature | Flushmate | Gravity Toilet |
|---|---|---|
| Flush Power | Strong, pressure-assisted | Moderate, relies on gravity |
| Water Usage | 1.28–1.6 GPF | 1.6–3.5 GPF |
| Clog Resistance | High | Moderate |
| Noise | Loud | Quiet |
| Maintenance | Regular checks needed | Less frequent |
Flushmate toilets are ideal for places needing strong flushes and less clogs, but they require more maintenance.
Common Mistakes When Troubleshooting Flushmate
Avoid these errors for best results:
- Ignoring water pressure: Always check pressure before replacing parts.
- Using generic parts: Only use Flushmate-approved items.
- Overtightening connections: This can crack plastic parts.
- Skipping maintenance: Regular checks prevent big problems.
- Not following installation instructions: Mistakes can cause leaks or weak flushes.
Friendly mentor tip: Take your time. Rushing repairs leads to mistakes. Read instructions carefully and check each part before reassembly.
Preventing Future Problems
To keep your Flushmate running smoothly:
- Inspect seals and connections every 6 months.
- Clean the cartridge yearly.
- Listen for new noises and fix early.
- Use only recommended parts.
- Teach staff (in commercial restrooms) how to spot issues.
Experience-based insight: Many problems start small. Early fixes save money and prevent bigger repairs.
Frequently Asked Questions
What Should I Do If My Flushmate Unit Is Recalled?
Check your unit’s serial number on the official Flushmate recall page. If your unit is affected, stop using it and contact Flushmate for a free replacement. Recalls are serious, and continuing to use a recalled unit can be dangerous.
Why Does My Flushmate Toilet Make Loud Noises When Flushing?
Flushmate systems are naturally louder because of the pressure-assisted flush. However, unusual noises like banging, whistling, or gurgling can mean supply line issues, air inducer problems, or vessel leaks. Check connections and seals, and add a water hammer arrestor if needed.
Can I Use Any Replacement Parts For My Flushmate?
No. Always use Flushmate-approved parts. Generic or incorrect parts can cause leaks, weak flushes, or even damage the system. Check the model number and order from trusted sources.
How Often Should I Maintain My Flushmate System?
Check seals and connections every 6 months. Clean the cartridge yearly. Listen for new noises and fix problems early. Regular maintenance prevents most issues.
What’s The Difference Between A Flushmate And A Gravity Toilet?
Flushmate uses air pressure to deliver a strong, fast flush, reducing clogs and using less water. Gravity toilets rely on water weight and are quieter but less powerful. Flushmate toilets need more maintenance but work better in busy restrooms.
conclusion
A Sloan Flushmate system can make your restroom more reliable and efficient, but only with regular care and proper troubleshooting. Understanding how the system works, knowing common problems, and following clear steps will help you fix issues quickly. Always use the right parts, avoid common mistakes, and call a professional for complex repairs.
With these tips, your Flushmate will deliver strong, trouble-free flushes for years.