If your water dispenser isn’t working, performing basic glacier bay water dispenser troubleshooting usually resolves the issue by checking the power supply, the bottle seal, or the internal temperature settings. Most problems stem from simple blockages or loose connections that you can fix without professional help. If the unit remains unresponsive after these checks, it’s time to contact the manufacturer or a licensed plumber for an inspection.
Why your Glacier Bay water dispenser stopped working
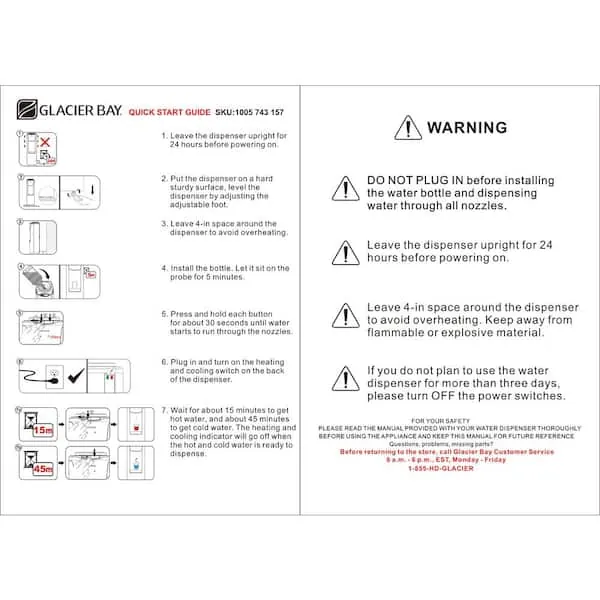
When a water dispenser fails, it’s rarely due to a broken internal motor. The most common cause is a failure in the power delivery system, such as a tripped breaker or a loose wall plug. Check your home’s electrical panel to ensure the circuit is active before inspecting the unit itself. If the power is fine, look at the water bottle placement to see if the probe is properly piercing the cap.
Another frequent cause is an air lock within the internal lines. When you replace a bottle, air can get trapped in the tubing, which prevents water from flowing to the tap. This often happens if the bottle isn’t seated level or if the air vent is blocked. You can usually clear this by removing the bottle and letting the unit reset for 10 minutes.
Finally, temperature issues often relate to the thermostat settings or environmental factors. If the dispenser is placed too close to a wall, the cooling system can’t vent heat effectively, which causes the water to stay lukewarm. Ensure there’s at least 4 inches of space behind the unit for proper airflow. You should also check the NSF International standards for water treatment equipment to ensure your unit is operating within the recommended performance parameters.
Safety: Inside a mains-powered machine, the parts behind the outer cover can hold a dangerous electrical charge even after it has been unplugged — that’s why they sit behind a cover. Opening the housing, or testing or replacing anything behind it, is a job for a qualified technician, never a home repair.
Clear blockages and air locks
This fix is for users who experience low water pressure or no flow at all despite having a full bottle. First, unplug the unit from the wall outlet to ensure safety. Remove the water bottle and check the reservoir area for any plastic debris or film that might have remained from the bottle cap. If you see pieces of plastic, use a clean pair of tweezers to lift them out gently.
Next, press both the hot and cold dispensing buttons until the water stops flowing entirely. This helps to empty the internal lines of any trapped air. Once the lines are empty, place a fresh, clean bottle onto the probe, ensuring it’s perfectly vertical. If the bottle is tilted, the seal will fail and the unit won’t draw water.
Wait for the internal tanks to refill, which usually takes about 3 to 5 minutes. You’ll hear the water bubbling as it fills the reservoir. If the water flow remains weak after this process, the internal intake valve may be stuck.
Never force a tool into the intake valve to clear a clog, as this can puncture the silicone seal and cause a permanent leak. If you suspect the valve is faulty, contact the manufacturer for a replacement part or professional repair.
Adjust the thermostat and cooling settings
If your water isn’t cold enough, the thermostat might be set too low or the cooling switch could be off. Most units have a small switch on the back panel, typically colored green or red, which controls the cooling function. If this switch is in the “off” position, the water will simply remain at room temperature. Flip the switch to the “on” position and wait 30 minutes for the cooling cycle to finish.
If the switch is on but the water is still warm, check the thermostat dial located on the rear of the unit. You can turn this dial clockwise to increase the cooling intensity. Be careful not to turn it to the maximum setting immediately, as this can cause the internal coils to freeze over. Start by turning it a quarter-turn and wait for one hour to see if the water temperature changes.
This process isn’t for units that are showing signs of electrical burning or strange odors. If you smell plastic or see smoke coming from the back of the unit, unplug it immediately and stop using it. Electrical repairs require a qualified technician to avoid the risk of fire or injury. If the unit is under warranty, keep your purchase receipt ready when you contact the support team to discuss a replacement.
Verify the water bottle and probe
Sometimes the issue is simply the bottle itself rather than the dispenser. If you’re using a bottle with a damaged or thin cap, the dispenser probe may not be able to pierce it correctly. This prevents the vacuum needed to pull water into the system. Always inspect the cap for cracks before loading it onto the machine.
If you’re using a glass bottle or a non-standard container, the dispenser might not be able to create the necessary seal. The machine is designed for standard 3 or 5-gallon plastic bottles with universal caps. If you have recently switched bottle brands, try a different one to see if the flow improves. A bottle that’s slightly deformed may also fail to sit flat on the support collar.
If the bottle is leaking onto the floor, the probe seal is likely worn out. This is a common issue that occurs over time as the plastic components degrade. You can tell if the seal is the problem by checking for water pooling around the base of the bottle.
If the leak is coming from inside the machine cabinet, don’t attempt to patch it yourself. Call a professional to inspect the internal tubing, as hidden leaks can damage your flooring or cause mold growth.
Things to avoid during troubleshooting
Never use sharp objects to clear the probe. Using a knife or screwdriver can damage the silicone gasket and cause permanent leaking. If you find debris, use a soft-bristled brush or a toothpick.
Don’t submerge the unit in water. Cleaning the exterior with a damp cloth is fine, but spraying water into the vents will damage the electronics. If the unit falls into a sink, unplug it immediately and let it air dry for 48 hours before testing.
Avoid using harsh chemical cleaners. These can leach into your drinking water and leave a bad taste, so stick to mild soap or vinegar solutions.
Never attempt to open the electrical housing. The internal capacitors can hold a charge even when unplugged, posing a serious shock risk. Opening the casing also voids your warranty instantly.
Don’t bypass the safety switches. These are there to prevent the heating element from running dry. If the unit fails to heat, check for scale buildup rather than overriding the internal thermal fuse.
Prevent future dispenser problems
Regular maintenance is the best way to keep your unit running smoothly. If you’re currently ignoring the cleaning schedule, start a routine to flush the lines every time you change the bottle. This prevents mineral buildup and keeps the water tasting fresh.
Most users make the mistake of waiting for a leak before inspecting the seals. This oversight often costs a full floor replacement or expensive internal pump repairs. If you notice a slow drip, replace the silicone gasket immediately. A hardened gasket is the primary cause of reservoir overflow.
| If you’re doing this | Do this instead | Why |
|---|---|---|
| Leaving the unit in direct sun | Move it to a cool, shaded area | Heat forces the compressor to run constantly |
| Using tap water to fill bottles | Use filtered or spring water | Prevents mineral buildup in the valves |
| Cleaning with bleach | Use a vinegar and water mix | Bleach is hard to rinse out of internal lines |
| Moving the unit while full | Drain it completely before moving | Prevents internal cracks from the weight of water |
Use this simple decision rule: if the water flow slows down, descale the lines. If the water tastes metallic, replace the reservoir filter. The frequency of this maintenance depends on your specific usage, so always refer to your owner’s manual for the authoritative schedule.
Frequently asked questions
How long does it take for the water to get cold?
The water typically reaches a cold temperature within 30 to 60 minutes after plugging in the unit or loading a new bottle. This duration assumes an ambient room temperature below 80 degrees Fahrenheit. If the water remains warm after two hours, ensure the cooling switch on the back is set to the on position.
Why is my water dispenser leaking from the bottom?
A leak from the bottom is often caused by a cracked water bottle or a damaged internal probe seal. Check the bottle first for any tiny holes or cracks near the neck. If the bottle is intact, the probe seal inside the cabinet has likely failed. Because this involves internal water lines, you should contact the manufacturer or a professional plumber to avoid water damage to your home.
Can I fix a noisy water dispenser myself?
Yes, you can often fix noise by ensuring the unit is on a perfectly level surface. A dispenser that wobbles will vibrate against the floor, creating a loud humming sound. If the floor is level, check that the unit isn’t pushed directly against a wall, as this can cause rattling. If the noise is coming from the compressor itself, it’s an internal mechanical issue that requires professional service.
How often should I clean the dispenser?
You should sanitize the reservoir every 3 to 6 months to prevent bacteria growth and mineral buildup. This involves draining the unit and running a mixture of white vinegar and water through the lines. Always follow this with a thorough flush using at least two full gallons of fresh, clean water to remove any lingering taste of vinegar. Check your manual for specific cleaning steps for your model.
Is it safe to leave the hot water switch on?
It’s safe to leave the hot water switch on if you use the dispenser regularly, as it keeps the water at a constant, safe temperature. However, if you’re going away for more than 48 hours, you should turn the hot water switch off to save energy. This prevents the heating element from cycling unnecessarily while the unit isn’t in use, which also extends the life of the heating components.
What happens if I run the dispenser empty?
Running the dispenser empty can cause the heating element to dry-fire, which may permanently damage the internal safety sensors. If you hear the pump making a loud, grinding noise, it means the reservoir is empty. Turn off both the hot and cold switches immediately and replace the bottle. You should wait for the reservoir to fill completely before turning the heating and cooling switches back on.
Conclusion
Keeping your machine clean and well-maintained will help it run smoothly for years to come. If you’re still having trouble after these quick fixes, don’t hesitate to reach out to the support team for extra guidance. They’ll be happy to help you get your refreshing water flowing again in no time.
Related guides