The most common reason your heater fails to ignite is a blocked pilot orifice, but effective glass tube patio heater troubleshooting begins by checking your fuel supply and battery ignition connection. When the unit doesn’t start, the flow of propane is usually interrupted by debris or a loose hose connection. You can safely resolve these issues by inspecting the tank level and ensuring all external fittings are tight. If the heater still doesn’t light, the pilot light assembly likely needs cleaning or the spark generator requires a fresh battery.
Troubleshoot your glass tube patio heater ignition
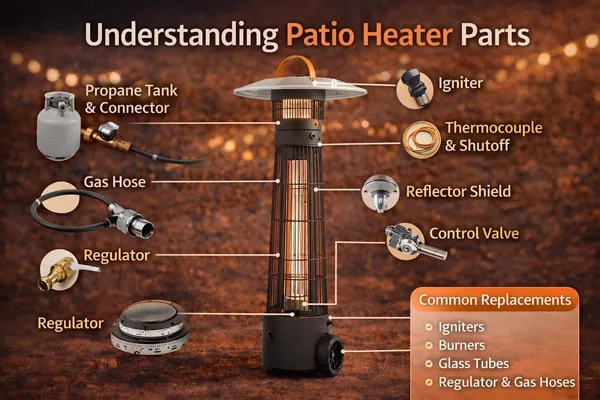
The primary cause for a failure to ignite is a lack of fuel flow or a weak spark at the burner. Propane tanks often feature a safety device called an excess flow valve; if you open the tank valve too quickly, this device restricts gas flow to prevent leaks. This feels like an empty tank, even when you have plenty of fuel. Always open the valve slowly to allow pressure to equalize across the regulator.
Another frequent issue involves the ignition system itself. These heaters rely on a small battery-powered spark generator to light the pilot flame. If the battery is dead or the wire connection at the back of the igniter is loose, you’ll hear no “click” sound. Without that spark, the gas escapes but never ignites, leading to a lingering smell of propane.
Finally, the pilot orifice—a tiny hole where gas exits to meet the spark—can become clogged with spider webs or dust. This is common if the heater has sat unused for a season. When this opening is restricted, the pilot flame can’t form or stay lit. You can often see this by looking through the observation hole; if you see no blue flame, the gas isn’t reaching the igniter.
Check the fuel and regulator
The first step is to confirm the fuel path is open and secure. If you recently changed the propane tank, the regulator might be stuck in a safety lock position. To reset this, close the tank valve, disconnect the regulator from the tank, wait one minute, and then reconnect it firmly. Slowly open the tank valve completely before attempting to ignite the unit.
Check your hose connections for any signs of damage or leaks. You can apply a mixture of dish soap and water to the hose fittings to check for bubbles. If you see bubbles, the connection is leaking gas and is unsafe to use until tightened or replaced.
This fix is for users who suspect a simple pressure lock or a loose connection. If you smell a strong, persistent odor of gas even after tightening the fittings, turn off the tank immediately. Don’t attempt to light the unit again. This indicates a leak that requires a professional gas technician to repair, as handling internal gas valves carries a risk of fire.
Inspect the igniter and battery
A weak or absent spark is the most common reason for a failed start. Locate the battery compartment, usually found behind the red or black ignition button on the control panel. Remove the old battery and check the terminal for white, chalky corrosion. If you see corrosion, wipe it away with a clean cloth before inserting a fresh, high-quality alkaline battery.
Ensure the wire leading from the back of the igniter to the burner assembly is pushed firmly into its slot. Sometimes, vibrations from moving the heater cause this connection to wiggle loose. If you hear a clear, sharp clicking sound when you press the button, the electrical path is likely working. If the sound is dull or absent, the igniter itself may be faulty.
This check is strictly for the battery and external wiring. Never attempt to remove the burner assembly, the glass tube, or the internal gas valves. These parts are sensitive, and incorrect assembly can lead to gas leaks or improper combustion. If replacing the battery doesn’t produce a strong spark, you should contact the manufacturer for a replacement igniter module.
Clean the pilot assembly
If the heater has a spark but fails to stay lit after you release the knob, the pilot assembly may be dirty. The thermocouple—a small metal probe near the pilot flame—must get hot enough to signal the gas valve to stay open. If the pilot flame is yellow, weak, or blocked by carbon buildup, the thermocouple won’t reach the necessary temperature.
Use a can of compressed air to blow out the area around the pilot burner and the thermocouple. Aim the nozzle at the small openings to clear out any dust or spider webs. Don’t use metal tools like needles or wires to poke into the orifice, as this can widen the opening and create a dangerous, uneven flame.
This fix is helpful if the heater lights only while you hold the button but dies immediately upon release. If you have cleaned the area and the pilot flame remains yellow or doesn’t touch the thermocouple, the thermocouple may be worn out. Replacing a thermocouple is a task for a qualified service technician, as it involves working with the internal safety shut-off system of the heater.
What to avoid when fixing your heater
Never use a match or lighter to manually ignite the burner if the internal igniter fails. This common mistake triggers a localized flare-up, often resulting in severe facial or hand burns. If the igniter clicks but produces no flame, stop immediately and check the gas supply line for kinks instead.
Don’t spray cleaning chemicals or lubricants into the burner or glass tube. These substances are highly flammable and create toxic fumes when heated. Even residue left on the surface can ignite, leading to a sustained fire that damages the heater’s structural integrity.
Avoid using a wire brush or sandpaper on the pilot orifice. Scratching the brass surface alters the gas flow, ruining the precise calibration of the burner.
Never leave the heater running while you aren’t in the room. This is critical if you have recently performed repairs. If the flame flickers or the unit makes a whistling sound, shut it down.
Don’t attempt to bypass the safety tilt switch or the thermocouple sensor. These components prevent gas leaks during a tip-over. If these sensors fail, replace the entire assembly rather than wiring around them.
How to stop it happening again
To keep your heater running reliably, you must perform basic maintenance before the cold season arrives. Proper storage is the most effective way to prevent the debris and moisture that cause ignition failure.
| If you’re doing this | Do this instead | Why |
|---|---|---|
| Leaving the unit outside | Use a waterproof cover | Keeps moisture and spiders out |
| Storing the tank attached | Disconnect the propane tank | Prevents regulator seal degradation |
| Ignoring the burner | Brush off dust monthly | Prevents pilot orifice blockages |
| Forcing the ignition | Wait for the gas to clear | Avoids dangerous gas buildup |
If you notice the heater takes longer than usual to light, it’s a sign that the pilot orifice is beginning to collect dust. Don’t wait for a complete failure. A quick blast of compressed air every few months will extend the life of your equipment significantly. If you see rust on the base or the emitter screen, it’s time to check for structural integrity issues.
Frequently asked questions
Can I replace the glass tube myself?
You can replace a cracked glass tube once the unit is cool and the propane is disconnected. Remove the top reflector and support brackets to slide the old glass out. Always use a genuine manufacturer replacement, as generic glass may not withstand high heat.
How long should the pilot light stay on?
The pilot light should stay lit after you release the control knob if the thermocouple is heated properly. Ensure the flame touches the thermocouple tip. If the flame still dies, the thermocouple likely needs professional replacement.
Is it safe to use the heater if the glass tube is chipped?
No, you shouldn’t operate the heater if the glass tube is chipped or cracked. The glass serves as a protective barrier and helps concentrate the heat; a crack can cause the glass to shatter under thermal stress. Shattered glass can be extremely sharp and poses a serious injury risk to anyone nearby. Replace the glass tube before using the heater again to ensure your outdoor space remains safe for guests.
Why does my heater smell like gas?
A gas smell indicates a leak at a connection or a pilot ignition failure. Tighten all hose fittings and the tank valve connection immediately. If the smell persists after turning off the tank, evacuate the area and contact your gas utility provider.
How often should I clean the burner assembly?
Inspect and clean the burner area at the start of every season or after a month of disuse. Use compressed air to clear debris blocking the gas flow. Frequent checks are necessary if spiders are common, as they often build nests in burner ports.
What happens if I ignore a weak pilot flame?
A weak pilot flame will eventually cause ignition failure or an uneven burn. This happens because the flame fails to heat the thermocouple, triggering the safety valve to shut off gas. Address flame quality issues immediately to prevent soot buildup and efficiency loss.
Conclusion
Regular care ensures your heater remains a safe and reliable source of warmth for your patio. By following these simple maintenance checks and avoiding common mistakes, you can extend the life of your unit and enjoy your outdoor space comfortably throughout the cooler months. If any issue persists after you have performed these troubleshooting steps, don’t hesitate to contact a professional technician to ensure the safety of your home and family.
Related guides